Category Archives: Canning and Preserving

Hot ‘n’ Juicy: food blogger discovers new torture method!

Imwalle Gardens garlicIn a totally unexpected turn of events, by simply being greedy about a source of locally grown garlic and a race to process it all without using gloves, I have discovered a more effective and more nefarious method of torture than the always popular Chinese Water Torture.

what earth gives
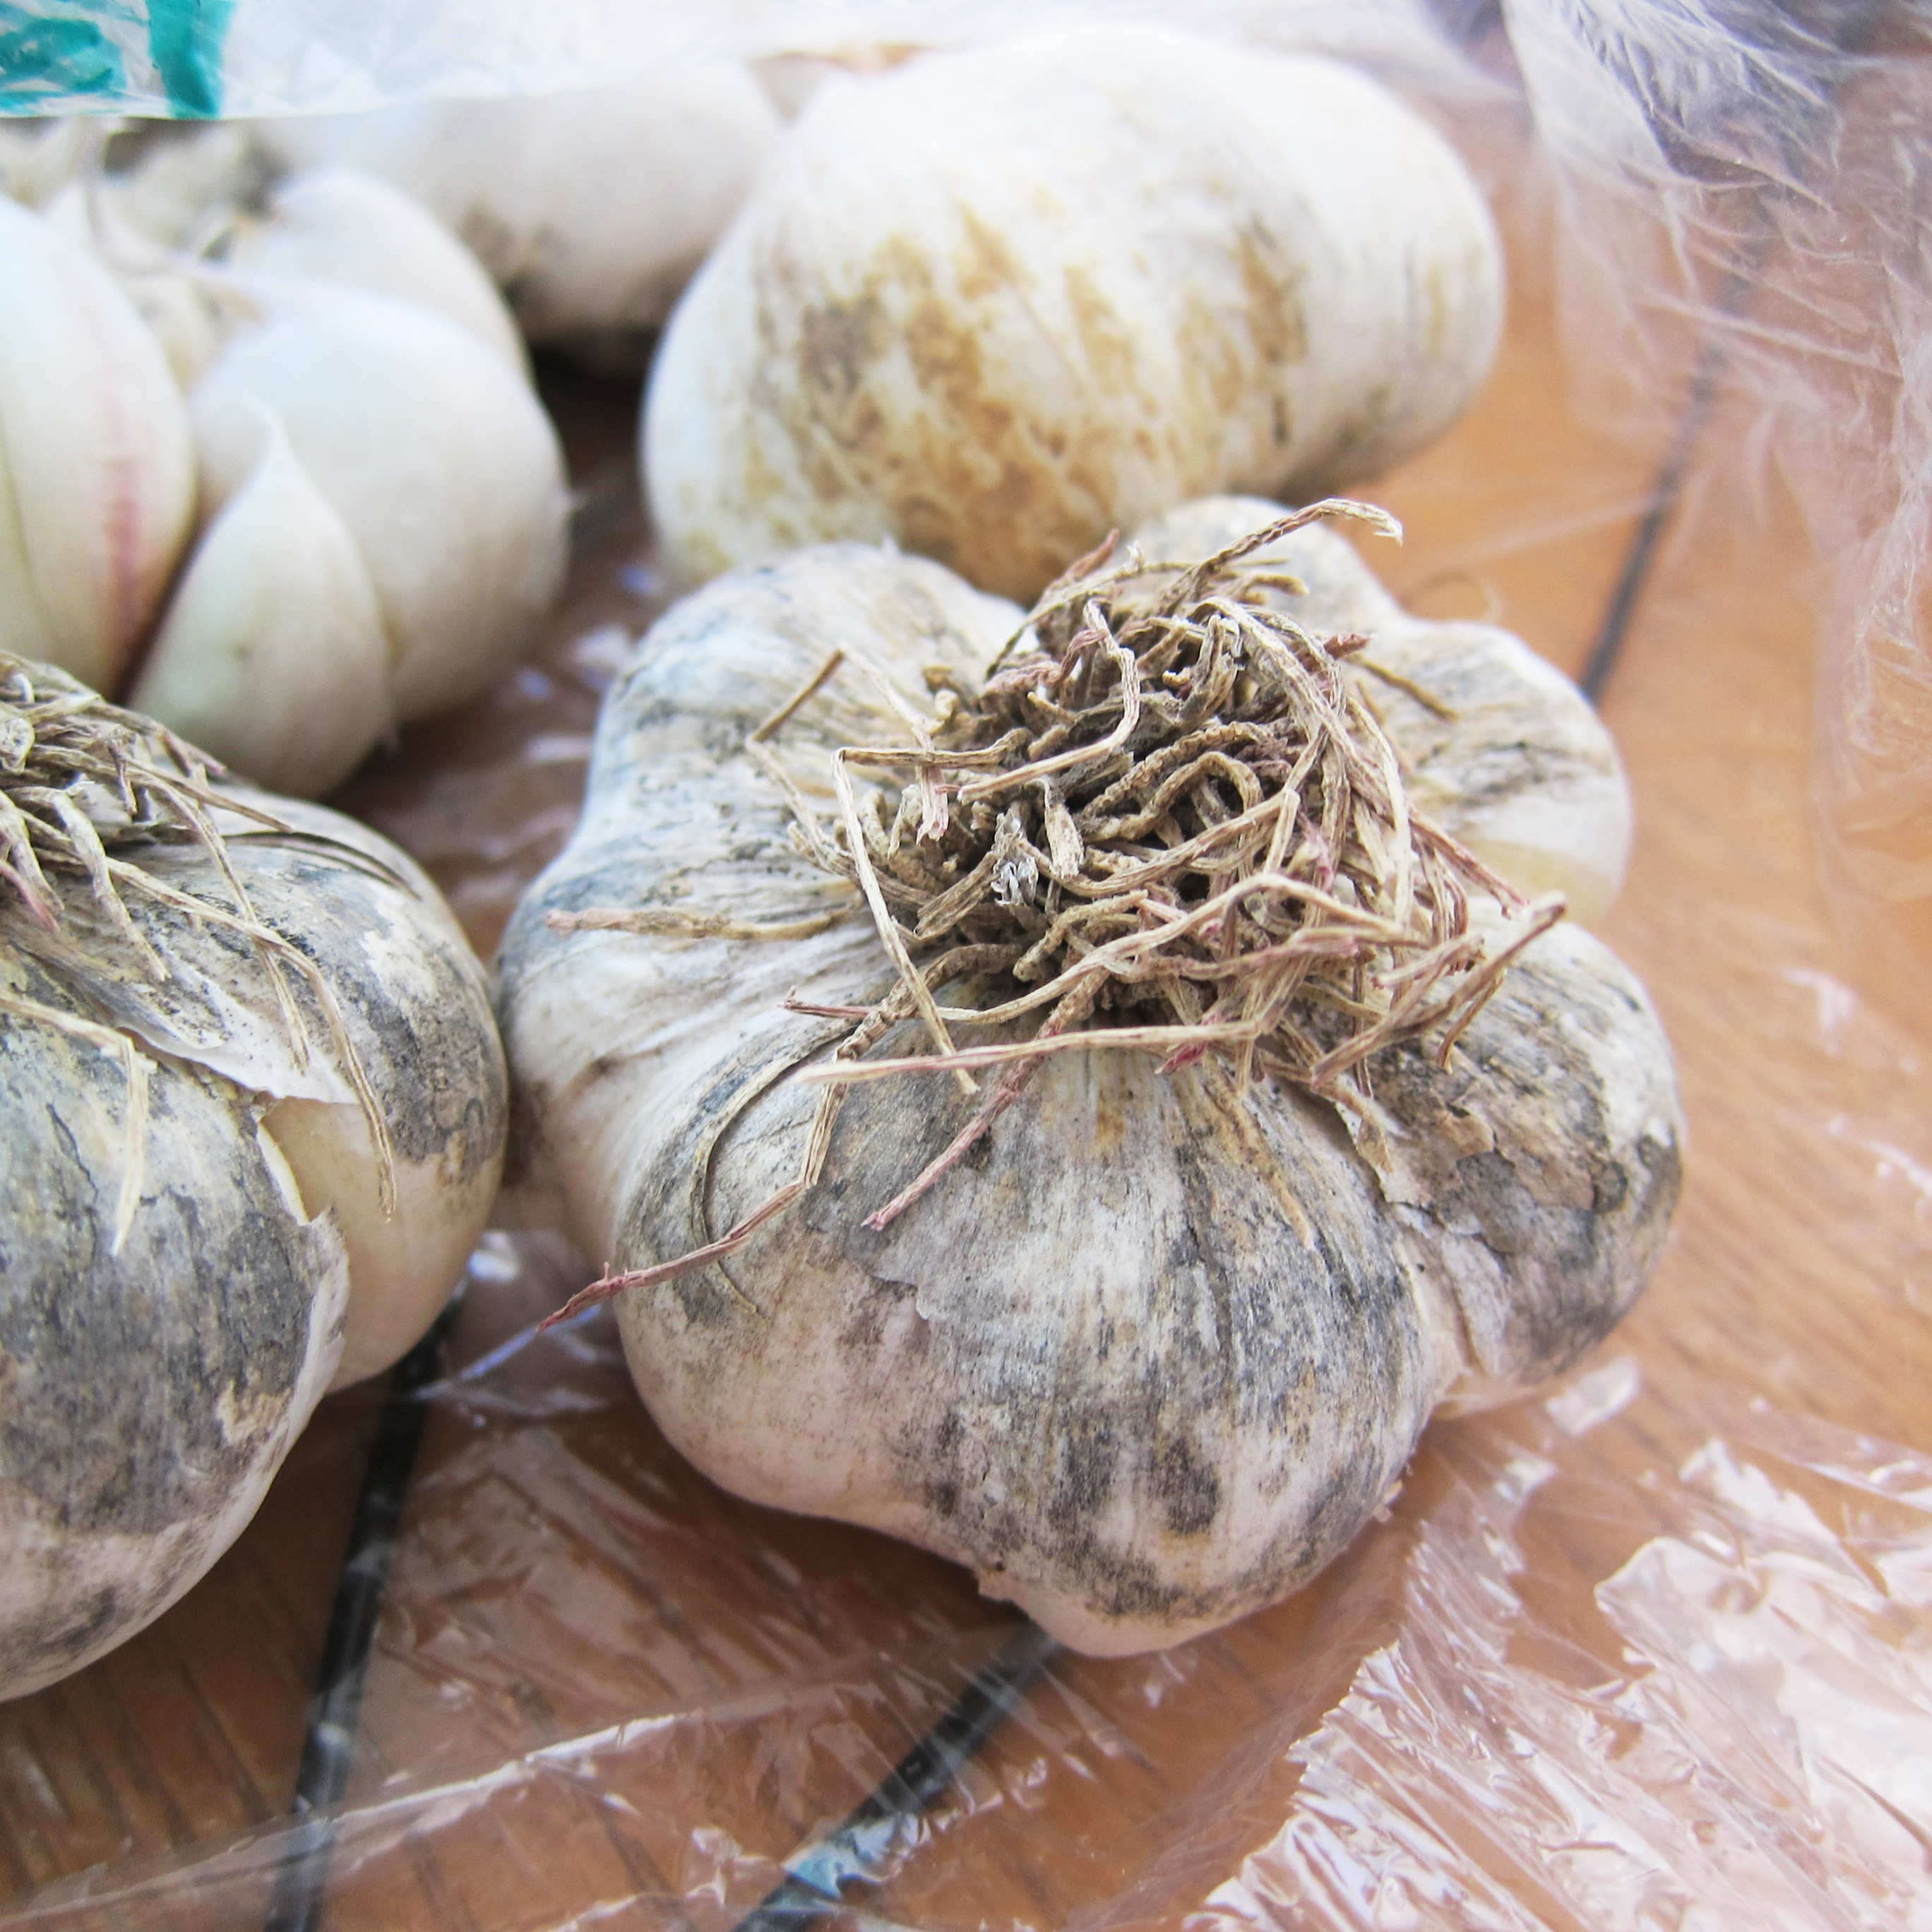
Here’s how it works:

  • Sit your prisoner down at a table equipped with a huge pile of whole garlic heads.
  • Force prisoner to peel all the garlic with bare hands and offer no water to rinse them with once they start getting grimy and sticky.
  • Within one hour the accumulative effect of the hot ‘n’ sticky fresh garlic juices will begin to burn the prisoner’s fingers and the skin under their nails will be especially painful.
  • They will brave it out for a while and that’s when you bring in a fresh pile of whole heads of garlic and make them peel these too.  The sight of more garlic may be enough to break them at this point.
  • Tell them about the permanent damage the hot garlic juice will do to their fingertips by the time they have peeled 40 heads of garlic with their bare hands; how the tips of their fingers will be destroyed by the volatile juice as though they had been dipped in hydrochloric acid.

whole garlic cloves in oil
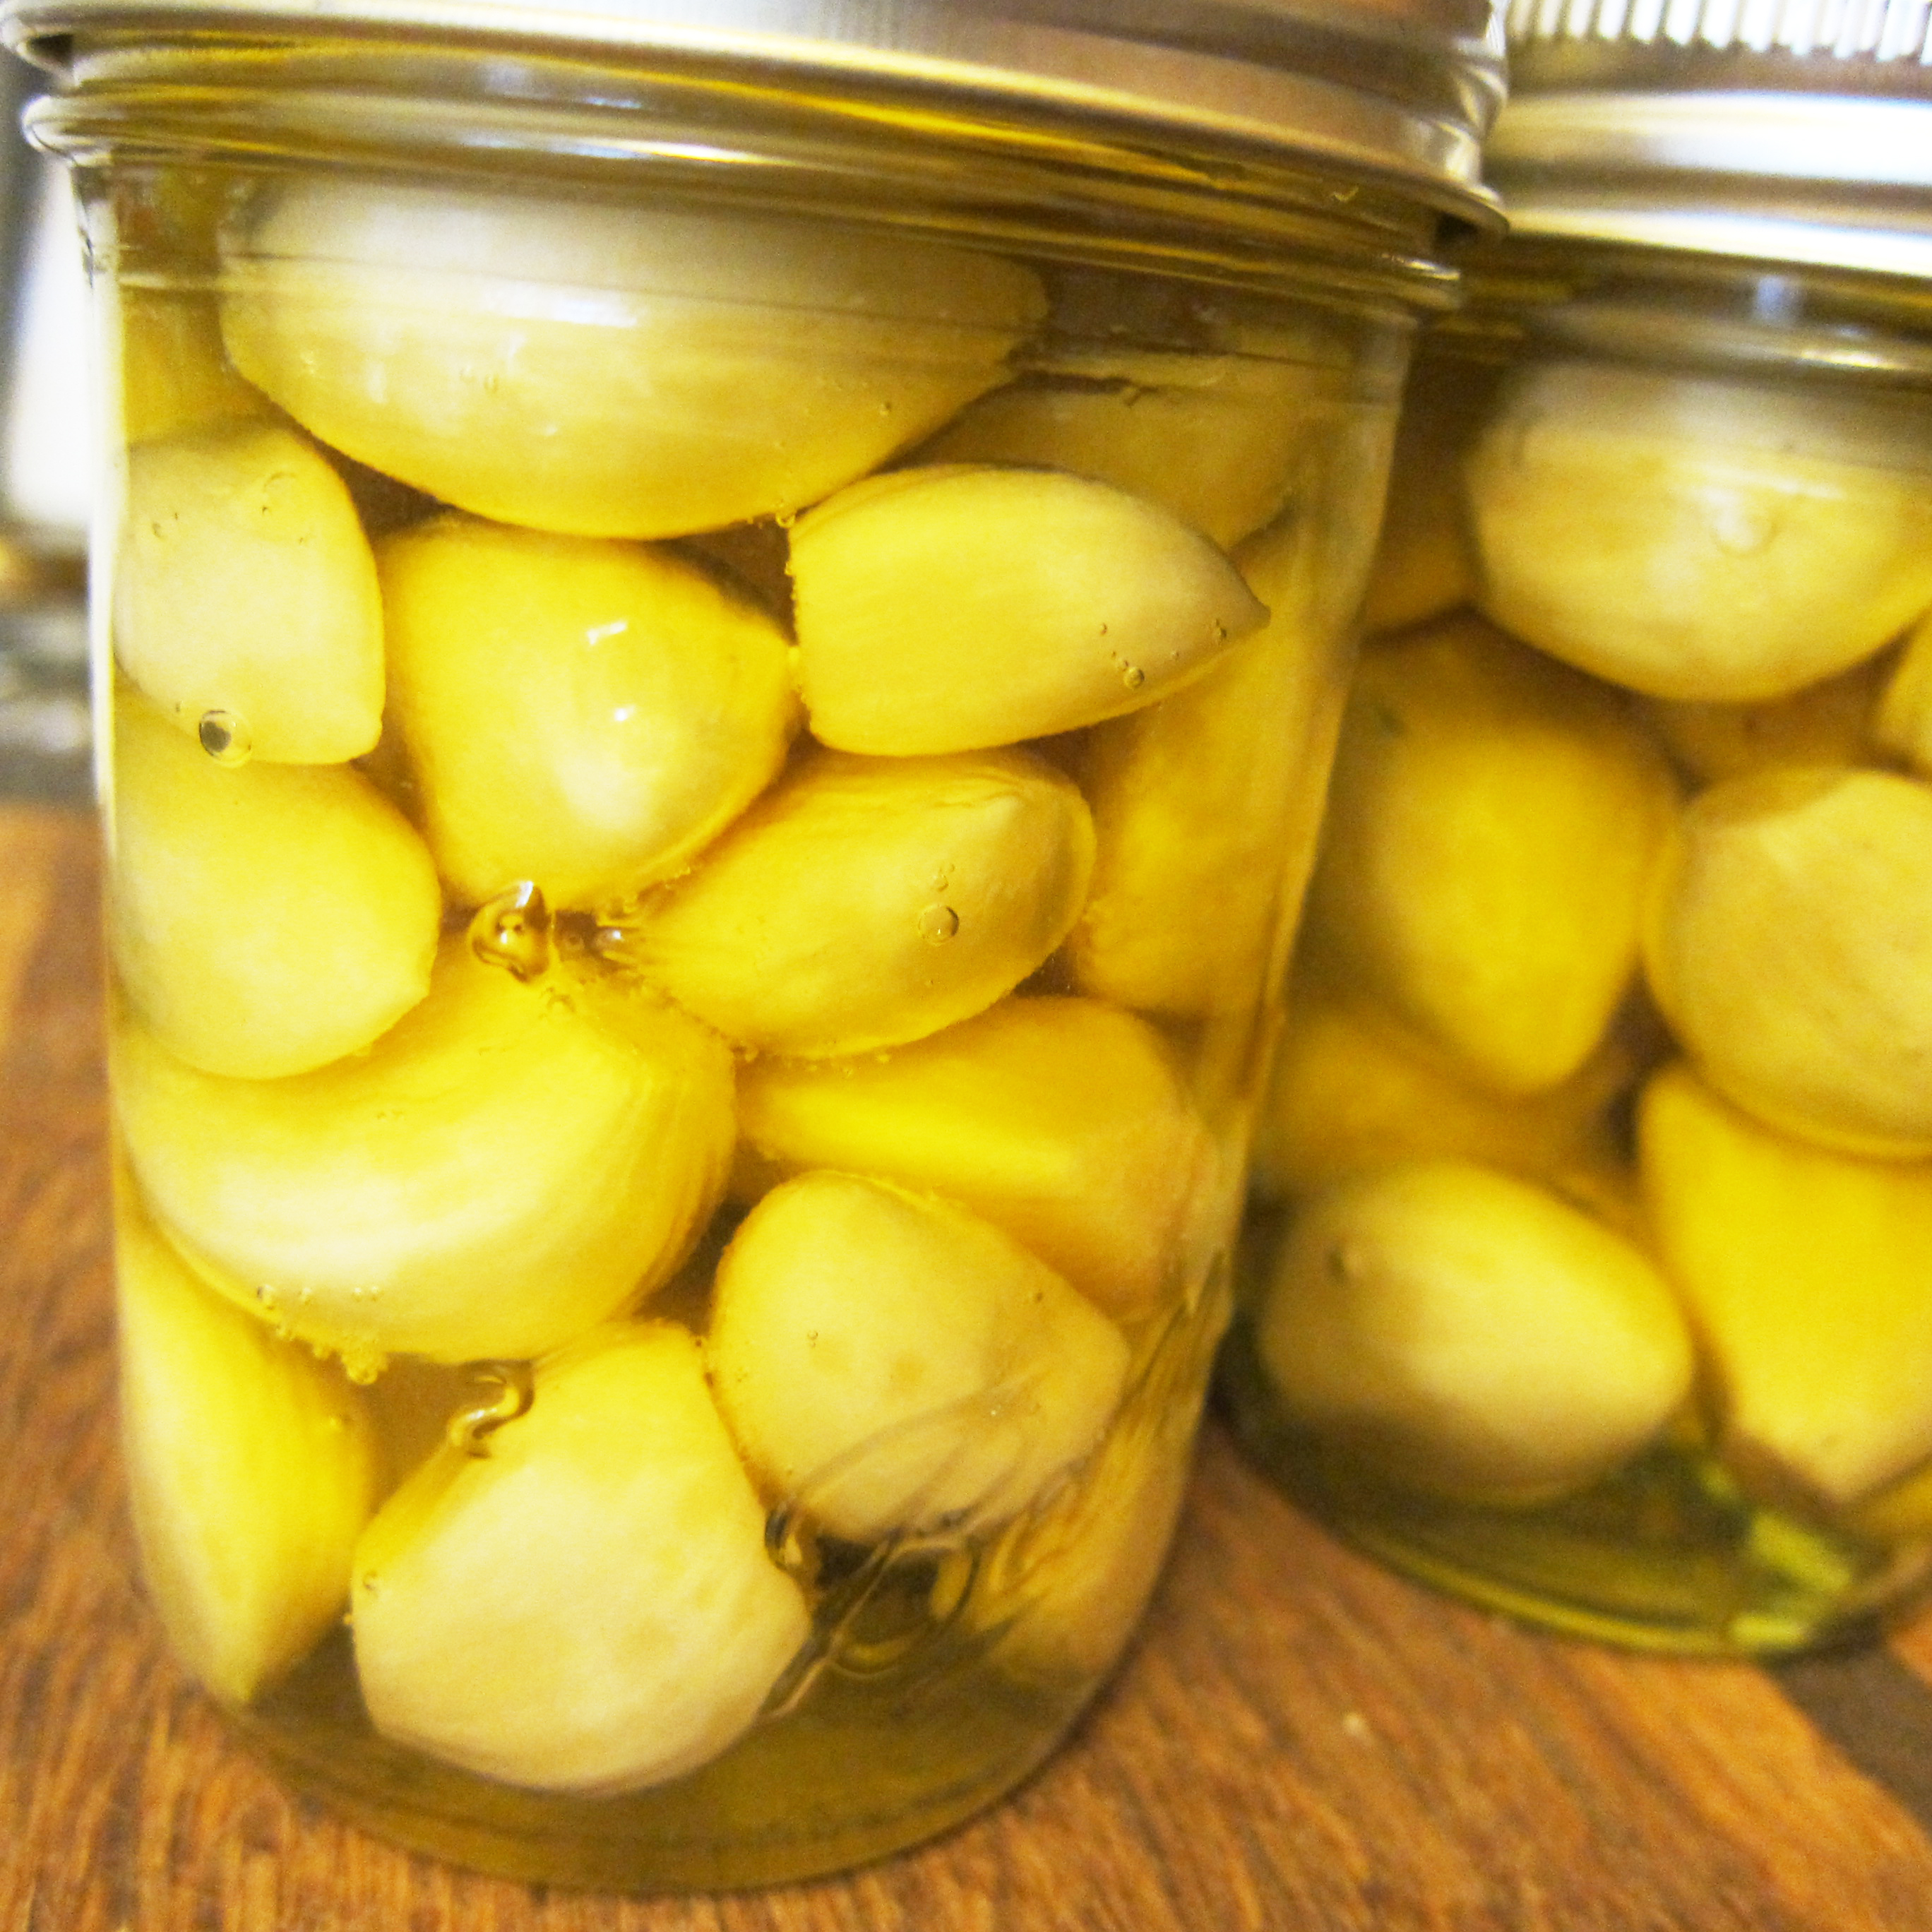
The beauty of this torture is that there’s virtually no end to it.  The pain is cumulative so you don’t even feel it coming until it’s unbearable and renders your hands completely useless.  It will wear down even the most sturdy of prisoners and, like all good torture methods, will get you RESULTS.


chopped garlicWith this method you are guaranteed to get 100% unreliable intel out of any prisoner you use it on because they’ll be desperate to tell you whatever they think you want to know.

chopped garlic 3An exclusive benefit to the Hot ‘n’ Juicy Garlic Method of Torture©® is that once your prisoner breaks you’ll have a year’s worth of garlic to put in the freezer!

Good things happen when you combine smart thinking with urban homesteading!

Disclaimer: for best results use freshly harvested garlic.  Inventor cannot be held responsible for revenge plots hatched and carried out by the victims of this torture method.

Preserving notes: 76 heads of garlic grown locally by Imwalle Gardens has resulted in many jars of whole and chopped garlic in olive oil in the freezer and possibly permanently damaged fingertips on the left hand, especially the index finger.  Would like to further note that claims of magic tricks to peel garlic using jars or bowls did NOT result in more than 1 in 50 cloves being peeled.  Hand peeling still best method.  Recommend using gloves even if you have to rinse them every 60 seconds to keep them from sticking to everything and making you want to hurl because it triggers sense of panic and claustrophobia of the hands.


How (not) to Cure Olives with Lye

I have wanted to try curing olives for a long time.  Moving back to California where olives are planted all over the place as landscape trees and finding actual clear instructions for curing them (not a lot of information could be found 12 years ago) meant it was time to forage for olives and play with lye.  If you want to play with olives too – always use a source who has lots of personal experience SUCCESSFULLY curing olives.  I recommend Hank Shaw’s instructions for Curing Olives with Lye.  I am writing this post merely to illustrate what NOT to do.

  • The first thing you need to do is pick through your olives and remove any bruised or bitten ones.  What likes to bite into a tongue-numbingly bitter fruit?  Olive fly.  Also remove any blushed olives.  You only want really hard green ones.

I removed all olives with olive fly holes in them and all the bruised ones but I couldn’t bear to remove all the blushed ones.  Which are now an unbecoming shade of grey.

  • Put very cold water in a non-aluminum container.  Put on gloves and safety glasses.  Measure your lye with a non-aluminum measuring device and add it to the cold water.  Stir it up with a non-aluminum spoon.  Now weight the olives down because if the olives are exposed to air while curing they will darken.

This, my friends, is the trickiest part of the whole process: keeping those suckers submerged.  I suggest figuring out what works BEFORE you mix up your lye and mess up your olives.  Even if you think you have a system that works – it might not.  Do not weigh your olives down with anything aluminum.  By now you may have noticed that aluminum should have nothing to do with your lye curing project.  Lye + contact with aluminum = poison.

I had two batches of olives to cure.  So I had two stainless steel pots.  Pickling crocks would work way better.  I haven’t got any pickling crocks because they are so flippin’ expensive.  What’s up with that?!  One of my pots worked pretty well because a smaller lid fit perfectly inside it without letting any of the loose olives float to the top.  But the other pot?  Nothing fit well in it.  I finally found a ceramic pie weight that almost fit.  I got it so the olives weren’t quite able to float up around it to the top.  I walked away for one hour.  ONE hour.

And all of the olives had managed to get around the small space at the sides of the weight like crafty little bastards and were floating at the top.  I think “dicolored” is so gentle sounding.  They were RUDELY discolored.  Check it out:

Angry orange-ish red.

And blackened.  Needless to say I had to throw half of this batch out.  Even if the discoloration wouldn’t have rendered them technically inedible – would you eat that?

Hank has a solution mentioned in his instructions and if I had been smart I would have tried this to begin with.  Tie the olives up in cheese cloth (but make sure the olives are pretty loose inside so liquid can flow freely between them).  Then your weight doesn’t have to match the circumference of your container precisely.  Worked like a charm.  So if you don’t have the perfect container and plate or lid situation: listen to Hank.

USE CHEESE CLOTH.

  • Let the olives soak in the lye for 12 hours.  No need for more.  This is the perfect amount of time to leach out the bitterness and preserve flavor.

I left mine in for 21 hours.  Because to take them out at 12 hours would have required me to be showered and dressed by 8am with a clean enough kitchen to be dealing with lye and olives.  I think I might have gotten dressed around 11am but then I had to clean the kitchen and then some other random bullshit came up and I didn’t get the olives out of the lye until 1pm.

This is what you’ll see at 21 hours.  The water/lye solution will be a reddish color.  Kind of like deadly punch.

  • Drain the lye solution out and then rinse the olives.  Next you fill your container with water, covering them, and weigh them down again, they can still discolor. You want to rinse the olives and replace the water 3-4 times a day for 2 to 4 days (until the lye is completely rinsed out).

Or if you’re me: 2 times a day for the first 2 days and then once a day for the next 9 days.  Because I am lazy.  And I forget about them.  If you did it like you were supposed to then in 2-4 days your olives will be ready for the next step.  How do you know they’re ready?  The water will look clean when the lye is completely rinsed out of the olives.  How do you make sure the lye is all out?  You  bite into an olive, if it’s soapy tasting then they need more soaking and rinsing.  And no, you won’t get sickened or die if there’s a little lye in your olive at this point.  There’s very little and it’s no longer caustic.  Trust me, I did it.

Lye is in traditional soap.  So the olives will be foamy and slippery like you’ve just slathered them up with some soap.  Because that’s essentially what you’ve done.  See the discoloration of the water in that picture above?

Now there is no discoloration.

The next step after all the soaking and rinsing in plain water is brining the olives.  I just did that last night with my first two batches while putting a whole new crop of olives in lye with a much better container this time.  But as per my usual way of doing things – I picked some olives 9 days ago that only got into the lye last night along with some olives I picked fresh yesterday*.  So I’ll be able to report to you if curing olives that have been off the tree languishing on a warm sunny project table are worth bothering with.

Next up: brining and flavoring the olives Angelina-style.

*I tied up the old ones and new ones separately in cheese cloth so they don’t mix together.  I am very scientific.

Southwestern Style Saute for Freezing

If you need new ways to use up your zucchini, corn, and peppers – this recipe is for you.  I got access to fresh local corn being sold 4 for $1 and had to take advantage.  I bought 80 ears – I froze 9 pints of plain blanched corn, made and froze 5 pints spicy corn chowder, and froze 5 quarts of summer vegetable soup with corn.  But I still had a lot left.  This is what I did with it.  I made this last year and added it to pots of bean chili in the winter – it was a great way to make a chili with very little prep work.

I was cooking up a few batches of this saute the other day when I needed to come up with a quick dinner.  I made a Southwestern style pasta salad using this recipe, whole wheat rotini pasta, and a cilantro dressing with lime juice – my family ate it so fast I barely got any of it myself.  But I got enough to be able to tell you it was so good I can’t wait to make it again.  (I’ll be making it again so I can post the recipe for you!)

Southwestern Style Saute Recipe (for Freezing)

Southwestern Style Saute Recipe (for Freezing)

Ingredients

  • 1/4 cup olive oil
  • 1 onion, chopped
  • 3 Hungarian wax peppers
  • 8 oz green beans, trimmed and cut into 1 1/2" pieces
  • 3 zucchini, diced into 1/2" thick pieces
  • 4 cups corn

Instructions

  1. Heat the olive oil in a large saute pan on med/high.
  2. When olive oil is shimmering, add the onions, green beans, and peppers. Saute until onions are translucent.
  3. Add the zucchini. Keep sauteing on med/high heat until zucchini start to brown at edges.
  4. Add the corn and saute just until some of the kernels have started browning. Take off the heat.
  5. Once completely cooled - put the sauteed vegetables in a 1 gallon Foodsaver bag and freeze it.
  6. When contents are completely frozen - seal the bag using a vacuum sealer and label before returning it to the freezer.

Notes

I always freeze the contents of my Foodsaver bags first so that when I'm using my vacuum sealer it doesn't suck the juices out and a) prevent a perfect seal and b) collect messily in the drip tray.

This sauteed vegetable dish can be defrosted, heated, and eaten as a side dish. It can be added to chili or soups. And it can also be defrosted and added to pasta with a cilantro dressing.

When frozen in a vacuum sealed bag this will stay good in the freezer for about 8 months (possibly longer - we used ours up within 8 months). If you store it in a ziplock freezer bag - make sure you get as much air out of the bag as possible before closing it and use it up within a couple of months.

If you are cooking for less than 4 people you may wish to halve this recipe.

Schema/Recipe SEO Data Markup by ZipList Recipe Plugin
http://stitchandboots.com/2012/09/19/southwestern-style-saute-for-freezing/

Preserving Notes for Fall 2011

I would like to say that canning season is truly done for me as of today.  Instead, I can say with confidence that canning season is kind of winding down but who knows when it will truly end because I still have quince on my tree and a friend has said her concords are in.  I dearly want to make concord grape soda and/or grape syrup for Italian grape sodas.  Or even just juice.  It’s the only home canned thing my son enjoys that I make.  It’s the only thing he asks for.  Here are my notes from this year’s canning adventures so far.

Jam:

My jams almost always taste fantastic.  It’s hard to go wrong with jam flavor so I can’t claim it’s because of my great mastery or kitchen brilliance.  Jam consistency is a whole different story.  Most years I have more trouble getting my jam to set than making them set too hard.  What I find frustrating and weird is that the only jam I used pectin in didn’t set well at all, but the other two jams which I made without pectin set more firmly than I wanted.  Again and again.  I made three batches of blackberry jam.  I adjusted the boiling time to shorter and shorter periods with each batch until the last one I did I was absolutely SURE it would end up being too soft.  It was not.  It was just as firm as all the other batches.

I made two batches of Damson jam.  (Incidentally, I did jell testes for every single jam batch, in case anyone cares to know).  Each batch is more stiff than I’d like it to be.  For me the perfect jam consistency is sticky and thick but soft enough to spoon onto a scone without having to violently shake it from the spoon.  I think I know the trick now at last.  The jell test instructions say to put a teaspoon of jam onto a little chilled plate then put in the freezer for one minute.  This is not enough time to really tell.  That’s my opinion.  I think next year I will bring my jams to a boil for just a few short minutes and then take it off the burner, do the jell test, and let it cool at room temperature for a half an hour or so.  The little plate I did my jell test on last night that indicated my damson jam was not yet ready sat on the counter over night and this morning it was the perfect consistency.  But I boiled it longer last night because it didn’t seem set enough.  So what I learned is that to do it properly, I must take my time with the test.  Why should I be in a hurry anyway?

Rose Hip Syrup:

Gross.  I hate the flavor I got.  I have had dried rose hips in tea many times in my life and very much enjoyed the flavor and the slight tartness of them.  I thought the flavor of rose hip syrup would be similar.  Not so.  It was sweet, kind of soft and floral, and though that may sound good to some people it was awful to me.  So that was a total waste of time.  I can’t give up on rose hips, though, because they are so nutritious and full of vitamin C.  My plan is to do the tedious and cut them, gut them, and dry them.

Asian* Plum Sauce:

I tried a recipe from the book “Preserved” by Johnny Acton and Nick Sandler. This is not at all what I want in a plum sauce.  I didn’t use the spices they used because I dislike cinnamon in most savory food (except some North African dishes) and I really dislike star anise.  They have you cook the sauce for two hours (to let the spices I didn’t use infuse the sauce) and I did cook it down for quite some time because after adding so much vinegar, water, and soy sauce it was much too thin.  The sauce I ended up with has a very muddled dark taste.  Maybe the soy sauce had something to do with that.  Maybe just cooking it for so long.  I’ll tell you what, though, the spices that were called for would not have improved it one bit.

What I wanted is  the kind of plum sauce you get when you order Mushu vegetables in a Chinese restaurant.  The authors of this book claim that that’s what this is supposed to be like.  It’s not.  It’s been a while since I’ve had plum sauce in a Chinese restaurant but I haven’t forgotten that taste.  What I loved about that sauce was its bright, tangy, and very plummy flavor.  I’ll do better to make up my own version next time.  The plum sauce I made last year using yellow plums, ginger, garlic, sugar, and jalapeno was fantastic for dipping spring rolls into.  That’s more like what I want, except with dark plums.   What a waste of Damsons that turned out to be.

Dill Pickles:

There weren’t many pickling cucumbers to be had and the ones we got were too big and had much too developed seeds inside which means they will be mushier than usual on the interior.  I gutted many of them that were seriously sub-par and I have no idea how those will turn out.  The idea is that I will chop those up for potato and egg salads.  The seeds were enormous and gelatinous because they were too mature.  We were a little desperate, so we made do.

There are several quarts of mixed vegetable pickles (with green beans from the garden included) and I think those will be very nice.  They look super pretty as well.

Peach Chutney:

Second year making it.  Last year I cooked it a little too long and it got very dark.  We liked it, it was good.  The adjustments we made this year were to lower the sugar (it was too sweet) and to lower the amount of raisins.  I may have not cooked it quite long enough this time.  The color is prettier (lighter orange) but it may be softer than intended.  I think over all it will be an improvement.

Jalapeno peppers:

They’re very good.  Really wish they were more evenly sized (my mom is untame-able in this way) but they taste great and I’m happy we have so many of them.

Lots of freezing:

Lots of pesto.  That always turns out great.  I did some in jars (my preference) but since the freezer is actually running out of space this year I had to revert back to using plastic vacuum seal bags.  Also have 6 quarts of corn chowder in there, 3 quarts of pinto bean chili, at least 10 quarts of plain blanched corn, 3 pints of sauteed onion with hot peppers and corn.  A couple bags of slow roasted tomatoes which I don’t think turned out well but I can’t say how something that’s so simple and which I’ve made well so many times before could be unsatisfactory- yet it’s so.  I have several jars of strawberry syrup and ginger syrup in there as well.

Drying:

My mom has been doing a lot of this work.  Several quarts of dried nettles and a quart of dried kale.  Varying amounts of: thyme, stevia, calendula, cayenne peppers (there are still quite a few ripening), and arnica.  I’m considering drying a giant zucchini to experiment with how it is reconstituted in winter soups.  Anyone else tried this and have an opinion?

Theoretically I’ll be done with fall preserving when I’ve gotten and processed the concords and picked and processed the quince (Philip has requested quince jelly).  So where are all of you in your food processing – are you done?  Almost done?  Or just getting started?

*The original recipe was called “Oriental Plum Sauce”.  When referring to people or things from the Asian continent it is considered (according to my Asian friends and my personal opinion combined) to be better form to use the word “Asian” instead of the word “Oriental”.

Pickled Jalapeno Recipe

This recipe is based on the one in Joy of Pickling by Linda Ziedrich but I’ve changed the spices to match my own tastes.  I wanted pickled peppers like the ones I buy in jars in the Mexican section of the grocery store and these absolutely hit the spot. The main difference is that canning them at home gives you a softer finished pickle which some people might not like as much.  The ones in the store can be almost crunchy at times.  I don’t personally like them crunchy so these are perfect for me.  If you want a crunchier pickle you can add pickling lime but I’m not going to advise on how to do that since my one experience using pickling lime disgusted me beyond belief.  The taste of these peppers is tangy, hot, with just a little garlic flavor.  I suggest eating large quantities of them with huge blocks of cheese.

Pickled Jalapeno Recipe

Serving Size: yields about 4 pint jars

Pickled Jalapeno Recipe

Ingredients

  • 2 lbs jalapenos (whole or sliced in rounds)
  • 4 garlic cloves
  • 2 tsp mustard seeds
  • 1/2 tsp black peppercorns
  • 4 cups distilled white vinegar (5% acidity)
  • 4 cups water
  • 3 Tbsp canning salt (or pure sea salt with zero additives)
  • 4 Tbsp olive oil

Instructions

  1. In a nonreactive sauce pan mix the vinegar, water, and salt and bring to a boil. At the same time put your jars in the water canner to boil until you need them.
  2. Wash the peppers and trim the stems to about 1/4" or cut all the peppers into rounds discarding the stem ends. If using whole peppers slit them twice lengthwise.
  3. Divide the spices between the jars evenly and fill each jar with as many peppers as you can fit without cramming them.
  4. Fill each jar with brine. Shake the jars a little and tap (gently) on counter top to bring air bubbles to the surface. Top up with more brine if needed leaving 1/2" headspace.
  5. Pour 1 Tbsp olive oil into each jar. Wipe the rims carefully with a clean damp cloth. Fit the jars with two piece lids.
  6. Process in the boiling water bath for 10 minutes.*
  7. Let the peppers cure for 3 weeks in a cool, dry, dark place before opening.

Notes

*I have not included the basic steps for boiling water bath canning here. I assume you already know them. If you are new to canning then please check out this link for how to can foods using the boiling water bath method here: Intro To Canning

How much brine you need is going to depend on the size of your peppers and whether you leave them whole or slice them. You may have some left over and that's fine.

If you are working with a large amount of peppers it may be more useful to follow this guideline: add to each jar 1 garlic clove, 1/2 tsp mustard seeds, 1/8 tsp peppercorns, and 1 Tbsp olive oil.

At the time of this writing I canned 12 lbs of jalapenos and ended up with 28 pints of pickles. I did a mix of whole and sliced peppers. I mention this to illustrate that yields can only be given in approximations here.

Schema/Recipe SEO Data Markup by ZipList Recipe Plugin
http://stitchandboots.com/2011/09/08/pickled-jalapeno-recipe/

Strawberry Jammy Sauce or Saucy Jam?

For the first time in my gardening life I had enough fruit from my own yard to make jam.  For anyone who has dreams of living off the fruit of the land, this is a beautiful and triumphant moment.  Although, I suppose it’s a little less triumphant when I report that the bed of everbearing strawberries, from which this incredible bounty grew from, did not produce consistently good tasting berries the way my June bearing patches did.  We couldn’t stop eating the ones that came from the June bearing patch but these ones… eh.  So making jam was less about using up the crazy excesses of my bountiful yard as it was about finding a way to make them taste better.

I will take this moment to dispel an insidious myth that everything you grow yourself tastes better.  Not true.  This deserves an entire post on it’s own.  I’ve grown carrots that were, indeed, better than any carrot I’ve ever bought.  I’ve also grown carrots that were woody, bitter, and stupid.  In that order.  There are so many factors that go into what makes a vegetable good: variety planted, soil quality, frequency of watering, heat available to plant, etc.  It’s really annoying when everyone out there claims that everything home grown is better.  It annoys me, but apparently not everyone else.  It also may indicate that they have magic soil and mine is just ordinary.

Back to the jammy strawberry sauce.  Or saucy strawberry jam.  Whatever.

You are always going to get the best preserves from using the freshest and best tasting fruit.  Truly.  But the magical thing about jam is that if you have a somewhat watery flavored fruit, cooking it down a little with a lot of sugar can result in a more intensified flavor so that a mediocre strawberry will make a good flavored jam (and an ambrosial flavored strawberry will make something you want to describe in some stupid poetical way that will make everyone around you want to hit you).   I chose to use a recipe from Hilaire Walden’s book “Perfect Preserves” which is full of dreamy recipes for what promise, right on the cover, to be perfect preserves.

I think if you’re not me making perfect strawberry jam might be a cinch.  But I AM me.  I am an excellent food preserver.  My pickles are renowned (and not just limited to my close small family circle either, at least two friends have raved as well!), my blackberry jam has given much pleasure, my pickled cauliflower is shiny, my canned peaches coveted.  I’m not bragging, I’ve just practiced a lot.  Except with pectin.  Pectin and I have yet to come to an understanding.

I’ve used several varieties and several recipes and sometimes it works out well and I can’t understand how come people make such a big fuss about it (mostly me), and then other times I follow the exact same instructions and it doesn’t set.  I used timers and everything.  I am not a sloppy preserver.  You already know the end to this story because I gave it away in the title of this post.

My strawberry “jam” didn’t set much.  It’s definitely thicker than sauce, but likewise it’s thinner than what I like to experience in a jam.  It’s not Hilaire’s fault.  I know the fault must lie in my own methods, or in the natural pectin levels of the fruit I was using being perhaps unusually absent.

It doesn’t actually matter because it tastes SO good!  No watery flavor at all, nice and rich and exactly what my idea of perfect strawberry jam tastes like.  There is a quality some strawberry jams can get that’s almost – I’m not even sure if this would be the right word- metallic.  This doesn’t have that unhappy quality.  It’s sweet without shriveling your teeth up.

So I’m happy.

Which I better be because I took 6 1/2 pounds of berries and turned it into 15 half pint jars of strawberry jam.  I’m not done with pectin yet.  I think we’re going to come to an understanding soon.

Thoughts on Fitting Food Preserving into a Busy Life

organic apple 2.jpgI have been doing a lot of preserving in the past month.  It has been my intention for weeks to hang up the jar tongs and get back to seriously writing the second draft of my book.  I have this goal that I will have the second draft finished by January 1, 2011.  Instead of writing I’ve been making batches of pesto (I’m up to a little over 20 batches in the freezer), canning stewed tomatoes (17 quarts this weekend), making quadruple batches of enchilada sauce to freeze, and yesterday I made an enormous batch of soup using the last of the summer vegetables (corn, green beans, summer squash, tomatoes, new potatoes, and fresh basil).

The elderberries are winding down now.  I’ve got 11.25 cups of elderberries getting sauced in 2,250 ml of 100 proof vodka in the pantry.  I have at least another 6 pounds of foraged elderberries in the freezer.

I could be done now.   I could throw the towel down and leave the ring.  But if I did that I wouldn’t have any dill pickles.  There weren’t enough pickling cucumbers for me to make cucumber pickles but right now there are these giant locally grown cauliflowers and cabbages that I can pickle the same way I do the cucumbers.  I made the cauliflower last year and it was an enormous success- not only between myself and my husband but all of our friends who tried them loved them also.   

tomato stack 2.jpg

I have another nagging ambition: I want to make a green tomato salsa.  I want to do it just like the tomatillo salsa I made a couple of years ago.  Tomatilloes, like tomatoes, had a rough year and I didn’t manage to get any through u-pick.  But I have a Mexican cookbook that mentions that green enchilada sauce can be made with either tomatillos or green tomatoes.

I want to try it!

There’s more.  I saw a recipe for dill pickled green tomatoes that I think I’ll regret not trying all year if I don’t make them.

And what about the eggplants?  They’re 4 for a dollar at Bernard’s and I wanted to grill a huge bucket of them for the freezer…

I keep telling myself to stop, but the truth is that doing these preserving activities makes me feel good.  It makes me feel more hopeful and excited about the coming months during which time anything good or bad might happen but one thing’s for sure: I’ll be eating home pickles and making soups from tomatoes that have no pesticides on them.  When I’m feeling low I can make a pasta with grilled eggplant and pesto. 

So the book takes a little longer to write.  I’ve been thinking a lot about my characters as I preserve, thinking about how important these same activities are to them.  More so since they can’t just buy things from a grocery store the way we can today.  The inspiration for the story originally came from doing urban homesteading activities and asking “What if oil didn’t completely run out but became so limited and so costly that the average person couldn’t drive a car because they couldn’t get oil and what if they couldn’t buy anything plastic?  What if no one could afford to buy imported foods except on rare and special occasions?  What would you have to know how to do in order to survive being more isolated in the community you’re in?

These are the things I think about while processing 50 pounds of tomatoes. 

What I’ve realized is that preserving as much food every year as I can, at least in the fall, isn’t just a silly little project I enjoy doing, it’s a big project that I feel a deep need to participate in.  I need to know how to preserve food I have now so I can eat it later.  Because I already mostly eat seasonally my choices in produce are about to become much more limited.  I buy a few things out of season, but not much.  No green beans, no corn, no out of season fruit (except for Max), no summer squash, no tomatoes, no eggplant, no asparagus, no peas, and no fresh herbs I can’t still get out of my garden.

It isn’t a fancy rich person’s hobby.

I’m not rich and I’m not fancy.

It isn’t an indulgence as I’ve been telling myself it is just because I know I have other things to do.  It’s one of the most important things I do for myself and my family every year.

So I’m reminding myself, and anyone else who needs a similar nudge, that preserving your own food (no matter how much or how little you do) is using the kind of knowledge that allowed humans to cross the ocean.  Practicing this knowledge is what allowed humans to settle down in one place.  Unfortunately it’s also what allowed armies to march far enough to conquer and oppress other countries.  Food preserving is responsible for so many huge changes in human history.

It’s something I look forward to every year.

Enhanced by Zemanta

Marinated Summer Vegetables: a canning recipe

closer marinated veg 2.jpg l love marinated three bean salad, so when I found a canning recipe for it I was really excited to try it.  The only problem was it called for green peppers which I don’t care for, and which aren’t traditionally found in a three bean salad.  I’ve noticed that a lot of canning recipes call for green peppers where I wouldn’t normally suspect them and I’m sure this is because everyone grows them and then doesn’t know what to do with them.  Toss them in the pickle!  Toss them in the sauce!  Put them in the piccalilli!.

If you ask your local extension service about substitutions in canning recipes you are almost guaranteed to be told: NEVER MAKE SUBSTITUTIONS! and then they’ll fall into a dead faint.  They take this subject very seriously, and rightly so.  The danger of making substitutions in a canning recipe is that you  might alter the acidity level of the food which may possibly make it unsafe to can.

I chose to call my local extension office for advice and I ended up having to talk to the head master canner because the other ones were too scared to answer my question: can I safely replace the bell peppers in this recipe with more of some of the other items such as the green beans?  She looked into it and came back with the answer that it was safe.  She went on to explain that there was no reason other vegetables couldn’t be used in this recipe in place of what’s already in it, that the kidney beans and the chick peas were the lowest acidity items in the recipe and as long as I don’t skip the over night marinating step, I can make substitutions in this recipe.

Why is marinating this recipe for at least twelve hours important?  Because you need to allow the beans, which have the lowest acidity level of all the vegetables in this recipe to become well saturated with the marinating liquid which ensures that the beans are at the proper acidity level.

I’m offering two versions here: Marinated Summer Vegetables and Marinated 3 Bean Salad.  What I love about these recipes is that when it’s the middle of winter and there isn’t a lot to put on a salad I can drain a jar of these and add half a cup to a bed of lettuce and enjoy summer vegetables in winter.

marinated veg in pot.jpg

Marinated Summer Vegetables
yield approximately 6 pints

Ingredients:
5 cups equal parts corn, green bean, and summer squash
1/2 onion, quartered and very thinly sliced
1/2 cup celery, thinly sliced
1 1/4 cups water
1/2 cup white vinegar (5% acidity)
1/4 cup lemon juice
1/4 cup olive oil
1/2 tsp pickling salt
2 tsp dried oregano

Method:

Wash the vegetables and cut so that the pieces are all between one and two inches.  For example: I cut my zucchini in half lengthwise and then into 1/2″ thick slices except for the really small ones which I sliced into 1/2″ thick rounds.  Add the celery and onion and mix them all together.

In a big nonreactive pot mix the water, vinegar, and lemon juice and bring to a boil, then remove from the heat.  Add the oil, salt, and oregano and mix well.  Add all the vegetables to the solution and bring to a simmer.  Remove from heat and let it cool down before adding it to the fridge to marinate for a minimum of 12 hours.  I let mine marinate for almost 24 hours because that’s when I could get back into the kitchen to process them.

Once the vegetables have marinated, bring them back to a boil and fill clean hot jars with the vegetables, topping each jar up with marinating liquid, leaving 1/2″ head-space.  Adjust the lids and process for 15 minutes in a water bath canner.

Variation:

Marinated 3 Bean Salad

yield approximately 6 half pints

Ingredients:

2 cups green beans, cut into 1-2″ pieces
1 1/2 cups red kidney beans, cooked and drained
1 1/2 cups chick peas, cooked and drained
1/2 onion, quartered and very thinly sliced
1/2 cup celery, thinly sliced
1 1/4 cups water
1/2 cup white vinegar (5% acidity)
1/4 cup lemon juice
1/4 cup olive oil
1/2 tsp pickling salt
2 tsp dried oregano

Method:  Follow the same instructions for the Marinated Summer Vegetables (given above).

Recipe notes:  If you are one of those people with lots of green peppers to use up, reduce the green bean quantity by 1/2 cup and add 1/2 cup thinly sliced peppers if you’re making the 3 Bean, or you can add them in equal parts to the other summer vegetables in the Marinated Summer Vegetables recipe.  Another safe variation is to do all green beans for the vegetables. 

Enhanced by Zemanta

Preserving Notes: 9/5/10

pesto freeze 2.jpgI have 13 batches of pesto in the freezer.  That’s 13 up from last year.  There were many bone-damp cold winter evenings when I would have given a lot to defrost some pesto to put on hot pasta.  Something so green and fresh tasting never fails to bring warmth to the cold.  I never buy pre-made pesto any more.  It is always such a disappointment compared to my own.  I would like to get 9 more batches in the freezer before basil disappears from the market.

plum tomatoes 2.jpg

This is a terrible year for tomatoes in the Willamette Valley.  All the farmers are saying so.  I managed to pick (maybe) close to 80 lbs this weekend.  It was difficult finding that many ripe ones in the upick fields where I go.  The guy working at the farm stand yesterday said their tomatoes are 7.5 weeks behind from last year.  We don’t generally get hot enough weather to ripen tomatoes reaching into September.  So this is it.

I didn’t put up any tomatoes last year.  All winter I was bummed to have to buy canned tomatoes from the store.  I’ll have to do it again this year.  I have 5 precious quarts of tomato sauce I made yesterday which I will save for the darkest gloomiest days of winter.  I have 40 pounds still waiting for processing in the garage that I picked yesterday and haven’t yet processed and I’m having to ask myself what the best use for them is. 

I don’t buy fresh tomatoes once they disappear from the farmer’s markets.  Two things I’ve learned to make this year that call for fresh tomatoes but which I’ve had to use canned for are Mexican style rice and red enchilada sauce.  So my plan today is to make enchilada sauce and make the tomato/onion/pepper puree that goes into Mexican style rice, portion it out, and freeze them. 

To have one quart of tomatoes a week I would need to put up close to 300 pounds of tomatoes.  The most I’ve ever done were 36 quarts (200 pounds).  I didn’t buy a single fresh tomato or a single can of tomatoes from the store for an entire year.  But I was very careful how I used my tomatoes and realized that I use tomatoes so much in my cooking that I would have done better with a quart a week.

I put up 9 pints of marinated vegetables yesterday and have just as much ready to process today. 

I’ve got one box of peaches for which I must use half to make a peach chutney.  I’m not even sure I like chutney and since I don’t eat meat of any kind I’m unclear on the best use for it in my cooking- BUT – this is a labor of love for my mother who loves chutney.  The rest of the peaches will be jarred with a light sugar syrup.  If I’m lucky and there are some more peaches in at the farm stand next week I’ll put up another box in syrup. 

I also have about ten pounds of summer squash for making into relish and chutney.

There I should stop.  I don’t have time to do all the preserving I wish to do.  I’m squeezing all of this between work and parenting.  I haven’t worked on my book now for a month and I’m getting anxious about it.

I’m squeezing it in because last year I barely did any preserving and I regretted it all year.  Preserving food is generally fairly simple but terribly time consuming.  Why do it?  I love doing it.  I LOVE it.  The truly frantic preserving season is September for most people and this is the turning of the season as well. 

When I’m canning I feel as though my internal clock is being calibrated.  I become very present to the changes of weather which are influencing what’s available to preserve, I become connected to my own nourishment in such a primal way that I often find myself thinking about the history of humans as I peel blanched tomatoes, get sticky up to my elbows in sugar syrup, and think about the evolution of pickling as I fill jars with dill and spices for pickles. 

Whether you preserve your own food or buy commercially canned food this is still the only reason human beings can live in one place all year and get fat in winter instead of thin and feed more babies than you could feed if you still had to hunt and forage all year.  Agriculture and food preserving are the reason we can settle, fight wars, play golf, and mess ourselves up with junk food like Twinkies. 

I like to preserve as much of my own food as I can because it feels good.  It feels essential and keeps me from taking my food for granted.  The raisins I dried myself that I’m about to use in the peach chutney took time (though little effort) to make and came from a friend’s vines.  That’s a lot of interconnectedness with the local earth, friends, labor, and I’ve used very few of them because I didn’t have a lot to begin with and now it’s going to be used to nourish my own mother.

Preserving is a great labor of love. 

Preserving food is life-affirming. 

It makes my hands feel worthy of the life they’ve been given.

I’ve got a lot of work to do today and I couldn’t be happier.

I’ll be thinking of all the rest of you out there today putting up jams and sauces, fruits and vegetables.

Happy canning!

Enhanced by Zemanta

Concord Grape Juice: How To Make Grape Juice

concord 2

Making grape juice isn’t difficult but if you’re doing it without a press (as I must) then it does take some time because the straining process is slow.  You can use any grape varieties you like but if you want the classic grape flavor (like Welch’s makes) the concord variety is the only grape to use.  They are a deep bluish purple color when they’re ripe and the flesh slips out of the skin easily and has two sizable seeds in each one.

This is how you make grape juice but it isn’t a recipe with specific amounts.  Use whatever quantity of grapes you have on hand and if you want to know exactly how many jars you’ll need to heat in your canner you can measure the amount of juice you have before you reheat it to process it in the jars.  You won’t know exactly how much you’ll end up with until you’ve finished straining the pulp out of the liquid.

First step:

Put your grapes in a big enough pot that it won’t boil over.  If you have more than will fit in one pot you can use as many as you need that will fit on your stove.  Don’t add any water.  Before turning the heat on, crush some grapes with a potato masher or the back of a spoon.  This will keep the grapes from burning at the bottom before the juice is boiled out of the grapes.

bubbling hot 2

Second Step:

Bring your pot of grapes to a boil.  Boil the grapes for as long as it takes for the grape flesh to reduce to juice leaving mostly grape skins as pulp.  Look at the first picture in this post to see how they start out looking and then look at the picture below to see how your pot of grapes should look when they’re ready to strain:

 grape mash 2

Observe how the slotted spoon brings up only skin and seeds.  There are no more globes of grapes left.  Also notice how the skins look more red than purple now as the pigmentation has been cooked out of them into the juice.

 grape juice drain 2

Third Step:

You need a large bowl or pot to strain your juice into, a strainer, and either double layer cheese cloth or butter muslin.  Place your strainer over the top of the bowl or pot and place your straining cloth over it, be sure to push it into the bowl of the strainer before ladling your juice into it.  Now you can fill the strainer to the top with juice and pulp you just cooked.  Let it drip until most of the juice has drained out.

 grape squeeze 2

Fourth Step:

Now gather up your cloth and squeeze all the extra juice you can out of the pulp.  You will be surprised how much you can get out of it- so don’t skip this step for the best yield.  When you’ve gotten all you can out of the pulp, put it in your compost bin, rinse the cloth out well, and set it back into the strainer.  Rinsing the cloth each time is important because if you don’t do it the fine sediment will make the next batch you ladle into the cloth drain even more slowly because it clogs up the cloth.

This is the part that can take a long time.  Just keep straining until all of it is done.  At this point you may wish to restrain it, this time through one extra layer of cloth to strain out even more fine sediment before canning it.  This is up to you.  Once you can your juice and let it sit for a week on a shelf you will see all the sediment sink in a layer at the bottom of your jars.  You can carefully pour your juice out of the jars, when you’re ready to use it, leaving the sediment in the jar, or you can restrain it at that point.  One think I can tell you for sure is that the sediment is not pleasant to drink and kids especially don’t appreciate it.

To Process the Juice:

1.  Heat up the strained juice to boiling point and then turn off the heat.

2.  Ladle the juice into hot pint or quart jars leaving 1/4″ head space.  Adjust the two piece caps.

3.  Process pints or quarts for 15 minutes in a boiling water bath canner making sure to cover the tops of the jars with at least an inch and a half of water.

Special notes: Depending on the sweetness of the grapes and according to personal taste, you may need to add sugar to your juice.  Some years the grapes are sweeter than others.  There is no specific amount for me to recommend.  Taste the juice and add sugar a half a cup at a time to your entire batch, tasting after the sugar has completely dissolved into the juice.  I prefer my juice to be tart but my son has a sweet tooth so I add sugar to mine until it’s sweet enough for him to enjoy, but only just.

You can also freeze juice.  If you freeze it in jars you need to leave a lot more head space for the expansion of the freezing of the juice- leave about two inches room.  You can also freeze in plastic containers.  Juice freezes exceptionally well so this is a good option for people who have room in their freezers.