
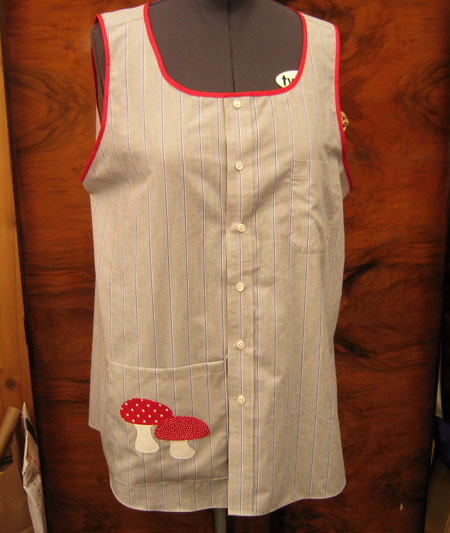
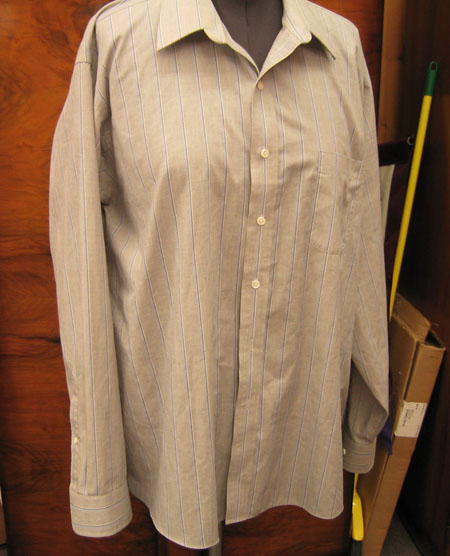
Here is a fairly quick and easy project you can do to make use of men’s shirts that may have grown too shabby for the office or for dressing up. If you don’t happen to have any lying around your own house, they are easy to find at thrift stores for a couple of dollars. Smocks are great garments to have around for cooking in, mucking out chicken runs, doing yard work, or wearing while canning. They cover your clothes more fully than most bib aprons.
Sewing skills needed: ability to apply bias binding to a seam edge and experience making and stitching appliques. This project is appropriate for intermediate level sewers.
Materials needed:
1 men’s shirt
3 yards narrow bias binding
matching thread
contrasting fabrics for applique (1/8 yard each of 3 different fabrics of your choice)
fusible web (1/8 yard should be enough)
2 pieces of paper

This project is easiest if you have a dress form on which to make your alterations. If you don’t have one, you will need to use a friend or family member to model the shirt while you pencil in the shape of your neckline.
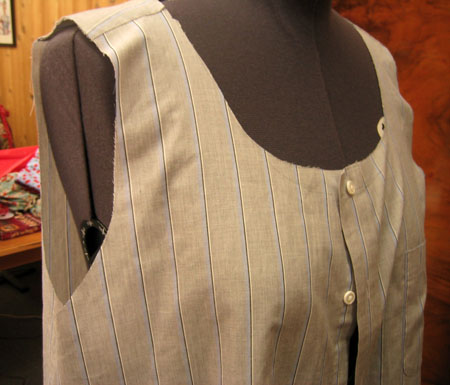
1. Pencil in your desired neckline. There is no science to this. You can keep the neckline high if you prefer for more coverage or scoop it out lower for a looser fit. Sketch it out using your dress form for guidance to help make each side as even as possible. Try to follow the natural curves of the neckline of the dress form or the person helping you.
In the front you want to keep your eye on where the buttons are and sketch your cutting line either just above a button or just below it.
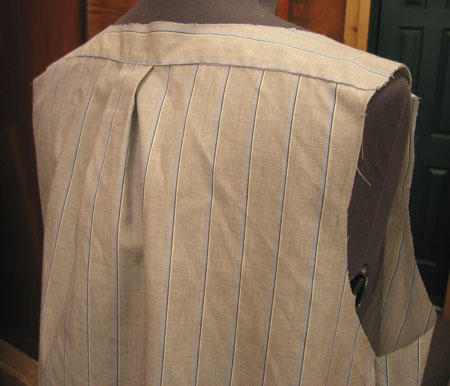
In the back you want to avoid cutting into styling details that are already sewn into the shirt such as yokes with pleats.
2. When you are satisfied with the shape of the neckline, cut the shirt along the lines you have made. Then cut the sleeves off of the shirt as well. Don’t widen the armscye until you try the smock on after this first cutting.
Once you have tried it on you can widen the armscye if you need more room (a smock should be a comfortable garment) and make any adjustments to the neckline that you feel will improve it.
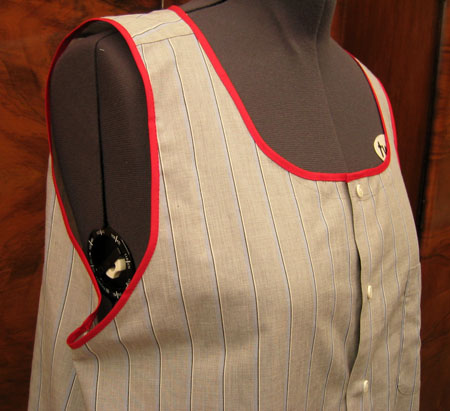
3. Now measure your neckline and your armscye and add 1″ to each measurement to allow for turning the ends under. If it’s a little longer than you need you can snip the excess off when you’re finishing the edges. It is better to have a little too much than not enough in this case.
4. Stitch the bias binding on your raw edges.
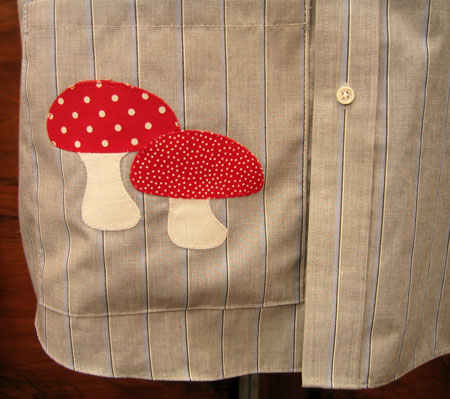
At this point you have a usable smock and if you like it plain then you’re set to go. But making an applique is such an easy embellishment that I urge you to do it. My mushrooms give me joy every time I see them and it is the little touches like these that make putting on an apron or smock so enjoyable.
To Make A Pocket:
1. Using one of the pieces of paper measure out a rectangle that is 8.5″ wide x 9.5″ tall (use a T-square ruler if you have one).
Note: if you are petite you may need to make a smaller pocket, depending on the width of the cut open sleeve of the men’s shirt you’re using. I have simply supplied you with the measurements I used.
2. Cut open one of the shirt sleeves that you removed and press it.
3. Pin the rectangle to it at its widest point, making sure that if there are stripes you line them up with the straight edge of the paper.
4. Cut it out.
5. press the top of the pocket under 1/2″ and then turn it under 1/2″ again and stitch it down.
At this point you need to make your applique which you will sew to the pocket before stitching the pocket in place on the smock.
1. On your second piece of paper draw out 2 mushrooms (I made one slightly bigger than the other). Keep in mind that you will be cutting the stem from the top so that you can use contrasting fabrics. Cut the mushroom shapes out. You should have 2 stems and 2 caps.
2. Using your paper cutouts as patterns, cut out one each of these in the fabrics you have chosen.
3. Now use your mushroom pattern to cut out fusible web. You don’t have to use the fusible web but I find it makes appliques so much easier to stitch without having the fabrics pucker.
4. On your ironing board, lay all the fabric mushroom pieces together on the pocket with the fusible web between them and iron them in place. (Do not move your iron back and forth. Just place the iron over the applique and apply gentle pressure for several seconds.)
5. Use a narrow zig-zag on a shortened stitch length (or an applique stitch, if you have one) to stitch the pieces in place.
The Last Step- stitching the pocket on the smock:
1. Turn the sides of the pocket under 1/2″ and press them.
2. Turn the bottom of the pocket under 1/2″ and press it.
3. Place the pocket on the shirt. If you have stripes try to match them up (but don’t agonize, this detail will not be noticed by others, just by you if you can achieve it.) and pin it in place. I placed mine about 1.5″ from the hem of the shirt. Place it where it feels comfortable to you.
4. Top stitch the pocket edges down.
Now show me your work please! I want to see the pretty smock you’ve made.
I very much like this tutorial. Now, if I only had a husband that isn’t smaller then me!!! Maybe I can get an old shirt from my dad
Wow- super cute smock!! I’m very inspired by your innovative use for a thrifted men’s shirt! Love the mushrooms!
I have a question though…did you make the lower pocket from the sleeve material? And, did you sew the placard (I think that’s the name of the button part of the shirt) down and use the bias tape as one continuous piece, or if you didn’t, how did you finish each end of the tape around the neckline?
Just curious…
Great project, can’t wait for more!
Oh man- I cannot believe I forgot all instructions about the pocket!! A smock needs a pocket. This is why you are the other head-mistress of the farmhouse finishing school! So yes, the pocket was made from the sleeve material and the binding was finished individually at the end of each placket so that you can button and unbutton the smock. I will amend my instructions to be clearer. Excellent questions!
Great tutorial. I love the one that you made for Riana of These Days in French Life.
Thank you for visiting! The one I made for Riana is a little harder, I’ve been thinking about making a pattern that people can copy for free. It will take me a little time to get around to it though.
Oh, what a fantastic idea! I could use a bunch of those. Hope you don’t mind if I post a link to this tutorial in the next Homesteading Carnival: http://homesteadcarnival.blogspot.com/ !
!
Blessings,
Catherine…off to find a shirt to recycle
What a great idea to recycle those old shirts! Reminds me of some of the old aprons my grandmother use to wear!
Want.
Give.