Category Archives: Kitchen Garden

April 29 2010: In The Kitchen Garden

male kiwi 2.jpg

This is the male fuzzy kiwi I got this winter to pollinate the two female fuzzy kiwis that I got two years ago and planted in half wine barrels.  This wasn’t meant to be their permanent resting spot and this year I will be putting all three in the ground to climb over a metal arbor around one of my garden gates.  Hardy kiwis do more reliably well here in the Pacific Northwest but I couldn’t resist the attempt to grow the bigger more well known variety.  I had bought a male to go with the females and it died.  So I know there is risk for them.  I love the fuzzy growth on their stems- and in this male the coloring is really red!  Some people have cute new lambs and kids to get excited over, I have male kiwis.

red currant 2.jpgI also bought three red currants a couple of years ago that ended up living in pots until last month when I finally put the surviving two in the ground in my monastery garden.  That may not be their permanent spot but they needed a more substantial bit of soil to grow strong roots.  They are still very young plants but I saw that one of them flowered and now there are these very tiny berries hanging delicately the thin branch and my hope is that they will ripen so I can finally taste them.  I will need to get one more, of a different variety, to improve pollination, but it’s exciting to see progress in the garden even when it’s small.

red rome apple blossom 2.jpgLast summer we managed to dig up a few of our good plants from our old house.  This was not my favorite apple tree but it was the one in the best condition.  It’s a Red Rome apple.  It already produces quite a few apples on its small form.  We’ll be getting another tree to ensure pollination.  There are apple trees fairly nearby but when one is planning a food producing garden it’s important to make sure that you have all the pollinators available on your own property because you never know when neighbors will cut down their own trees. 

white lilac 2.jpg
A lilac has a place in the kitchen garden just as all flowers do that attract beneficial insects.  I wouldn’t have chosen to plant a white one myself, but this one was already here and now I’ve come to enjoy its delicate coloring.

I’ve been clearing out my raised beds full of quack grass.  This is no easy feat as I have let them really settle in.  The first bed I worked on broke my shovel.  Literally.  My great lesson this year is to never let the quack grass completely take over any of my raised beds.  It’s almost time to plant out the summer vegetables like summer squash, tomatoes, corn (I don’t grow any but many do), cucumbers, and all the other vegetables that need the soil to be warm before transplanting. 

The lettuce I planted is coming up but not nearly as much as I planted, so that’s disappointing.  My peas and favas are up and climbing and looking really robust!  I look forward to growing and eating peas and favas every year.  I’m already planning the dishes I will make with them such as pasta with favas and peas and my constant favorite: grilled polenta and fava rounds which I usually serve with a marinara sauce and other grilled vegetables.

I’d love to know what’s going on in your gardens too!

Elderberry: Plant Profile

Native Elderberry 2

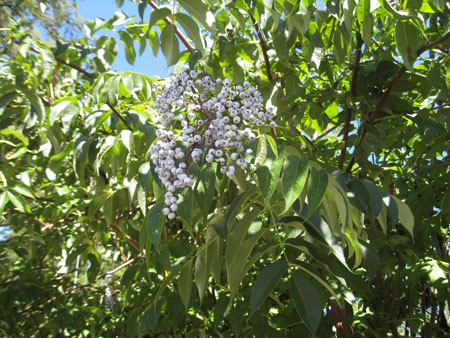
An elderberry tree is not difficult to identify, especially when they are in full fruit.  The umbels of small berries are not easily confused with any other kind.

 elderberry tree 2

Elderberry bushes can be pruned to be kept smaller in a garden but given free rein they can grow up to 30′ tall.

 elderberries macro 2
The

Sambucus Caerulea is distinguished for its light blue appearance that the white bloom on the berries gives them.

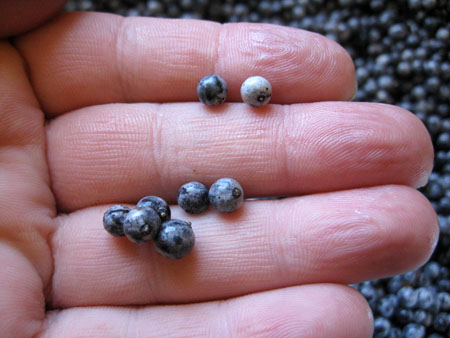
 tiny berries 2

Different cultivars of elderberry may produce different sized berries, but even the larger ones are pretty small.

 stripped 2

You can see the structure of the umbel better when stripped of berries.  Its branching is intricate and rather pretty.

Most cultivars of elderberry are edible and used in both food and medicine.  Although the elderberry has somewhat fallen out of popularity outside the grandmother crowd, it has been highly valued by people for hundreds (possibly even a couple thousand) of years.  The berries have been used to make jellies, syrups, liqueurs, and pies while the delicate cream-colored flowers have been used to make teas, wine, and “champagne”.  The wood of the elderberry was used by craftsmen and in pipe making and the flowers have been used in cosmetics since the Roman times at least and are still used in cosmetics to this day.

Medicinal uses: the number one medicinal use for elderberry is as a cold and influenza remedy.  It is used in various forms to alleviate feverish conditions, and as an immune system stimulant.  It is prescribed for allergies, congestion, ear and throat infections, burns, inflamed skin and mucous membranes, and for arthritis and rheumatism.

Nutritional value: elderberries are high in vitamin C, vitamin A, vitamins B6, and iron.  They are a powerful antioxidant and are high in fiber.

Elderberry is native to Europe and North America.  The European elderberry (Sambucus Nigra) has dark bluish purple berries while there are two  North American elderberries, Sambucus Canadensis is native to the area east of the Rockies, and Sambucus Caerulea (a sub species of Sambucus Nigra) is native to the area West of the Rockies and extending all the way down to Mexico.

All the elderberries I have mentioned above are edible though it is important to note that it is best not to eat the flowers or berries raw unless you are very sure of the plant’s specific variety because some varieties have poisonous parts without being cooked*.  Unless you know exactly which species of elderberry you have you should always cook the berries and flowers before eating them.  If you are growing your own you can pick the specific variety you would like to grow; if you are foraging for elderberry you may find any of the types mentioned above growing in the wild.  Any elderberry with blue or purple berries is safe to consume when cooked, what you need to avoid is any elderberry with red berries.

Sambucus Racemosa (Red Elder) and Sambucus Canadensus “Aurea” are two types of elderberry with red berries that are poisonous.  While some red berry varieties may be safe to use under certain circumstances, it is best to avoid them unless you are an herbal expert.

Red berries = poison.

Black, blue, or purple berries = edible and safe when cooked.

That ‘s the most important thing you need to know.

Why would you want to grow this yourself?  Elderberry is the most popular cold and flu remedy used in Europe even to this day and the scientific evidence supporting the medicinal claims of this plant are growing all the time.  In the National Geographic Desk Reference to Nature’s Medicine they cite that many modern studies have been done to test the folksy claims of the power of the elderberry to heal and that the tests have shown that elderberry has consistently reduced the severity of flu and cold symptoms as well as reducing the length of illness.  This plant continues to be of interest to scientists as well of herbalists.

You can still forage elderberry but with public wild lands continually shrinking, most people’s access to wild elderberry is decreasing all the time.  This is a powerful enough herbal with enough uses to earn it a place in your garden.

Cultivation facts:

  • Elderberry is a large deciduous bush growing up to 30′.
  • It grows quickly and suckers freely.
  • All elderberries prefer a sunny location.
  • All elderberries require cross pollination with other varieties.  Either plant two different varieties in their own spots in your garden or if you have limited space, plant two varieties in one hole.
  • European elders do particularly well in alkaline soils though all elders are adaptable to most soil types.  Most elders enjoy a wet soil which is why it is common to find elders growing along the banks of rivers, however, once established an elder has few watering requirements.
  • propagation can be accomplished with seeds or cuttings.  The seeds need stratification.  Cuttings should be taken from semihardwood in the summer from new growth.
  • Because elderberries sucker freely they can take over your yard unless you control them.  However, the bush is not long-lived.
  • Elderberry is rarely bothered by pests as its bark has a natural insecticide in it.

*One of my herbal books says that all parts of the elderberry Sambucus Canadensis are poisonous (at least mildly) unless cooked.  Although I foraged and correctly identified the elderberries I’m using for elderberry syrup, and theoretically I should be able to eat these raw, they don’t taste very good raw anyway.  I tried one.  The flavor is greatly enhanced by being cooked.  Furthermore, throughout my elderberry reading I have read that all the bark and twigs of all the elderberry varieties are at the very least mildly poisonous which is why it is suggested in a number of sources to take care to remove all of the stems of the berries before using in recipes.  I would certainly follow this advice.


**The only problem you will run into with the two in one hole planting is that eventually as you prune old growth away or it dies off you may end up with one of the two varieties completely dying out.  If this happens you can always take a cutting of a cross pollinator and replant it with the more mature plant: dig up any existing suckers and plant your cutting there, near the base of the mature planting.
Make your own elderberry syrup:
Elderberry Syrup: DIY Apothecary
Information for this article comes from:
“The Complete Herb Book” by Jekka McVicar
“Desk Reference to Nature’s Medicine” by National Geographic
“The Essential Natural Health Bible” by Nerys Purchon
Nutrition Data- an online resource for nutritional data (nutritional information from the USDA)

Be sure to also check out our post on making elderberry syrup:
Elderberry Syrup: DIY Apothecary

Evaluating This Year’s Vegetable Cultivars

chard 2

I spend a lot of time thinking about what I want to plant in my garden each year.  I make my decisions based on an ever-evolving criteria which often include these points:

Is it cheaper to grow it than to buy it?

Will it do well in my soil?

If I grow it, will I actually eat it?

If it does so well I can’t keep up with it- can I preserve it?

Is it worth the water it will take to keep it alive?

But there are other considerations as well.  I like to plant a big variety of things but there’s a part of me that is always working towards finding all the “perfect” cultivars of everything I love to eat so that one day I’ll grow only one kind of carrot every single year (from seeds I save myself, I like to think) and I’ll stick with only a couple kinds of lettuce (only my favorites), and I’ll become the gardener famous for that variety of squash she grows every year.  I think it pleases me to imagine having a garden full of vegetables that have been acclimated to my peculiar little lot and become special and I like thinking of lovingly saving the seeds each season to use again and to share with friends.

The reality, of course, is that I love trying new vegetable varieties and I know that I’ll always have something new to try every year.

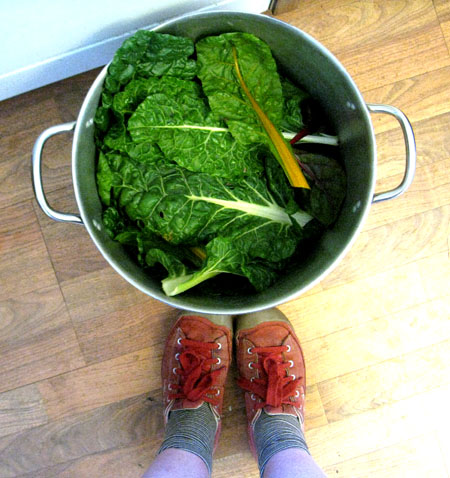
I love this time of year when the garden is finishing up with all the produce, ripening one last bunch of tomatoes before the cold, offering another handful of beans before the vines all dry up.  This is when I start evaluating what worked for me and what didn’t.  Today I was thinking about Swiss Chard versus kale.  I do enjoy eating kale but I don’t ever crave it like I do chard.  Yesterday I cut a huge pot of greens (pictured above) from my garden.  I realized that I hadn’t been harvesting them and most of my kale is about to bolt.  While I was cutting the kale I discovered that most of them were covered in that variety of aphid that matches the silvery green of the leaves and are attracted to all members of the Brassica family.  My chard was untouched by aphids.  As I was picking the two different kinds of greens I was thinking that perhaps I should only grow Swiss chard from now on because I prefer it.  I like how it gets more tender than kale when steamed or sauted.  I like that my chard hardly ever has pest problems (something likes to lay tiny white eggs on the backs of the leaves but these are easily rubbed off).

If you don’t love eating something you shouldn’t be growing it in your yard.   This is what I usually think.

Then I started thinking that I should find out which one is healthiest to eat.  So I pulled out my trusty “Laurel’s Kitchen” with the nutritional tables in the back and had a look.  Both are very high in vitamin A.  Kale has twice the calcium of Swiss chard but half the potassium.  What I got from doing that comparison is that both are very healthy and have different essential things to offer.

Is it better to plant a garden that gives you the broadest spectrum of nutrients your body might need, or better to plant only what you love best?  What do you think?  How do you decide what you will plant again and what you will not bring back to the spring garden?  What were the biggest winners of your garden this year?

Here are a few of my old and new favorites that I will plant again and again:

Forellenschluss Lettuce:  this romaine lettuce does so well for me and is never bitter.  Plus I love the red speckles it’s covered in.

Lazy Housewife Bean: I grew it for the first time this year and it did much better than “Kentucky Wonder” or “Bluelake” have done for me.  They were so flavorful and tender even when large.  It’s a Romano type bean.

Helda Bean:  this one grew right next to the Lazy Housewife and to be honest, I couldn’t tell the difference.  They both grew so well for me and produced such great beans I will plant both again next year.

Sungold Cherry Tomato:  my very favorite cherry tomato.  I always plant this variety every year and couldn’t possibly get tired of them.

Rainbow Chard:  this will always be the variety of chard I grow.  I cannot imagine giving up the brightly colored stems for an all white stemmed variety.  It never fails to taste great and do well for me.

Willamette Tomato:  I generally prefer heirloom tomatoes even though they don’t tend to fruit as prolifically as the more modern hybrids do.  However, I always plant one or two of the hybrids so as insurance if my heirlooms don’t do well.  This one turned out to be not only prolific but had great flavor.  I will grow this one again next year.

Nantes Carrot:  I used up the seeds I had from a previous year.  I can’t remember specifically which Nantes it is but I let one go to seed and will continue planting these because they have done so well for me.  I’m not sure how to get the seeds out of their tiny spiky pods so if anyone knows, please tell me!
Your turn!

Warba Potato Yield: Summer 2009

potatoes 2

I have begun to take better garden notes so that I can share my data here for those who might find it helpful.  Normally I let my potatoes remain in their bed and harvest them as I need them but this year I needed to free up my potato bed for some blueberry bushes.  This gave me the opportunity to weigh them all at once.  The potato plants were already dying and so I stopped watering them anyway.

Here are my notes on this year’s potato planting:

Potato variety: Warba (early season)

Number planted: 24 seed potatoes

Bed size: 4′ x 16′ raised bed

Space between seedlings: 10″ between them in their rows, rows were 24″ apart

Planting date: April 17

Harvest Date: First picking July 3, complete harvest July 12

Growing conditions: typical cold wet spring and cold wet early summer with some brief intermittent heat waves.  Barely watered the bed at all.  Though I planted them in trenches 6″ deep, I failed to continue to cover them as the plants grew which generally gives a higher yield.  Didn’t mulch at all which also tends to produce higher yields.  I would call the growing conditions less than ideal, though the soil they were planted in was very good; loose and full of well composted material.

Total yield: 30 lbs 15 oz

Or you can think of it as 1.29 lbs of potatoes per seed potato planted.  Or you can think of it as a fraction over 1 pound per square foot of garden space.

This is a respectable yield but would have been much better if I had followed good potato growing practices.  I also think it’s important to note that some varieties of potatoes can get much larger and grow a lot longer before harvest which translates to a much greater pound per square foot ratio.  I nearly always harvest my potatoes as “new potatoes” because I like young potatoes best.  So that affects the yield as well.

What this information should do, though, is reassure you that even under less than ideal growing conditions, potatoes do produce well and are rewarding to grow.

Caring For Chicks: The First Six Weeks

chicks 2

How To Care For Chicks For The First Six Weeks

Raising your flock of hens from day old chicks is rewarding, easy, and inexpensive.  A chicken is most vulnerable for the first six weeks of its life which is the general length of time it takes for a chicken to develop their first feathers.  Before they feather out they cannot regulate their own body temperature and are sensitive to both the cold and to overheating.  The most difficult part of raising chicks is managing the temperature in their pen.

To raise chicks you will need:

Housing: Big aluminum tubs are great for raising chicks in but you can also use a large cardboard box, a wire brooder, or a bunny hutch.  If you use a wire cage of any sort you need to make sure the gaps between wires aren’t so large that your chick’s feet can fall through them and get stuck.  I’ve used a large cardboard box (which had to be replaced a couple of times since chicks spill their water frequently) and I’ve used a tin wash tub.  The wash tub was the best.

Heat Lamp: you can get these hat the hardware or feed store for pretty cheap.  You need a lamp that can clamp (or hang) above the chicks’ living space.  The red bulbs that the feed store sell are best but we’ve done fine using regular 100 watt bulbs.

Feeder: I definitely recommend that you buy one of the aluminum feeders that are made for chicks.  It keeps their feed cleaner and makes it harder for the chicks to knock it over.  It’s is a small round (or sometimes long triangular) dish with a top on it with circles cut out so the chicks can get to the feed.  All feed stores carry them and they aren’t expensive.

Waterer: Again, I recommend you get one of the small plastic waterers that are sold in the feed stores.  You don’t want to put a bowl of water in with your chicks for two reasons, the first of which is that they will spill larger quantities of water all at once requiring more frequent litter changes, and the second is that you don’t want to provide water in which the chicks could drown.

Litter: Use only pine shavings.  Cedar is unhealthy for them.

Feed: Buy chick feed from your farm store that is formulated especially for them.

Thermometer: You can get a thermometer at most dollar stores or supermarkets.  You want an outdoor type of thermometer (not a cooking thermometer).  This is the easiest and surest way to manage the temperature in your chicks’ environment.

To set up your chick’s environment you need to clamp the heat lamp to one side of the box, wash tub, or cage in which your chicks will live.  If you’re using a box or a wash tub you need to cover the floor with about an inch of pine shavings.  This will help absorb their droppings and the water they will inevitably spill.  Place their feeder and waterer on the opposite side of the space from the lamp.  If their water gets too warm they won’t drink it.  Chickens are very thirsty creatures and need constant access to fresh cool water.  Place the thermometer somewhere between the side with the lamp and the side with the food.  Now you are ready to add your chicks!

Temperature:  Chicks need access to heat.  For the first week or so of their life they need the temperature to be between 90 and 100 degrees.  After that you should lower the temperature by 5 degrees each week.  You can do this by raising the heat lamp higher each week (you may need to clamp it to something other than the edge of the cage/tub/box in order to lessen the heat enough as they get larger).  You can tell if they are too hot because they will huddle together in the farthest spot away from the heat source.  Likewise, if they are too cold they will all huddle tightly together directly under the lamp.  Ideally you should see your chicks spread out in their pen, some in the warmer spots and some in the cooler moving freely all over their space.

Food and water: It is important to check their water a couple of times a day.  Chicks are messy babies and tend to stand in their water, spill it into their chips, and drink it too.  The water will get dirty frequently so you must keep your eye on it to prevent them from drinking water with their feces in it.  It is sometimes helpful to put their water and food on a brick in their pen to help keep it cleaner by raising it up.

Changing the litter: You should change the litter every other day.  I have always had very messy chicks who spill a lot of their water so if you notice the pine shavings are getting wet near the water you need to remove the wet shavings and add some more dry.  This means I was removing some shavings every day but I only did a full clean out every other day.

Handling Them: Handle your chicks as often as possible.  You can try to train them to perch on your finger (set them on your finger over and over again and eventually as they get used to it they may comfortably stay put).  Small children should be supervised while handling them because they don’t always understand how fragile the chicks are but encourage them to hold the chicks while you are there with them.  Always wash your hands after handling them.  Chicks are birds and everyone likes to eat birds so they will try to get away from you, it’s their instinct.  What you want is for them to eventually feel comfortable enough that when they are full grown it will not be difficult to catch and hold them.  Remember that some chickens are always going to be shy and some will become very curious and friendly.

One of the biggest common dangers that can occur in chicks is “pasting up”.    Pasting up is when a chicks feces sticks to their vent and dries there preventing them from eliminating which, if not caught, will kill them.  So every day you need to check their bottoms for pasting up.  If you see that one of them has poop stuck to their vent gently wash it off using a warm damp washcloth.  It may take some time to clean it up and the chick will not enjoy the activity- but it’s important to take care of it as soon as you see it.

It’s good to remember that sometimes chicks die.  Not because you did something wrong but because they were too weak, or the travel from the hatchery made them sick.  Most vets won’t treat chickens but if you see that any of your chicks aren’t thriving, call the feed store where you got them and ask for the person who is in charge of the chickens.  I have always found those people to be very helpful in determining what’s going on with a chicken’s health.

When your chicks begin to develop their feathers you can let them play a little bit outside on really warm days.  If you do this, be sure that you can pen an area off for them so they are easy to catch and bring inside when it’s time.  Be very careful of predators like your cats and dogs who would love to catch themselves a little chick-snack.  Chicken hawks aren’t uncommon either so don’t leave your chicks unattended!

Chicks are funny to watch.  I never cease to enjoy seeing them fall instantly to sleep no matter what they’re doing or where they are.  They’ll be walking around and suddenly their head will drop to the side and their eyes will close.  The first time I saw my chicks do this I though they were dying or dead!  Spend time with them and enjoy their funny antics.  If you have any questions you can feel free to ask me any time or don’t hesitate to call your feed store.

More information on raising chickens:

Choosing Chicken Breeds For Backyard Flocks

Is it cost effective to can your own tomatoes?

home versus store 2

A cost analysis of home canned versus store bought tomatoes.

A question that a lot of people ask about home canned goods is: can you save money by canning your own food?  I think it’s an important question to ask.  I can’t say that I preserve my own food for the possible savings,  I do it because I think it tastes better, I know what’s in it, and best of all, I truly enjoy doing it.

For many people it is only worth their time if they know they are saving money by doing it and I respect that.  So I decided it was time to try and answer that question.

I am starting with an analysis of canned tomato products because I use this more than any other pantry staple that I can make myself.  I can about 36 jars of diced and sauced tomatoes a year and I would like to do more.

I took price notes on two different types of canned tomatoes (diced and sauce) from two very different grocery stores: Winco, the leading bargain grocery store in my town (most things they sell are dirt cheap and close to the expiration dates) and Roth’s, the leading family owned fancy grocery store (where everything is pretty top notch quality and prices reflect this).  And then I calculated the cost of my own home canned diced tomatoes and tomato sauce.

Roth’s:

Diced Tomatoes 28 oz can (Hunt’s brand)- 9¢ per ounce

Diced Tomatoes 28 oz can (Muir Glen Organic brand)- 12¢ per ounce

Tomato Sauce 28 oz can (Hunt’s brand)- 8¢ per ounce

Tomato Sauce 28 oz can (Muir Glen Organic brand)- 12¢ per ounce

Winco:

Diced Tomatoes 28 oz can (S and W brand)- 7¢ per ounce

Tomato Sauce 28 oz can (Hunt’s)- 6¢ per ounce

Home Canned:

Diced Tomatoes 1 quart (using U-pick tomatoes)- 5¢ per ounce

Diced Tomatoes 1 quart (using home grown)- 2¢ per ounce

Tomato Sauce 1 quart (using U-pick tomatoes)- 10¢ per ounce

Tomato Sauce 1 quart (using home grown)- 4¢ per ounce

(homegrown here is assuming you buy the vegetable starts, not grow them from seeds.  Keep reading!)

There were only two choices to include from Winco as they don’t have the widest selection at any given time.  For the homegrown I took into account the price of plants and how much you can generally expect a plant to yield and how many pounds of tomatoes it takes to make diced tomatoes versus how many pounds it takes to make sauce.  For the sauce I chose to use the number of pounds it takes to make a pretty thick sauce rather than a thinner one to maximize the meaning of the numbers here.  I always make a thick sauce, the thicker you make it the more tomatoes it takes to fill a quart.

I didn’t account for the price of canning equipment, jars, the power it takes to can, nor the amount of water it takes to grow your own and here’s why:  with almost any worthy activity you must buy tools.  Tools are a one time cost.  If you really want to add the price in you must make a guess at how many years you think you will be using the tools.  I plan to keep on using my canning tools until I am a grizzled old lady like the ones I meet at the u-pick field who have been canning for over 50 years.

So my canning pot and equipment cost me $1 per year to use.  If you are a stickler, you can do the math and figure out how much it costs per jar (37 quarts per year X 30 years) (Seriously?  You’re going to do the math?)

The cost of the jars if bought brand new and not on sale works out to be about $1 a piece.  So if you want to do the math on that- be my guest.  Figure that each jar is (if treated with reasonable care) likely to last you 30 years.  You will have breakage once in a while but it is rare if you are good at canning.  So, divide $1 by thirty years and you will have the cost you can add to the per ounce prices I’ve listed above.

Some sticklers insist on adding the cost of watering home grown vegetables to the cost of their food.  I don’t do this because I think it’s ridiculous and here’s why: the majority of Americans who have homes (whether rented or owned rarely makes a difference) with yards in them are already watering lawns.  In my master gardening class we were given some astonishing figures on how much water in the US is used to keep lawns looking alive and “nice”.  It’s shocking.  Even if you don’t have lawn you’re already watering (and I bet you do) you’re probably watering a bunch of shrubs and flowers- am I right?

It most certainly doesn’t cost any more to water vegetables than it does to water your lawn.  In fact, if you are using drip irrigation or some other form of water efficient irrigation, you are probably going to save money on your water use.  This is why you should turn your lawn into your own grocery store (thanks, Kathy, that is a lovely way to look at my kitchen garden!).

The power it takes to can vegetables or to freeze them.  Yeah, this is another one that I discount.  If the average person watched less television, used less power lighting their homes, had energy efficient heating, threw away their hair dryers, and used fewer plug in items, the amount of extra power it takes to run a small auxillary freezer or to can your own food could be easily offset.  No need to add that in.  Make some effort and you will see the difference.

During canning season (and I’ve been canning now for 9 years) I have never seen a significant bump in my electricity or gas usage.  It increases a little bit but it is also generally increasing because the lights are being turned on earlier as fall digs in.

Oh, but the biggie that I have heard many people say which never ceases to annoy me is “But my time is money…so when you account for the labor it takes me to make my own food, it isn’t worth it.”  Most of you have already heard my feelings on this issue, but for anyone who has not, let me just ask you if you compare all the time you spend raising your kids against what daycare providers earn and make your decision based on how much money your time is worth?  Because if you do, you have some pretty twisted priorities.  Most people give their children as much personal care as they are able to without once asking themselves if it might be worth just handing them over to the babysitter full time because it just isn’t worth their time.

What makes an activity worth the time and effort you put into it is dependent on more factors than how much your time is professionally worth.  There is pride at stake, there is quality to consider, there is control that adds bonuses most people don’t want to think about when it comes to food preparation (such as not allowing a certain percentage of insects to be cooked with your sauce), and there is enjoyment.

Feeding ourselves and our families is the most important thing we do.

I suggest that all of us work a little less for other people and a little more for ourselves.

Because it does save us money.  (See the numbers above).  And because it enriches more than just the food on our plate.

Let me finish by summarizing my analysis.  If you don’t have a great deal of space (or time) but you want to preserve some of your own tomatoes you will get the most for your time, space, and dollar if you grow roma tomatoes and dice them and then freeze them.  (They should be blanched first).  Doing this is a lot less work than actually jarring them.  Efficient freezers don’t take much energy to run and the quality of frozen tomatoes if cooked first is excellent.

If you can start your own seeds for the tomato plants you will reduce the cost of either diced or sauce by a huge percentage that I have yet to calculate.  (One envelope of tomato seeds costs anywhere between $1 to $3 and will have at least 25 seeds in it.  Germination rates should be at around 85% which means you should be able to get 21 plants out of one package.  Wait, I’m going to do the damn math for you…

If you had room for 21 roma tomato plants and can keep them well irrigated with drip you should expect an average of around 12 pounds of fruit per plant.  At that rate you will yield at least 252 pounds of fruit.  If you made all sauce from that you could get 38 jars of thick tomato sauce a year.  This would cost you 7¢ per jar.*

Did you read that?  Did you take that in yet?

I’m not even sure how to say a fraction of a penny but this makes home made sauce (from home grown plants started from seed) cost .21 of a cent per ounce.

So the next time you ask if it’s worth growing your own and doing all that work?  Well, don’t ask me or I will wither you with my math.

So, go pick out a spot in your lawn to grow some romas!

*I made my calculation based on the most expensive packets of seeds.

A similar article you might enjoy:

Is Making Your Own Clothes Economical?

Dandelions (Taraxacum officinale): Plant Profile

dandelion-2

Dandelion

Taraxacum officinale

Asteraceae (Sunflower family)

true-dandelion1

Picture Above: Dandelions

Dandelions are native to Europe but have established themselves around the world.  They thrive in moist sites: meadows, lawns, pastures, and most likely in your own garden.  It is a perennial herb whose leaves grow in clusters around the root crown and whose long tap roots exude a milky juice.

The dandelion is both a food and a medicine.  Its leaves contain a number of nutrients including: iron, zinc, boron, calcium, silicon, and is especially high in potassium.  It is also high in vitamins A, B complex, C, and D.

As a food you can add young dandelion leaves to salads, to stir fries, or pasta dishes.  It is best to pick the leaves from crowns that have not yet flowered because once the plant flowers the leaves become tougher and more bitter, though you can still eat them if you choose.  The root can be dried and then used as a coffee substitute.  The flowers have traditionally been used to make wine.

As a medicine the dandelion plant has proved to be one of the safest and best diuretics because, unlike conventional diuretics, it is extremely rich in potassium so that it replaces what the body loses through water elimination.   Dandelion is used as a liver and kidney tonic, a digestive stimulant, and is considered a remedy for high blood pressure.   The latex contained in the leaves and stalks is used to remove corns.

Every part of the plant is safe to use.

 identification-2

Identifying dandelions in your yard or in wild areas:

Dandelions are not difficult to find  and most people know them by sight already.  However, if you want to be sure you are collecting the true dandelion, you need to become familiar with its imposters.  In the picture above there are 4 leaves.  The first one is from a plant often mistaken for dandelion which is why it is commonly referred to as “false dandelion”.  The next 2 are both true dandelion leaves.  The last one I have yet to identify but it grows everywhere the dandelion does in my garden.  Let’s go over the identifying qualities of the dandelion.

Identifying factors of a true dandelion:

The leaves are oblong with a jagged edge.  (Think “toothy”)

The leaves grow in a rosette close to the ground.

The stems of the flowers are hollow.

There is only one flower per stem.

The leaves are smooth to the touch.

 dandelion-comparison-2

1. closed dandelion bud 2. opening dandelion bud 3. false dandelion semi-open bud 4. false dandelion bud 5. false dandelion bud

false-dandelion-collage

Picture Above: False dandelions

False dandelions grow just as prolifically in most people’s gardens and are easily confused for them if you don’t know a couple of ways to differentiate them from the real thing.

Identifying factors of Spotted catsear (false dandelion):

The leaves are oblong and don’t have a jagged edge.

The stems of the flowers are thin and solid.

The flowers and flower buds are small.

The leaves are prickly both on top and on the underside.

Once you observe the differences between the two you will have no trouble telling them apart.  The two most immediately discernable differences are the fuzziness of the leaves of the imposter- true dandelions do not have prickly, fuzzy, or spiny leaves, and the stem of the flower- the true dandelion has a thick hollow stem and its imposter has a thin solid one.

You don’t need to worry about accidentally picking the wrong one to put in your food because although there are some toxic members of the Asteraceae family, all of the dandelion look-alikes in the family are completely harmless.

You can pick the leaves to eat fresh or you can dry them for later use.  All parts of the plant are bitter, though the bitterness is much less pronounced in the young leaves.  I have eaten them in pasta and I can say that they are bitter but paired with the rich cheese sauce I used the slight bitterness was counteracted nicely.

Dandelions, in most climates, bloom for about nine months out of the year.  The best time to harvest young leaves is either in the spring or the fall.  The roots can be cut and dried for later use as well.

It is amazing how a plant we have come to regard as an enemy of our yard can be such a boon to our health and well being.  Instead of cursing yours or using poison to get rid of them, how about harvesting them to dry for year round use and why not consider making wine with them?  This little weed packs a powerful nutritional punch and is worth putting back on our list of revered plants.  I don’t generally prefer bitter greens but I have to admit that after doing a bunch of reading about dandelions I feel I have wasted a great deal of time not treating my body to such an easy source of vitamins and minerals.  I am teaching my palate some new tricks and I entreat you to join me in the adventure!

Reference Material for this article:
Weeds Of The West” edited by Tom D. Whitsun
National Geographic Desk Reference to Nature’s Medicine” by Stephen Foster and Rebecca L. Johnson
The Complete Herb Book” by Jekka McVicar
Rosemary Gladstar’s Herbal Recipes for Vibrant Health” by Rosemary Gladstar

Choosing Chicken Breeds For Backyard Flocks

red-light-district-2.jpg

Choosing Chicken Breeds For The Back Yard Flock

Choosing what breed of chickens to get for your first flock can be confusing.  There are a lot of different kinds to choose from and how will you know which ones are going to be right for you?

Start off by answering the following questions:

How many chickens will you have?

Are you raising chickens for meat, eggs, or both?

Are you planning to butcher your hens when they stop laying?

How important is it that your hens be friendly?

The number of chickens you will have can influence your choice of breeds.  For example: if you are on a city lot that only allows three hens then you will want to make sure you get breeds that are known to be excellent layers.  If you are able to have more hens than you strictly need to keep your family in eggs you might want to choose a few excellent layers and also choose a couple of heirloom breeds for the enjoyment of variety.  In my own flock I have three excellent layers and one that isn’t as prolific but is much prettier than the others to look at and this gives me pleasure every day.

It is important to know what your purpose in raising hens is.  If you plan to raise them just for butchering you will want to purchase only game breeds such as Old English Game or Cornish Game.  If you want to have hens that lay well but can be butchered after they slow down you will want to be sure to get a dual purpose breed because these are breeds that not only lay well but make good table birds.

Most people who are starting back yard flocks of chickens, especially in urban environments, are doing it for both eggs and family enjoyment, not usually for butchering.  If this is your purpose then it’s important to choose poultry breeds that are known to be friendly.  I am going to make some personal reccommendations but it’s really important that you understand that a breed description is only general and that hens, like people, can be highly individual.  I have heard stories of Rhode Island Reds being mean but the two I’ve had weren’t at all mean, though they are both fairly shy.

The specific suggestions I’m going to make are suitable for families who are wanting great egg production from friendly birds.  If you need more information on game breeds or layer breeds I am going to include links at the bottom of this post to some great breed information sites that can help you pick what birds you want.

My favorite picks for small(ish) back yard flocks:

Buff Orpingtons– these are a golden colored dual purpose breed that lays well and has a sweet docile disposition.  Cora, our Buff Orpington, was so sweet you could pick her up and carry her around.  She was huge and funny and we loved her.  Lays large pinkish-brown eggs.

Ameraucanas*-this breed is an excellent layer of green eggs (only the purebred ones lay blue eggs) and is a very strong forager.  They are friendly and curious to people but bossy to other birds.  Our Easter Egger (see footnote), Claudine,  was great at foraging, leading the flock, and loved her sun baths.  Lays green medium sized eggs, often with double yolks.

Black Sex Links– this is a hybrid breed that is sexable at birth so you aren’t at much risk of ending up with a rooster.  They lay incredibly well, are friendly, pretty, sturdy, and not skittish.  Lays large brown eggs.

Golden Sex Links– this is the same as the Black Sex Link but is golden in color.  Excellent layer of large brown eggs.  friendly, curious, loves kitchen scraps, not bossy.  Ours has been a great addition to our flock.

Plymouth Barred Rock– this black and white striped breed is very pretty.  They lay moderately well.  In general the breed is known to be docile, easy to handle, and friendly.  Ours (Flower-bud) is quite shy and skittish but we love how pretty she is and she lays medium sized pinkish-brown eggs so how can we really complain?  I love having at least one striped or dotted hen in the flock.

Rhode Island Reds– this is an excellent layer of large brown eggs.  They are active but generally docile, though the cocks in this breed are notorious for their aggressiveness.  Our own experience is that ours are a little shy but will not be mean if you are quick enough to pick them up and they will come around and be calm if you spend some time with them quietly.

Most of the breeds I’ve just mentioned are readily available in feed stores.  If you get confused when faced with choices at the feed store never hesitate to ask for advice from whoever is the chicken expert.  And be sure you already have their nursery set up before you bring them home!

Here are some fantastic on line resources for reading about poultry breeds:

Henderson’s Chicken Breed Chart

Feathersite

Backyard Chickens

*Also known as Araucanas.  The truth is that mostly what you find in the feed stores are mixed breed versions of these birds, not purebreds.  Which is fine by me since I don’t need papers on my chickens.  Just so you know, if you’re buying a bird by either of these names, what you’re really buying is what is known as an “Easter Egg” hen.