
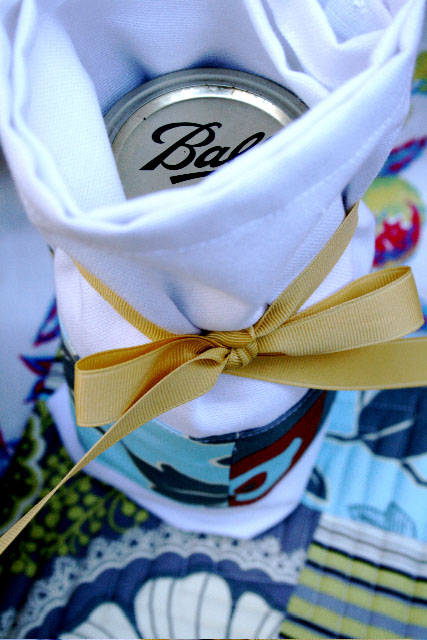
Home canned goods wrapped in a handmade dish towel.
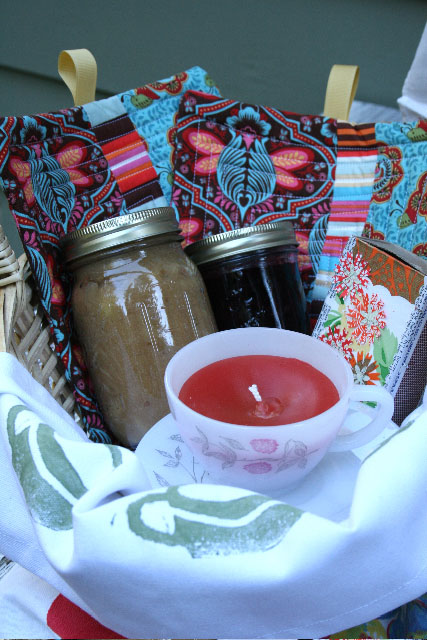
Beautiful homemade gift basket collection including potholders, decoupaged match boxes, tea cup candle, and home canned goods.


Different presentation from Bethany’s gift larder.

Close up of decoupaged match boxes and tea cup candle.
Note from the headmistress Mrs. Williamson: Bethany Mann, best known as Bitter Betty from her creative crafting blog Bitter Betty Blogs, spent many years working for Nordstrom’s as the regional manager of the window displays before deciding to leave her career to stay home and pursue a more personally rewarding path of becoming an urban homesteader and professional craftsperson.
On her blog you can find useful craft and homesteading tutorials. Here she is presenting several projects you can easily make from things you likely already have, or can find inexpensively at thrift stores, to create a gift larder.
Give What You Have
By Bethany Mann
Every Urban Homesteader can appreciate the happiness and security of a full pantry, made by your own hands. It is also a great idea to keep a full gift larder, making gifts in batches, to give for most any occasion. Using what you have on hand and recycling make these gifts both green and affordable, which makes giving and receiving them that much better.
I have started a gift larder of my own. It began with putting up some extra preserves with nicer labels. I have moved on to also putting up a few other items that are great to keep on hand. These projects are ideal to do in the wintertime, while the garden is resting.
I do try and reuse as much as possible and some of these items required little or no new purchases to create.
Thrifted Teacup:
Clean the teacup thoroughly.
Chop up old candles and crayons, or new candle wax, into tiny pieces. I like to use the big pillar candles after the wicks get buried and they are no longer useful… but often still have a pound or so of wax left. Half-burned tapers are even easier to chop up. The wick bits are skimmed off after melting.
Melt in a tin can over a pot of boiling water.
(Do not heat in oven, with direct heat, or in the microwave,
as this is a huge fire hazard.)
Prepare the teacup by putting a new cotton wick into a wick clip and tying to a bamboo skewer that has been laid across the top of the teacup. The wick should extend up from the bottom of the cup.
Pour the melted wax slowly into the cup to the desired level.
Let cool overnight.
Best given with:
Decoupage Matchboxes:
Take the slider off the box of matches.
Cut paper to fit. Reuse wrapping papers and pretty gift cards or magazines. You can use just about anything!
Use decorative shears to cut borders.
Punches can add pretty 3-d elements to the boxes.
Coat the flat non-strike surfaces with Mod-Podge.
Place the paper and let dry, pressing out the air bubbles as you go.
You can either add a topcoat or not, as you desire.
Glue the 3-D punch-outs in place.
Another couple of items that always seem to be needed are the ubiquitous pot holders and dish towels. Everyone uses them – and they wear out and get shabby so quickly.
These also make a great extra to add to the jar of jam. The dishtowel can even be used as wrapping!
I use scraps from my stash to make the potholders and trim the dishtowels.
A day or two at the machine, and you can have a nice little stack ready to give.
Quickie Potholders:
Cut 3 strips of coordinating fabric for each front panel.
Strips should measure 4×9 inches.
Cut one rectangle that is 10×9 inches for back panel.
Sew strips together (1/4 – inch seam allowance) and press open seams.
Place front panel, right sides facing on back panel, and pin if you desire.
Sew around the perimeter leaving a 4 inch opening at the “top” of your potholder.
Layer in 2-3 layers of cotton batting or recycled towel and smooth flat.
Hand stitch (or machine stitch) the opening closed, inserting a loop of ribbon with which to hang the holder.
Machine or tie quilting makes this project even nicer.
I machine quilt mine in a loose square spiral pattern.
Handmade dish towels can be trimmed with patchwork, stamped with potato prints, or embroidered to match.
Often freshly-baked goodies are gift enough, but a sophisticated presentation can be a little tricky. I am trying to avoid using plastics too much and the prints on the average tins are usually “not my style.”
On the upside, that is easily changed.
Peace Tins:
Thrift store purchased tins are cleaned and sanded.
Several coats of a non toxic (check label – some are okay for kids’ rooms) spray paint applied to both top and bottom.
Find a plate that is slightly smaller (by 1.5 to 2 inches) than the lid.
Trace it on the lid, and also on contact paper.
Use blue tape to mark the peace symbol lines on the contact paper and cut out along the lines.
Re-assemble on the lid using the circle line as a guide.
Spray paint the lid white and let dry.
Remove the contact paper.
Wash, line with wax paper, and fill with cookies.
I also keep an eye out for clean baskets while thrift shopping. People donate these like crazy. These are cleaned, sometimes painted and filled as needed for whatever occasion may come up.
Why not give yourself the present of never having to make a mad dash to the mall or pull an all nighter and set up a little gift larder all your own? You’ll probably want to send yourself a Thank You card every time you use it.
I LOVE this idea…Excuses to use up the extras, get crafty and share…Thanks!
Great ideas and all very do-able (silly word, but appropriate here).
I’d love to receive any of these gifts as they are all practical, pretty, and most of all, thoughtful.
Thanks Bitter Betty.
Super content so far stitchy!
i love this idea!! i often wished i lived on an orchard so that i always had a gift of fruit everywhere i went. but i’m a seamstress, heck, i can make gifts, and ahead of time! thanks
What marvelous ideas! Fun things to make AND give…I have a feeling I’m going to have to make some lunch-hour runs to the thrift/antique stores up the street soon…
I’ve been thinking lately that the very best homesteading investment is fruit trees. Fruit gets moe expensive all the time and as far back as people have been cultivating fruit it’s been considered a delicacy worth giving as gifts. Perhaps you could have a couple of dwarf trees in your back yard! However- being a seamstress does mean you have so much you can make to give people. Thanks for visiting Stitch and Boots and leaving a comment!
Hi Shelly- thanks for visiting our blog! Bitter Betty always has such great ideas and inspirations. I hope we’ll get her to contribute more in the future.
the fabrics here are making me swoon….oh how I love them!!
Luv the ideas! How about patterns on how to make the pot holders look as good as yours :).
Also enjoyed reading some of your other blog posts. You have a very nice and educational blog.