
I remember when I was a kid that it was pretty much a popularity killer to wear home-made clothes. My mom made me some clothes for a while and I thought they were pretty snazzy but I have never forgotten the attitudes of scorn that others had about it. Then when I went to Fashion Design School I learned to use industrial sewing machines and how to draft patterns and over the years of sewing professionally and working in other capacities in the garment design field I have come to understand where the attitudes have come from with regards to home sewing.
One of the major issues with making clothes from commercial patterns is that they generally use really large seam allowances. They do this to give the home sewer more room for adjustments and errors. Unfortunately the wider the seam allowance the bulkier the seams and the more clumsy a garment or project will look. For commercially made garment the standard seam allowance is 1/2". It's details like these that can make a big difference.
While most home sewers can't draft their own patterns and don't have control over the seam allowances (you can't just use a 1/2" seam allowance where a wider one has been given in a pattern because then the pieces won't come together properly) there are a lot of things you can do to make your sewing look more professional. Attention to detail is, as always, is the key to excellence.
 See how puckered this hemmed edge is? I pressed the fabric under first and it still has a puckery appearance after sewing. It needs to be steam pressed again. (See photo below)
1. Pressing is vital. This is the single most important tip I can give you. Unless the fabric you're using was just bought off the bolt a half an hour ago, you need to press your fabric before cutting your pattern pieces out of it. If you don't you may end up with irregular pattern pieces that won't fit well together.
Press your seams open. Use steam on all fabrics and use the hottest setting allowable for the fabric you're working with. I can't emphasize this enough: press open ALL of the seams you sew in any project as you go along. Don't wait until the end. After each step in a project- PRESS THE SEAMS OPEN. Also press any edges you're turning under for hemming BEFORE you stitch it. Your stitching will look much nicer. Then press again. Please see the difference this can make in the photos I have provided.
 The first photo is how some sewers leave their edges. It looks unprofessional. This photo shows what a difference pressing makes.
I have used many irons over the years both expensive and cheap and aside from the incredible industrial steam iron I got to use at my first industry job, the best one I've ever used in 20 years is the Black and Decker metal based iron I bought for $30. It's heavy, simple, and has few parts that can break. I highly recommend this iron.
2. Thread Color. Matching your thread to your project may seem like an unimportant detail but I assure you that the closer your thread matches the fabric color the less anyone will notice the thread at all. Unless you are purposely using a contrasting thread for design effects, the thread is something no one should notice. If you use a thread that's darker or lighter than your fabric then any mistakes you make, such as uneven top stitching, will become more noticeable.
3. Machine Tension. Your machine comes set at the average tension that is appropriate for sewing most things. Over time the tension wheel can shift or the tension may need to be recalibrated by a professional sewing machine mechanic. If the tension is off it's almost always the upper thread tension that needs adjusting. The middle setting is generally appropriate (around 5). Read your sewing machine manual for information on what settings are appropriate for different projects and test it out.
How to know if the tension is off? If your thread is so tight that it puckers the fabric as you're sewing it, the tension is too tight. If the seam is so loose that the thread is slightly loopy- the tension is too loose.
If you don't have a manual for your machine, take it in to get a tune up and make sure you ask the person who works on your machine to explain to you how to use the tension dial.
4. Top-stitching give the whole show away. Any time you have to do top-stitching you have a chance to make your project/garment look more professional. Top-stitching should almost always (unless specifically directed otherwise) be 1/8" from the edge. It takes practice to make a clean even stitch but pay attention and you can do it well. When you're just learning to do top stitching: go slowly! Use a seam gauge to help you keep the stitching at the length from the edge you need until your eye learns to judge it without measuring. Set the gauge at 1/8" and every couple of inches of sewing check the gauge against where your stitches are. Pretty soon you won't need a gauge.
5. Bulky seams are gauche. Although I have never been sloppy with my drafting or sewing when I'm doing it professionally, I have been known to get quite lazy with the projects I do for myself. One the steps I have occasionally skimped on is trimming the corners of seams when a pattern directs me to. Or trimming the seam allowance around curves where typically more bulk in the seam prevents it from laying flat around a neckline or
armscye. The lesson I learned is that neglecting to take these little steps resulted in a visibly bulky seam that looked bad. Whenever instructions say "trim the fabric..." do it.
6. Making the fit. One of the greatest benefits of sewing your own garments is that you can make clothes that actually fit you. If you are able to buy a commercial pattern, sew it up with no adjustments, and fit in it perfectly you just might not be human and I am most certainly extremely jealous! What you need to remember is that patterns are designed to fit average body types. Most people aren't actually average. The more you adjust a pattern to fit your figure specifically, the more professional it will look. Each pattern includes instructions on how to make basic changes in fit. Read these through. Do test fittings as you sew your project. Don't wait until you've sewn a waistband on to see if the waist size is really a good fit on you. Hem length is easy to adjust in a pattern so if you're a little taller or a little shorter than average this is an easy detail to adjust.

 If your stainless steel pots or pans ever develop a dull film on them from cooking that regular cleaning won't remove you should try this method of cleaning them.
 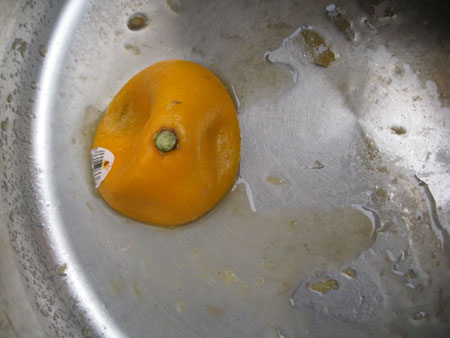 Instructions: cut the lemon in half. In the bottom of your pan sprinkle half the tablespoon of salt. Rub the lemon all around the dull stains squeezing as you do it to release the juice and using the salt to scrub the surface of the metal. When you have scrubbed enough so that no dry salt remains and the lemon is squeezed out. Let the lemon juice and salt sit for a few minutes.
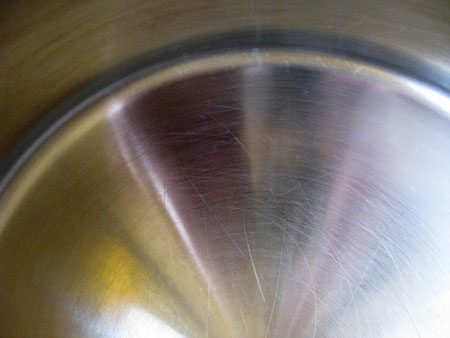
![Reblog this post [with Zemanta]](http://img.zemanta.com/reblog_e.png?x-id=99c88900-6555-4d2f-85f3-075a72e60bc3)


Recent Comments