Recently in All Season Recipes Category

Tomato Bread Soup

| 3 Comments
bread soup 2.jpgThis is an uncomplicated comforting soup to eat on a cold early spring day.  It's warm and filling without being heavy.  My mother said the pieces of bread in the soup were like eating clouds.  Seriously, I'm not kidding you, she really said that.  Best thing?  It gets even better by the second day. 

If you have a lot of home canned tomatoes this is an excellent recipe to make with them.


Tomato Bread Soup
serves 8

Ingredients:

1/2 cup olive oil
1onion, diced
2 quarts diced or stewed tomatoes (use the juice too)
1 quart vegetable broth
1/4 cup red wine
8 cloves garlic, minced or pressed
2 tsp salt
1 tsp dried oregano
30 grinds of pepper
1 day old baguette, torn into small pieces


Method:

Heat the olive oil in a soup pot on med/high heat, then add the onion and saute until it slightly browns.  Add the tomatoes, broth, red wine, salt, oregano, and pepper.  Turn the heat down to med/low. 

Cook for twenty minutes.

Remove from the heat and puree the soup with an immersion blender OR let it cool down and then blend it in a blender and then return it to the pot.

Put the soup back on the stove, bring to a brief boil, then turn the heat to low and add the bread to it.  Stir it in well and let it cook for ten more minutes.  The bread should be completely saturated and soft but not disintegrated.  If you used particularly hard stale bread you may need to let it cook a little longer.

It is very good just like this but I like to serve it with grated Parmesan.


another bread soup 2.jpg
Recipe notes:  You can substitute commercially canned diced or stewed tomatoes - use 2 28 oz cans in place of the quarts.  It's not precisely  the same number of ounces but it won't hurt the recipe at all.  If you use fresh oregano then use a tablespoon of minced in place of the tsp of dried.  If you make this in the summer time you can use 4 1/2 pounds of fresh tomatoes with the seeds squeezed out. 

If you object to cooking with wine (or don't have any on hand) you can substitute red wine vinegar for it - don't leave it out if you're using home canned.  If you use commercially canned tomatoes you can leave out the wine or vinegar all together, though I don't think you should. 

Don't cut down on the olive oil amount.  This is such a simple soup and the olive oil adds a very important richness to it.  It's not so very much per person when divided into 8 portions.

This recipe isn't gluten free but I'd love it if one of my gluten free friends would try making it with gluten free bread and tell me if it's good! 


This is a vegan recipe.

Enhanced by Zemanta

Mexican Style Rice

| No Comments
close bright mex rice 2.jpgLast year I learned to make Mexican style rice from a cookbook called "The Vegtetarian Table; Mexico" by Victoria Wise.  Since then I have adapted it and this summer I managed to freeze a few batches of the tomato puree that goes into to make it easier to make on a whim.  It's easy to adapt this to your own tastes by omitting the cilantro, for example, or making it spicier. 

One of the main things I changed with this recipe is the method for cooking the rice.  I tried it Wise's way a few times but I dislike the results when rinsing the rice first so I simply make my rice the way I've been making rice for twenty years now except for the one step of adding the puree to the rice before the water.

This Mexican style rice is very clean tasting, unmuddled by too much oil, salt, or any lard, yet it has full flavor and is satisfying to eat with just a little chimichurri sauce.


mex rice plain 2.jpgThis picture was taken before adding the cilantro- it's very good this way too but I can't get enough cilantro so I prefer adding it in.  Plus-green is pretty!


Mexican Style Rice

Ingredients:

2 med sized tomatoes
1/2 yellow onion
1 jalapeno pepper (can use a whole pickled one if you don't have fresh)
1 garlic clove
1/2 tsp salt
1 cup long grain Basmati rice
1 Tbsp olive oil
2 cups water or broth
1 bunch cilantro, minced


Method:

In a food processor puree the tomatoes, onion, pepper, garlic, and salt until completely smooth.

In a medium sauce pan heat up the olive oil on medium high heat and add the rice to it.  Stir the rice continually for a few minutes until you see the grains turning a little white (don't let them brown!), then add the puree and keep stirring so it doesn't stick to the bottom of the pan.  When most of the liquid is absorbed into the rice, add the water. 

Turn the heat up to high until the water reaches a boil then turn it down to a simmer (low heat), cover, and let it cook for 20 minutes. 

Remove the lid and if all the liquid has been absorbed* remove from the heat.  Add the minced cilantro and fluff the rice with a fork.


mex rice first view 2.jpg
More recipe notes:  I always make rice with plain water but if you like you can use vegetable, chicken, or beef broth.  This is an all season recipe if you use canned tomatoes in the winter and spring.  If you preserve your own whole tomatoes and have medium sized ones then simply substitute those for the fresh.  Most tomatoes that are canned whole are roma tomatoes which are smallish, so if you're using commercially canned tomatoes use four of them instead of just two.  I don't buy fresh hot peppers in the winter or spring so I usually use pickled jalapenos in place of them which I really enjoy for their slight tang. 


This recipe is gluten free
This recipe is vegan


*When I cook rice with plain water the cooking time is always exactly 20 minutes but because of the slightly variable nature of the size of tomatoes and onions I have found that occasionally this recipe needs a little extra time to cook off all the liquid.  Mexican rice is supposed to be moist but there shouldn't be any water in the bottom of the pan.

Enhanced by Zemanta

Cooking basics: How to Bake Acorn Squash

| 3 Comments
blond acorn 2.jpg Baking squash might seem too ridiculous to an experienced cook to explain but considering how many people I've met who've never baked their own pumpkin for pie, I think it's important to cover the basics.  I like to think that if I died before teaching my son how to cook, he could come to my homesteading blog to learn how to do the basic things that mothers tend to teach their children in the kitchen before they ever set eyes on their first cookbook.

I would like to say, then, that there is no life instruction too ridiculous to teach a person who doesn't already know it. 

cut lengthwise 2.jpgAcorn squash are usually a dark green on the exterior (the ones in these pictures are mutants from a local farmer!) and medium to light yellow on the interior.  Their flesh is somewhat stringy and a little on the watery side compared to sugar pumpkins or other large squash. 

1.  Preheat your oven to 375 degrees.

2.  Cut your acorn squash lengthwise.  Try to cut it into two even halves.  You can see that I didn't completely succeed with one of mine!

stringy 2.jpg3.  Using a strong metal spoon scrape the seeds and the most fibrous part of the squash cavity out. 

facing down 2.jpg
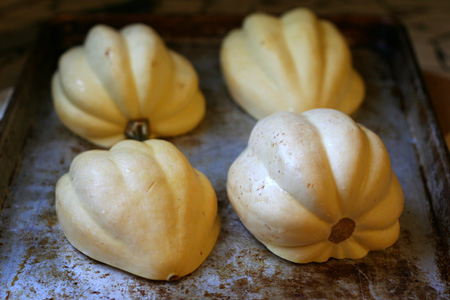
4.  Place face down on a sturdy baking sheet.  Preferably not a non-stick.
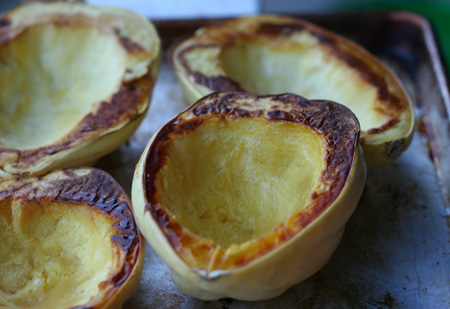
baked 2.jpg
5.  Bake until tender.  How long this takes will vary depending on the size of the squash and the thickness of the flesh but it should take somewhere around 45 minutes.  To test done-ness: you will be able to stick a knife into the skin with no resistance when it is done.

Things to consider:

Some people like to brush the undersides of the squash with olive oil.  You may do this if you like but it is unnecessary.

Many people like to cover their squash with aluminum foil.  This is also not necessary and I would recommend you don't do this to prevent waste in the kitchen.  I've heard some people say that it helps cook the squash faster by holding heat in but at least with regards to acorn squash you get the same effect by cooking them face down in halves. 

You can cook the squash at 350 degrees and just expect it to take a little longer.  I cook all my squash at 375 degrees which I think lessens the over-all cooking time without overcooking it too fast which a higher temperature might do.

What now?

Stuff them:
  They're perfect for stuffing because a half a squash is a good single serving size.  If you fill it with grains and beans you will have a complete protein and with some salad on the side you will have a very nutritious meal.

Dress them:  While still hot add a tablespoon of butter, a sprinkling of salt (about five shakes from a shaker) and some grinds of fresh pepper (also about five), then eat it.  Simple good food.  You can do this right in the skin or if you prefer you can scoop the squash out of the skin and then add the butter, salt, and pepper.


Enhanced by Zemanta
the macro shiny brie 2.jpgI don't often make hors d'oeuvres but I've noticed that when I don't provide something to snack on while making Thanksgiving dinner everyone starts getting edgy and unthankful. 

I'm not a person who gets up at the crack of dawn to brine a turkey, partly because the thought of shoving my hand up a dead turkey's "cavity" to remove its innards isn't something I can handle before 5pm (when the experience can be fortified with strong drinks), but mostly I don't make turkey because I'm a vegetarian.  In fact, I don't labor in planning Thanksgiving dinner much at all.  A day or two before my family gathers (we're a very small group) my mom and I discuss options.

This is the exception.  I have been planning to make this again since I made it twice last fall.  I took notes last year on the improvements I wanted to make and have been looking forward to making it again ever since. 


the cherry factor 2.jpgPeeling shallots takes a lot of time.  The ones from the store are slightly easier than the ones I grow myself which have a thin dry skin that doesn't like to come off.  I made my sister do the peeling last year so this year I performed an experiment in an attempt to improve the tedium of peeling.  Garlic roasts well in its papery skin and squeezes out afterwords very easily, so why not roast the shallots in their skins the same way? 

I peeled all of the bigger cloves and left the rest.

shallot experiment 2.jpgUnfortunately, the experiment didn't prove successful.  Yes, shallots can roast well in their skins but they are just as difficult to remove when they're sticky as when they're dry.  Most importantly, the bulbs that were skinned first got browned nicely whereas the ones left in their skin were browned on the skins only.  So the lesson is: peel your shallots.  Even though it's a pain in the butt.  Better yet, assign a minion to do the peeling.

This appetizer takes time and effort to make.  It's worth it.


godlike food 2.jpgCiabatta, Caramelized Shallots, and Brie with Sour Cherry Sauce


Ingredients:

2 lbs of shallots, trimmed and peeled by your minion
1/2 cup olive oil
salt
pepper

Sour Cherry sauce:
1 quart sour cherries, pits removed and chopped in half
4 cups sugar
(Alternatively: 1/2 jar sour cherry jam loosened up with water)

1 loaf of Ciabatta bread (or other good quality rustic bread)
2 wedges of Brie cheese, room temperature (Camembert is a good substitute)


the setup 2.jpgMethod:

Preheat the oven to 350 degrees.  Spread the shallots out on a baking sheet, drizzle all of the olive oil over them, then sprinkle with salt and grind some pepper on them.  Put on a rack in the middle and bake for up to an hour and a half, making sure to turn them with a spatula every ten to fifteen minutes.

Sour Cherry Sauce:

Add the sour cherries and the sugar to a medium sized sauce pan.  If the cherries are frozen, let them thaw enough to start liquefying the sugar before turning the heat on.  Once the cherry juice starts mixing and dissolving the sugar turn the stove on to high heat.  Bring the cherries and sugar to a boil, then reduce the heat to medium and cook for 20 minutes, stirring frequently to prevent scorching.  Remove from heat and let cool until everything else is ready.  As it cools it will thicken.

When the shallots are done (they should be browned but not scorched, see picture above) remove them from the oven and put them in a bowl with a couple of forks for serving.

Pour the cherry sauce into a bowl and provide a spoon for serving.

Slice the Ciabatta bread in appetizer sized pieces (each slice cut in four pieces worked well for me but you can cut them bigger if you like) and arrange them on a plate. 

Place the brie on a plate with knives.

If your guests are unfamiliar with or worried about the presence of fruit near their cheese and bread, go ahead and serve them up a piece before they have time to think about it. 

Each piece of bread gets a generous bit of cheese, a shallot or two, and a small spoonful of sour cherry sauce. 

sans cherry blood 2.jpgRecipe Notes:  If you can't get your hands on sour cherries, cranberries would make an excellent substitute.  The important thing is to make a sauce that is both tart and sweet.  The shallots are sweet by themselves so using a fruit that is just sweet will result in a somewhat vapid experience.  A red currant sauce might be good here too.  Please don't use sweet cherries.  They don't work. 

About the rind of the cheese:  I don't eat cheese rind.  I will dig into a wedge of brie completely gutting it, leaving just the velvety moldy exterior like a cheese-hungry termite which has caused some gasps of shock from others.  Some people view it as a crime to eschew the rind.  Some simply view it as the act of a philistine.  I've been told by many people that the French ALWAYS eat the cheese rind, however, I was finally gratified to find out from an actual French person that this isn't true.  He said many French people don't care for the rind either and it is a question of personal taste, not a point worthy of hysteria or snobbery.  I included the rind in these pictures and then fed them to my rind-eating relatives.  I think the rind is picturesque and since most people I know eat it, it seemed natural to include it for the shoot. 

The heat and cooking time: You can cook the shallots in less time at a hotter oven temperature but the results will not be quite as good.  Less heat keeps the shallots form scorching and consequently takes longer.  A good caramelization time.  Give it the time. 


best food ever 2.jpg
Enhanced by Zemanta

How to Make a Roux

| 2 Comments
roux base 2.jpg
What is a roux?


A roux is a cooked mixture of equal parts flour to fat which is used to thicken sauces, gravies, and soups.  Making a roux is very basic and is such a versatile cooking component that every cook should know how to make it.

The flour used is wheat and it works equally well with whole wheat as it does with refined wheat.  The whole wheat will give the roux an earthier fuller flavor while the refined wheat will be more flavor neutral. 

The traditional fat to use is clarified butter but you can use regular butter, rendered fat, or oil.  I nearly always use butter when I make a roux but I recently tried using olive oil because I've heard it works well and my friend Angela uses oil frequently and suggested I give it a try.  I did and it worked just as well as the butter so I can happily recommend that vegans learn to make roux in their kitchens using oil instead of butter.

A traditional roux is simply this:
Equal parts fat to flour, cooked.

That's very simple.  But before I give you the method to making the roux I want to mention that I always season my flour before I make the roux.  I like to mix in a ramekin the following:

3 tbsp flour
1 tsp salt
1/4 tsp freshly ground pepper
2 shakes of cayenne pepper

This is the flour mixture I use when I make cheese sauce and I love the kick of cayenne gives to the cheese.  Even when I don't use the cayenne, I always add salt and pepper to my flour.  (If you will be adding hot peppers a dish in which you will be adding the roux, omit the cayenne and only add later if your dish still needs more heat)  


roux 2.jpgHow to make a roux:

Heat up the fat in a skillet (or soup pot) at med/high heat, if it's butter don't let it brown*.  Whisk in the flour (or flour mixture).  When it's all mixed together it should form a thick paste as you see in the picture above. Whisk the paste for two to three minutes. 

It is important to cook it for at least two minutes because this removes the raw taste of flour from the dish you will add your roux to.  I always make a light roux and so never cook it for more than five minutes before adding liquid.  The longer you cook it the deeper the color and flavor.

After a few minutes you either take it off the heat and transfer to another container for use later, or add liquid to create a sauce, gravy, or soup base.
 

making roux 2.jpg
What to do with the roux:

You can add any liquid to a roux that suits your purpose: water, stock, or milk are the most common liquids to add depending on what you're making.

How much roux you need for a recipe will sometimes vary.  I have found that usually 3 tbsp of flour to 3 tbsp of butter is sufficient to thicken 3 cups of milk for making a cheese sauce for one casserole dish of macaroni and cheese.  I also find that this is adequate for thickening a medium batch of soup that serves 4 -6 people.

When you add your liquid to the roux you need to whisk constantly (and briskly) as you pour it into the pot to prevent lumps from forming.  I generally pour half my liquid in and make sure to get all the roux mixed well.  As soon as I see that the roux is mixed well with no lumps I add the rest of my liquid.  This will take longer to thicken.  It may take up to 20 minutes to fully thicken.

If you use milk (or cream) you want to make sure that you don't let it boil hard.  Watch it carefully and as soon as you see it begin to bubble, turn the heat down to med/low and whisk it frequently to prevent burning. 

Once the roux has thickened your liquid, it's ready for whatever application you intend it for. 

Here are a couple of examples of what you might do next:

If you're making a cheese sauce you turn the bechamel (roux + milk = bechamel sauce) off the heat and add two cups (or more) of grated cheese, stir, then add to pasta.

If you're making a soup you would add your veloute (roux + stock = veloute) to some sauteed vegetables or you would start adding your vegetables to the pot with your veloute. 


Every cook should know how to make a roux and I hope my instructions give a nudge to anyone who hasn't learned to make one yet. 


*Unless you are following a recipe for a brown butter sauce or
Enhanced by Zemanta

How To Make Couscous

| 4 Comments
fluffy couscous 2.jpg
Couscous is a granular pasta usually made of semolina.  I have never steamed couscous which is the traditional method of making it.  I first learned to cook it from Deborah Madison's book "Vegetarian Cooking for Everyone" (which I highly recommend every cook have a copy of) but in rereading her instructions today I see I've gone completely off-book over the years with my own preparation.  My way works very well for me so I'm going to share it with you.


How To Make Couscous

Ingredients:

1 tbsp olive oil
1 cup couscous
2 cups water or broth


Method:

Pour the olive oil into a large saute pan and put the stove on high.  Add the couscous and stir to coat with the oil.  Stir the couscous for 1 to 2 minutes until it slightly colors. 

Add the water or broth and shake the pan gently to evenly distribute it.  Keep the burner on high until the water starts to bubble.  Turn the burner off and put a lid on the pan.

Let it sit for 7 minutes.

Remove the lid and fluff the couscous with a fork.


Recipe Notes:  Sometimes it clumps a little and if it does you just have to use the fork to break them up.  I don't mind some clumps because they are never gummy or sticky for me.  I never eat couscous plain so by the time I mix vegetables into it the clumps usually break up completely anyway.  I don't salt my couscous.  If I'm going to use salt I add it at the same time that I add other things to it. 


Enhanced by Zemanta

Mustard Potato Salad Recipe

| No Comments
another potato salad 2.jpg
Although potato salad is a dish that generally doesn't get brought out until Memorial day, I think of it as an all season recipe because the ingredients can be found in your pantry all year.  When fresh dill is available it's even better and then can be considered more of a summer indulgence.

Growing up I wasn't a big potato salad fan because most of the time it's made with too much mayonnaise, a condiment I like only in very moderate portions and never so much that I feel like my mouth is full of it.  This potato salad recipe has only a half a cup of mayonnaise and just as much mustard which gives it just enough creaminess to compliment the potatoes and the sharp tang of mustard shines.


Mustard Potato Salad Recipe

makes 6 servings

Ingredients:


8 medium red potatoes, cubed
1/2 cup mayonnaise
1/2 cup spicy brown mustard
1/2 red onion, diced fine
3 hard boiled eggs, roughly chipped
2 dill pickles, diced medium
1 tsp dried dill or 1 tbsp fresh (minced)
20 grinds fresh pepper
1 tsp salt

Method:

Steam the potatoes until tender but not falling apart.  It usually takes about ten minutes for me but I rely more on testing with a fork than on timing.  When they're done put them in a large mixing bowl and let them cool for about fifteen minutes.

Once the potatoes are cooled down add the rest of the ingredients and stir them together well. 

This potato salad recipe is good eaten still warm or completely cold.


Recipe notes:  I used to make this potato salad with a couple of stalks of celery and if you like you can do this too.  I stopped being in the habit of using celery when I made greater efforts to shop seasonally for my produce.  Where I live celery is a late summer and early fall vegetable.  When using a large amount of prepared mustard try using a milder one first and then if you want it to be spicier try using a Dijon or experiment with other stronger prepared mustards.  The main thing is to remember that mustard is the star flavor in this recipe.

This recipe is gluten free IF the mustard you use doesn't use vinegar made with malt or wheat.

This recipe is NOT vegan.  To convert this recipe to be vegan: omit the eggs and use a vegan mayonnaise.
Reblog this post [with Zemanta]

Mustard Vinaigrette Recipe

| No Comments
mustard vinaigrette 2.jpg
I rarely buy salad dressing from the store since my close friend Chelsea taught me to make my own years ago.  I use this dressing for every kind of salad and I think it makes a great dressing for pasta with roasted summer vegetables. 

A salad dressing becomes very personalized in no time at all.  Once you learn to make one basic recipe, you will adjust it to suit your taste almost without thinking about it, and indeed, if you make your own frequently you won't need to think about it at all or look up recipes.  It will become second nature. 

If you don't already have a favorite mustard vinaigrette, try this one!  I use my favorite stone-ground spicy brown mustard but many people prefer the sharper bite of a Dijon mustard; use what you love best because mustard is the star of this dressing.

Chelsea tends to make her dressings in batches just large enough for her needs each time, I prefer to make enough to put it in a bottle and use it for a few different salads.  This recipe will make one full bottle of dressing.  I often double it so that I have two bottles premade.  This dressing will last indefinitely in the fridge due to the vinegar and mustard content, though it will thicken with the cold and may need to be warmed to be poured.

Mustard Vinaigrette Dressing

Ingredients:
1 cup olive oil
1/2 cup red wine vinegar
1 tbsp mustard
3 roughly chopped garlic cloves
1 1/2 tsp dried thyme
1/2 tsp salt
1/4 tsp freshly ground black pepper


Method:

Add all the ingredients to a tall sided bowl or very large measuring cup and then blend them together really well using an immersion blender.  I like using the immersion blender for this dressing because it emulsifies the oil enough to thicken it and make it creamy. 

To make by hand:
Instead of roughly chopping the garlic, if you want to make this without a blender, I suggest chopping the garlic very fine first or crushing it well in a mortar and pestle.  Then add all the ingredients to a medium sized bowl and whisk them well.  This method will not create quite as thick and creamy a consistency but the flavor will be just as wonderful.

Variations: Chelsea sometimes likes to add a teaspoon of sugar to her dressing to round out the sharpness of the vinegar, you might like to try it her way to see what you think, many dressing have sugar in them for this reason.  I prefer mine without but it's worth experimenting.  My preferred herb for dressing is thyme but there are many dried herbs that are just as good in this dressing.  One suggestion to try is: 1/2 tsp each of thyme, marjoram, and basil.   


This recipe is gluten free: if the vinegar is gluten free, red wine vinegar usually is but if you have Celiac's it is wise to be sure.  You can use an apple cider vinegar as a substitution.

This recipe is Vegan
Reblog this post [with Zemanta]

Veggie Burgers: Quinoa and Kidney Beans

| 7 Comments


Most people I know are omnivores so when they want something substantial to put in a bun they simply go for the classic meat burger.  I was brought up as a vegetarian and have never reconciled myself to the taste, and more particularly, the texture of meat.  So when I want to eat a substantial sandwich I turn to veggie burgers, and I don't want ones that are meaty and chewy.  I want one that is flavorful, robust, and textured without being toothsome.  So I am on a quest to develop a repertoire of veggie burger recipes that I can make, freeze, and then grab for easy nutritious meals when I haven't had time to cook from scratch.

This particular recipe can be baked or fried (sautéed) but will not hold together on the grill.  I will be experimenting with bread  crumbs which are a usual ingredient for their ability to soak up moisture and stiffen patties.  I didn't want to have breadcrumbs in this particular recipe because I wanted to keep the proportion of beans to grains at a 2 to 1 ratio.  The results are satisfying, flavorful, and just the perfect quick meal I was hoping for.

Ingredients:

4 cups cooked kidney beans
2 cups cooked quinoa
3 large carrots diced small
1 large onion diced small
3 ribs celery diced small
2 tbsp olive oil
1 bunch cilantro (chopped well)
1-2 pickled (or fresh) jalapenos (finely minced)
1 tbsp cumin
2 tsp salt

Makes 10 to 12 patties


Method: Have your kidney beans and quinoa prepared ahead of time.  Heat the olive oil in a medium sauce pan (on medium high heat) and add the carrots, onion, and celery.  Once they start lightly browning turn the heat down to med/low and stir frequently.  When the onions get soft and sticky they're done.  (It should take about 25 minutes.)

In a food processor combine the kidney beans and quinoa and pulse several times.  You want the beans to maintain texture but you want enough of them to be crushed that the beans and quinoa stick together.  Put this in a large mixing bowl.  Add the caramelized vegetables, cilantro, jalapenos, cumin, and salt and mix really well.

Form into patties.  You can make them any size you like.  I made mine palm sized and kept them fairly thick.

To cook: heat a tbsp of oil (any you choose) in a sauté pan and sauté patties on both sides until they develop a crispy brown crust.

To serve: I don't eat my veggie burgers with buns when I eat them at home.  I like to eat them with sliced avocado, some cheese melted on top, and some salsa.  These have a slight spiciness (depending on how many jalapenos you used) so if you like really spicy food you can use a super spicy salsa or a hot pepper sauce drizzled on top.  If you like your veggie burgers with a bun you can eat them with a bun as well with pickles, lettuce and tomato.


If I had sides to go along with this veggie burger, like steamed or roasted vegetables, I would use one patty per serving.  If it's going to be your whole meal, I would use two patties per serving.

Recipe Notes: I use 2 jalapenos for mine because I don't like really spicy food.  There is a wide variation in spiciness when it comes to jalapenos so be cautious.  I prefer them pickled because they have a little tangy taste to them.  Veggie burgers freeze well.  To freeze them: lay the formed patties on waxed paper on a baking sheet and freeze for several hours until they are hard, then put them in freezer bags.  For longer term freezing I recommend using a vacuum sealer.   Caramelizing vegetables takes time but in this recipe it adds an important dimension to the flavor so I don't recommend skipping it.


This recipe is vegan: unless you melt cheese on it or top it with sour cream.

This recipe is gluten free: provided the quinoa you buy was not processed in a facility that also processes wheat and if you use fresh jalapenos instead of pickled ones.


Candied Spiced Nuts Recipe

| 7 Comments


Spiced nuts make great holiday gifts but I usually make them for myself to put on salads.


Spiced nuts are easy to make and can be customized to suit your tastes.


Spiced Nuts Ingredients:

6 cups of nuts, I prefer walnuts
3 egg whites
2 tbsp water
2 cups granulated sugar
2 tbsp ground cinnamon
2 tsp ground ginger
1 tsp salt
1 tsp nutmeg
1 tsp allspice
1/2 tsp cloves


Method:

Preheat oven to 300.  In a mixing bowl, beat the egg whites and water until frothy.  Fold the nuts into the egg whites gently until they are completely coated.

Combine the sugar, salt, and spices and blend well.  Add it to the nuts, stirring gently, until it is mixed in well.  Spread the nuts onto two large greased cookie sheets.  Bake uncovered for 20 to 25 minutes being sure to stir the nuts a couple of times while cooking.

Let the nuts cool completely before storing.  They will not be crisp when they first come out because of the egg whites but after they are completely cool they will be.  Store in an airtight container.


Coating the nuts with egg whites.


Coating the nuts with the spiced sugar.


Making them pretty if you're generous enough to give any away.


Recipe Notes: If you haven't worked with egg whites before then you may not know why you have to be so gentle with them: when you beat them they fill with tiny bubbles which give them loft but if you stir too roughly or too much the bubbles collapse.  In this recipe it isn't as vital to maintain loft as it is in other recipes that use meringue like souffles, but it's the gently cooked whites that give a special crunch to these nuts.  Feel free to play around with the spices- leave one out if you like (or all of them if you want candied nuts with no additional flavor).  If you know your oven runs hot, try setting it a little lower.  If you don't like walnuts, like I've used here, use any kind of nut you like.


Recent Comments

  • angelina: We ate it up very fast! read more
  • Tarrant: oh my-this sounds appealling read more
  • Aimee: Oh, YUM. read more
  • angelina: For crying out loud, Angela, get on the vegan version read more
  • little big: I totally have that book! And the part II that read more
  • Angela (Cottage Magpie): Oh, that sounds gooooood! My favorite soup in all the read more
  • meigan1cameron: "White Bean And Basil Salad Recipe" is my one the read more
  • Karmyn R: I would not have thought to put squash with black read more
  • angelina: Allison- greet and compliment the snowdrops for me, will you? read more
  • Laura: Hi! This looks great, I always love your recipes! I read more