Category Archives: DIY journal and projects

How To Sew Your Own Dinner Napkins

Dinner Napkins With A Rolled Hem Finish

ant-napkin-scale-2.jpg 

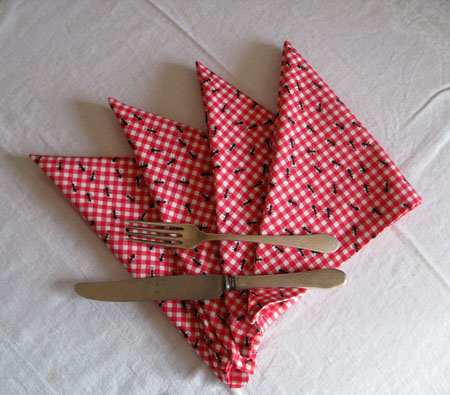
Many people use cloth napkins instead of paper ones, not because it’s better for the landfills and forests (though it is) but because they’re superior to the paper ones.  At the dinner table they are much more satisfying to wipe fingers on (they won’t tear) and they’re big enough and tough enough to clean up spills and other little table emergencies.
Another benefit of using cloth napkins is that they’re frugal because they can be washed and used again and again, you save money on buying paper napkins every month.  The best part is that they’re really easy to make yourself.  This is an excellent project for a beginner sewer and a super quick one for an experienced sewer.  It takes only 1 yard of fabric to make 4 generously sized cloth napkins.
 the-finish-2.jpg

You can make them all match or you can make them to mix and match.

 
pretty-napkin-2.jpg

You can make them out of many different fibers but I suggest using either a 100% cotton or a 100% linen or a combination of linen and cotton.  I would avoid using any synthetics.  My supplies list assumes you already have scissors and other necessities of sewing such as an iron.

What you will need:
1 yard of fabric
matching thread

 turning-2.jpg
Step 1: Fold your yard of fabric in half, and then in half again.  Use a ruler to mark straight square lines in an 18″ x 18″ size.    If your yard is a little short you may need to cut your squares a little bit smaller to compensate which is fine, you’ll still have a nice sized napkin.
 turning-under-2.jpg
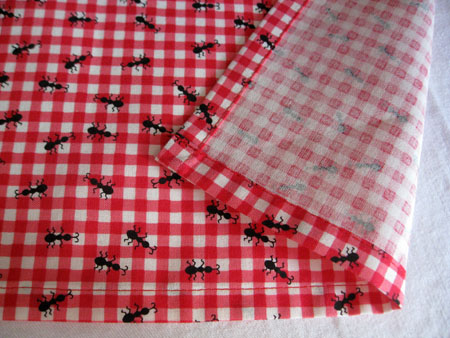
Step 2: On each napkin fold two parallel edges of the fabric under 3/8″ or 1/2″ and press them flat.  Fold each of them under again the exact same width and press.  (See the two pictures above to see the folded edges.)
 stitch-down-2.jpg
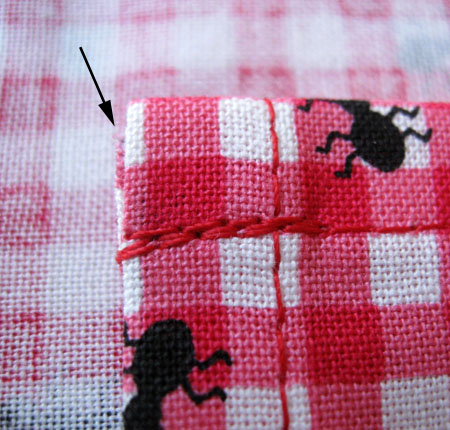
Step 3: Stitch along the edge of the hem on all the pressed sides of the squares.  Press again.
 backside-view-2.jpg
Step 4: On each napkin fold the remaining raw edges under 3/8″ or 1/2″ and press them flat.  Fold each of them under the same width again and press.
Step 5: Stitch along the edge of the hem on all the pressed sides of the squares.  Press again.

trim-2.jpg Step 6: If you have any edges hanging out of the hem at the corners carefully trim it off.  This isn’t necessary but will help your project look more professional.  Do  a final pressing.

Project notes: You can make your napkin hems as narrow or as wide as you’re comfortable with.  I never measure when I make them, (though I suggest that all beginners use a seam gauge until they can consistently eyeball widths), and I nearly always end up right between 3/8″ and 1/2″ hems which is a fraction I don’t care to calculate.  The important thing is that all your hems are the same width as each other.
I insist on a lot of pressing while sewing but once I’m done with a project I rarely ever press it again.  With these dinner napkins you won’t need to press them after washing if you line dry or if you fold them immediately when they come out of the dryer.  I recommend washing all fabrics in cold water and using a low setting on your dryer to prevent shrinking.

6 Tips To Help You Sew Like A Professional

I remember when I was a kid that it was pretty much a popularity killer to wear home-made clothes.  My mom made me some clothes for a while and I thought they were pretty snazzy but I have never forgotten the attitudes of scorn that others had about it.  Then when I went to Fashion Design School I learned to use industrial sewing machines and how to draft patterns and over the years of sewing professionally and working in other capacities in the garment design field I have come to understand where the attitudes have come from with regards to home sewing.

One of the major issues with making clothes from commercial patterns is that they generally use really large seam allowances.  They do this to give the home sewer more room for adjustments and errors.  Unfortunately the wider the seam allowance the bulkier the seams and the more clumsy a garment or project will look.  For commercially made garment the standard seam allowance is 1/2″.  It’s details like these that can make a big difference.

While most home sewers can’t draft their own patterns and don’t have control over the seam allowances (you can’t just use a 1/2″ seam allowance where a wider one has been given in a pattern because then the pieces won’t come together properly) there are a lot of things you can do to make your sewing look more professional.  Attention to detail is, as always, is the key to excellence.


See how puckered this hemmed edge is?  I pressed the fabric under first and it still has a puckery appearance after sewing.  It needs to be steam pressed again.  (See photo below)


1.  Pressing is vital. This is the single most important tip I can give you.  Unless the fabric you’re using was just bought off the bolt a half an hour ago, you need to press your fabric before cutting your pattern pieces out of it.  If you don’t you may end up with irregular pattern pieces that won’t fit well together.

Press your seams open.  Use steam on all fabrics and use the hottest setting allowable for the fabric you’re working with.  I can’t emphasize this enough: press open ALL of the seams you sew in any project as you go along.  Don’t wait until the end.  After each step in a project- PRESS THE SEAMS OPEN.  Also press any edges you’re turning under for hemming BEFORE you stitch it.  Your stitching will look much nicer.  Then press again.  Please see the difference this can make in the photos I have provided.
 

The first photo is how some sewers leave their edges.  It looks unprofessional.  This photo shows what  a difference pressing makes.

I have used many irons over the years both expensive and cheap and aside from the incredible industrial steam iron I got to use at my first industry job, the best one I’ve ever used in 20 years is the Black and Decker metal based iron I bought for $30.  It’s heavy, simple, and has few parts that can break.  I highly recommend this iron.

2.  Thread Color. Matching your thread to your project may seem like an unimportant detail but I assure you that the closer your thread matches the fabric color the less anyone will notice the thread at all.  Unless you are purposely using a contrasting thread for design effects, the thread is something no one should notice.  If you use a thread that’s darker or lighter than your fabric then any mistakes you make, such as uneven top stitching, will become more noticeable.

3.  Machine Tension. Your machine comes set at the average tension that is appropriate for sewing most things.  Over time the tension wheel can shift or the tension may need to be recalibrated by a professional sewing machine mechanic.  If the tension is off it’s almost always the upper thread tension that needs adjusting.  The middle setting is generally appropriate (around 5).  Read your sewing machine manual for information on what settings are appropriate for different projects and test it out.

How to know if the tension is off?  If your thread is so tight that it puckers the fabric as you’re sewing it, the tension is too tight.  If the seam is so loose that the thread is slightly loopy- the tension is too loose.

If you don’t have a manual for your machine, take it in to get a tune up and make sure you ask the person who works on your machine to explain to you how to use the tension dial.

4.  Top-stitching give the whole show away. Any time you have to do top-stitching you have a chance to make your project/garment look more professional.  Top-stitching should almost always (unless specifically directed otherwise) be 1/8″ from the edge.  It takes practice to make a clean even stitch but pay attention and you can do it well.  When you’re just learning to do top stitching: go slowly!  Use a seam gauge to help you keep the stitching at the length from the edge you need until your eye learns to judge it without measuring.  Set the gauge at 1/8″ and every couple of inches of sewing check the gauge against where your stitches are.  Pretty soon you won’t need a gauge.

5.  Bulky seams are gauche. Although I have never been sloppy with my drafting or sewing when I’m doing it professionally, I have been known to get quite lazy with the projects I do for myself.  One the steps I have occasionally skimped on is trimming the corners of seams when a pattern directs me to.  Or trimming the seam allowance around curves where typically more bulk in the seam prevents it from laying flat around a neckline or armscye.  The lesson I learned is that neglecting to take these little steps resulted in a visibly bulky seam that looked bad.  Whenever instructions say “trim the fabric…” do it.

6.  Making the fit. One of the greatest benefits of sewing your own garments is that you can make clothes that actually fit you.  If you are able to buy a commercial pattern, sew it up with no adjustments, and fit in it perfectly you just might not be human and I am most certainly extremely jealous!  What you need to remember is that patterns are designed to fit average body types.  Most people aren’t actually average.   The more you adjust a pattern to fit your figure specifically, the more professional it will look.  Each pattern includes instructions on how to make basic changes in fit.  Read these through.  Do test fittings as you sew your project.  Don’t wait until you’ve sewn a waistband on to see if the waist size is really a good fit on you.  Hem length is easy to adjust in a pattern so if you’re a little taller or a little shorter than average this is an easy detail to adjust.


How To Replace Weather-stripping On Doors

old weatherstripping 2

If the weather-stripping on any of your outside doors looks like this, you need to replace it and now that the cold weather has arrived, if you haven’t already done so, now is the time to tackle this easy project.  That gap between the door and the floor is big enough to let a lot of warm air out of a house which wastes energy and makes it harder to be comfortable inside.  It may seem that a little detail such as this can’t make a big difference but the truth is, all the little ways your house lets heat out adds up to a big expensive picture.  Big gaps under doors is a great place to start sealing your house against the cold.

 tools for the job 2

The tools you will need: Power drill (or screw driver and hand drill)*, hack saw, metal file, scissors, pencil, replacement weather-stripping (door sweep) for doors, and possibly a tape measure.

 pencil marking 2

First Step: Using the reverse mode on your power drill with the appropriate sized screw driver bit, remove the screws from the existing weather-stripping and pull it off the bottom of your door.  Carefully line up one end of the old weather-stripping with the new and if they aren’t the same size use a pencil to mark the difference in the size.  In my local farm store there was only one size of weather-stripping available (“standard”) which fits a standard sized door such as a front door.  My kitchen door is narrower than a standard door so I had to cut my weather-stripping down.  If you don’t need to cut yours to size, skip to the last step!

 cutting rubber 2

Second Step: Before you cut the metal part of the weather-stripping with a hack saw you need to cut the rubber sweep with scissors, as shown above.

hack sawing 2

Third Step: Use a hack saw to cut through the metal part of the weather-stripping.  I balanced mine over my sink but you can also use two saw horses to do the job if you have them handy.  Start sawing slowly and straight, once your cutting line is established you can go more quickly.  The main thing is to saw in a smooth straight motion, if you angle your saw at all it will get stuck.  When you’ve cut all the way through the metal, carefully feel the edge- if it’s rough and there are any jagged bits, use a metal file to smooth them out.  You don’t want to have anything sharp protruding from the bottom edge of your door where it can catch on socks or skin!

 marking the spot 2

Fourth Step: weather-stripping comes with pre-drilled holes, if you cut it down you will almost certainly need to add one to the cut end so that both ends of the weather-stripping are securely screwed to the door.  Use your old piece of weather-stripping to determine where the end hole should be.  Line it up evenly with the new piece and using a pencil, mark where the hole needs to be.

drilling 2

Fifth Step: Use a drill bit that matches the size of the hole.  You can figure this out by fitting drill bits into the pre-drilled holes until you find the right size.  Start drilling the hole.  Be sure to hold the drill with a steady hand because the metal will give some resistance at first.  Put some downward pressure on the drill but not so hard that it can bend the metal you’re drilling through.

 drilled hole 2

Be careful to clean up the metal dust because it can be sharp!

weatherstripping 2

Sixth Step: Position your weather-stripping on the bottom of the door so that the rubber sweep just touches the floor.  You don’t want the rubber to be low enough to bend or drag on the floor because it will be ruined quickly with all the opening and shutting of the door.  You want it to just make contact.  My floor is uneven, being an old house means many surfaces are not even, do the best you can.  Screw it into place using the holes provided (and the one you drilled if you had to customize the size).    That’s it!

Project Notes: As you can see, if the door your working with is standard size, replacing old weather-stripping is unbelievably easy.  You just remove the old and screw on the new.  You may notice I didn’t include any uses for the tape measure- yet it’s on the list of tools.  This is because there may be rare instances where you are putting weather-stripping on a door that doesn’t already have it.  In this instance you will need to carefully measure the bottom of your door to determine if you need to cut down your weather-stripping or not.


*We are a family who appreciates old  hand tools but having a power drill was one of the best home investments we’ve ever made.  If you don’t have one, you can still do this project, but it will simply take more muscle power.  (Not that that’s a bad thing!)

Hot Spot Remedy: DIY Pet Apothecary

hot spot remedy 2

My dog got her first hot spot recently and I couldn’t afford to take her to the vet.  She was licking the base of her tail obsessively and after a couple of days of this a completely bald round spot developed on her tail.  I noticed that it started getting slightly infected looking and so I looked up what the cause might be.  It became clear very quickly that she had a “hot spot” which is a section of skin on a dog that becomes infected with bacteria (known to vets as pyotraumatic dermatitis) and itches, so the dog licks it until it becomes worse and eventually the most infected spot loses its fur and the sore may even ooze with pus.

In my dog’s case I am almost certain the cause was fleas because we had neglected to give her flea medication for several months.  Other causes of hot spots may be irritated anal sacs, allergies, thick coats, or grooming issues such as tangles and mats.

A friend of mine who works in a feed store looked up the ingredients in their most highly recommended hot spot treatment and suggested I might be able to make one of my own.  (Thank you Blaize!!)  The three ingredients she mentioned were the chamomile, aloe vera, and the tea tree oil.  It seemed that my dog’s hot spot was very itchy and I had harvested some plantain from my yard because I’d read about its anti-itch properties and I decided that this would make a good addition to the hot spot treatment.

Once I made up the remedy I sprayed my dog liberally with it directly on her hot spot and then I did my best to lift the fur of her heavy coat to spray the skin surrounding the hot spot.  Before this she had been very agitated about her sore area and when I tried to examine the area she growled and warned me to keep my hands off.  She had been chewing and licking the area obsessively so it was easy to notice that after the first spray application she must have felt some immediate relief.  She stopped bugging the spot almost immediately and only tried licking it again after an hour or two at which point I applied another round of spritzing her hot spot.

Within 24 hours she stopped touching her hot spot entirely and it was able to scab up and heal.  She still has a little bald spot on her tail but there’s no sore left at all.

What You’ll Need:

Non reactive sauce pan (either stainless steel or enamel coated)

Wooden spoon

Strainer

3/4 cups dried chamomile

3/4 cups dried plantain

1 Tbsp aloe vera juice

6 drops tea tree oil

2 cups water

8 ounce spray bottle

Method:

In a nonreactive small saucepan add the chamomile, plantain, and water and bring to a boil.  Turn down the heat and simmer herbs for a half an hour or until the water has reduced by about half.

Strain out the herbs and then pour the liquid into the spray bottle.  Add the aloe vera juice and the tea tree oil drops.  Shake well every time before use.

Store in the refrigerator.

To use:

Shake up the remedy and then spray it on the affected area liberally.  Rough the fur up around the hot spot to expose the skin and spray as you do it.

You should notice an improvement within the first few hours.  Be very careful to notice if the exposed skin of the hot spot reacts to the spray.  If it shows any signs of getting worse stop using the spray immediately.  Though all the ingredients in this remedy are mild and in normal circumstances shouldn’t cause your dog’s skin to react, there is always the possibility that your dog may be allergic to one of the ingredients so use common sense.

Apply the spray to the hot spot every couple of hours until your dog stops worrying the sore and lets it begin to dry out.  Stop using the spray when the hot spot scabs up and your dog is no longer paying any attention to it.


Winterizing Your Home and Garden: Autumn around the urban homestead

wild spoils 2

What Autumn means to you is probably influenced by your climate.  Some people are already getting snow while others are still fanning the sun off their faces.  Here in Oregon it’s turning cold and rainy.  While Autumn is not my favorite season (winter is) I do love this time of year.  The past several years I spent most of my autumn canning apples, pears, and the last of the summer tomatoes.

I love the change in seasonal produce, seeing the winter squash get piled in my local produce sections and in the farmer’s market stalls for the last couple weeks of market.  I love cooking with potatoes, celery root, and cauliflower.  Soon my local market will have giant stalks of locally grown brussels sprouts and I’ll want to buy more than I can cook.  My CSA will have them too.  Soup is my favorite food and there are endless varieties of soups to make with the produce on hand.

In your garden you are probably harvesting the last of your tomatoes, squash, and beans.  What now?  Here are some things you might do in your garden:

  • Spread compost on your vegetable beds to overwinter.  The fall is the best time to amend your soil because then it is ready for you to use in the spring.  If you have chickens and some beds you won’t be planting in until spring, cover the beds with the hay you clean out from your chicken run.  Chicken manure is excellent for the garden but needs a few months (preferably six) to mellow because it ‘s a “hot” manure and spreading it on a bed with plants could cause the plant roots to burn.  Overwintering your chicken waste gives it plenty of time to mellow and will be safe to plant in by spring.
  • Rip out all the dead vegetable plants from the garden.  I never do this because I’m too lazy but fall is a great time to tidy up your garden and tuck it in for the winter.  Just be sure not to prune anything unless you have extremely mild winters.  Prune in the spring when most of the winter frost damage is done already and you can prune to the undamaged parts.  If you prune now you could lose more of your plants.
  • Winterize your more tender perennials if you live in a climate with a hard winter such as wrapping your roses or your potted fruit trees in insulation or with burlap stuffed with mulch to keep them warm.  In my climate the winter damage is usually pretty mild and fruit trees don’t need to be wrapped.
  • Bring in any tools or garden furniture that might get ruined by the weather.

I don’t do a lot with my garden during the fall but I live in an old house and one of my concerns right now is winterizing my house so that it will retain heat longer and use less energy to keep comfortable.  Last winter we had our kitchen door constantly opening and closing for our dog and cats and often it was simply left open for hours at a time.  We don’t mind a fairly cold house but every late afternoon the temperatures would drop and we’d put the heat on.  This summer my husband installed a dog door and we’ve been training our cats and dog to use it.  It’s harder for the cats to use it because it had to be installed fairly high off the floor level, yet they learned to use it faster than the dog.  Chick was really frightened of it for the last two months.  At last, just this week, all the animals are using it without coaxing and we’re practicing keeping the kitchen door shut. 

Just in time too because this morning was so cold I had to put the heat on for the first time in months!
One of the things people with old houses often do is replace old windows with new ones.  Unfortunately the old wood windows are almost always replaced with vinyl or aluminum windows and though these supposedly come with a warranty far exceeding wood windows I have known fewer old wood windows to leak than vinyl or aluminum.  If you have to replace your windows, consider replacing them with new wood windows.  They cost a lot more but look a million times better and with just a little care I promise they will last longer than your other choices.  I believe in maintaining the integrity of the old homes in our country so I’m passionate about this.
There are other things you can do to reduce the energy use in your house during winter:

  • Curtains.  A lot of people have thin curtains if they have curtains at all.   Consider making or buying lined heavyweight curtains to put up during the winter months.  Even a sturdy cotton will keep out a surprising amount of cold.  Just be sure the curtains completely cover the window when they’re closed.  You can open them during the warmer hours during the day and close them near evening as the temperatures outside drop.
  • Storm windows.  Around my town many old homes have storm windows as an alternative to replacing antique windows.  If installed correctly they serve to make your old single paned windows double paned.  It creates an extra barrier between the wet weather and your windows as well.
  • Weather stripping.  Check all the outside doors for gaps near the floor.  Weather stripping is inexpensive to buy and easy to install.  Our kitchen door which leads outside has gaps so big at the floor that light can be seen to flood through the openings in the morning.  I bought some weather-stripping  for it.  The door is fairly narrow so I’ll either need to cut it down to size or see if my hardware store carries the correct size.
  • Put insulation around any exposed water or sewage pipes if your area gets cold enough to freeze water.  It doesn’t always get that cold here but last winter it got cold enough to freeze one of our pipes and we were without kitchen or bath water for two days.  (This won’t actually reduce your energy usage but is simply a good thing to do before it’s too late.)

If you have the time, now is also a good season to clean your house and get it really well organized.  During the wet and cold months all the little things that irritated you all summer will become more irritating when you’re also having to worry about mud, coats and scarves everywhere, the holidays looming up, and when so much more of your time is centered around indoor activities.  This week end my husband and son agreed to clean up our living room and put everything away.  It was such a huge relief!  We have so far to go getting things around here running smoothly but that is what I’m thinking about now.  Putting things away, making more counter space, cleaning off high piled surfaces, solving little house problems that aren’t a huge deal but add a little constant irritation to my life.

What I am going to do today,  right now,  the second I get done posting:  Our under the sink cupboard, where we keep our kitchen garbage can, doesn’t latch shut.  For months now our dog has been rooting around in it daily for any tasty little crumbs she might find.  She drags empty cracker bags to the already ratty looking lawn and shreds them up and comes back for whatever else she can find.  I’ve been in such a flurry of work and scrambling to get other bigger things taken care of that I have continually put off taking care of this problem.

The funny thing is that it’s a simple fix.  I bought the magnetic hardware already.  It is ridiculous that it’s taken me this long to get around to it.  So I will do that today and not have to get angry when I see this week’s trash spread out across our yard.

What are you doing to winterize your home and garden?

Elderberry Syrup: DIY Apothecary

bottled syrup 2

I used a bottle with a swing top closure (with rubber washer).  I’ve had this one for years and have used it to store flavored vinegars, liqueurs, and now elderberry syrup.  I believe I bought it at a Cost Plus.

elderberries macro 2

I foraged these elderberries from my neighborhood.  When foraging for elderberries:  never pick red ones, they are not safe to eat, even when cooked.  The twigs and bark of elderberries are toxic and should never be taken internally and when you’re harvesting the berries, which are very small, be sure not to leave any stems on the fruit as these are also toxic.  The berries should not be eaten raw either*.  Cooking makes them safe to use in pies, jams, liqueurs, wines, and syrups.  They also become more flavorful when cooked.

elderberry syrup 2

Pouring the water into the pot of berries.

Cold medicine 2

The finished syrup poured into a little shot glass.

Elderberries have been used medicinally for hundreds of years.  The bark,  stems, and leaves have been traditionally used as healing poultices and the berries are used to make syrups to strengthen the immune system, to lessen the symptoms and shorten the durations of colds, coughs, and flus.  The berries have also been used to make jams, jellies, and pies.  It is important to always cook the berries- they are astringent when raw and could potentially make you sick.  Cooking them not only neutralizes the chemicals in them that can make you sick, but it enhances the unique flavor of the berry.  You can use both the American native varieties or the more traditional European varieties to make this recipe.

The proportions of ingredients here come from Rosemary Gladstar’s book “Herbal Recipes for Vibrant Health”.  Rosemary Gladstar is one of the leading herbalists in our country and it was her herbal training books that my mom learned from to get her herbology certificate.

I had to do some considerable research to find out about recommended dosage.  I ended up calling my mom for information and what she told me confirmed the information I found online.  It is not possible to overdose on elderberry syrup.  The only ill effect anyone might experience  is a little diarrhea if you eat/drink too many elderberries**, but only in the same way some people experience this eating too much of any fruit.

  • For boosting your child’s immune system during the cold season take a teaspoon every morning and every night.
  • For lessening the symptoms and durations of coughs, colds, sore throats, and flu: take 1 to 2 teaspoons every couple of hours until you are better.

What my mom said is that you can experiment to find what is most effective for you and your family members.  I found some recommendations on line that suggested taking 2 tablespoons a day for adults and 1 tablespoon a day for children to help avoid colds.  So there is a tremendous amount of flexibility here so that you can find what works.

Elderberry Syrup

Ingredients:

1 cup fresh or 1/2 cup dried elderberries

3 cups of water

1 cup honey

Method:

1.  Put the berries in a medium sized nonreactive sauce pan and cover them with the water.  Bring the water and berries to a boil and then turn the heat down to low and simmer for 30 to 45 minutes.

2.  Smash the berries and then strain them out.  (I use butter muslin over a strainer and then squeeze the muslin to get all the juices I can out of the berries.)

3.  Add the honey and stir well.

4.  When the syrup has cooled put it into bottles (or jars- but bottles will make for easier pouring), label, and store in the refrigerator.   The syrup will keep for 2 to 3 months.

You can freeze any extra elderberries to make additional batches of the syrup as you need it.

*I have seen some extension service information that says you can eat the berries raw, I ate one before I read that they could potentially not be safe to eat raw and was thoroughly unimpressed with the flavor so I am not tempted to eat more raw.  Most sources state that you should cook the berries before eating.

**This is provided you aren’t allergic to elderberries.

If you want to know more about foraging and identifying elderberries read this:

Elderberry: Plant Profile

Round Pot Holder Tutorial

pot-holder-2.jpg This is a tutorial for making the round pot holders I used to make and sell in my store.  They are easy to make once you’ve gotten the hang of stitching the bias binding in place.  I cannot stress the importance of not skipping the basting and pressing steps.  Your bias binding will look much nicer and the end product will look more professional if you take these steps.  Pot holders might not be the most glamorous item to sew but they can add instant cheer to a kitchen and the truth is that everyone who cooks needs them.  Because cooking is hard on them, you will always need more.  They make great gifts and don’t use a lot of materials.  (Please see the asterisk for information about total yield you can expect from the materials list I’ve given.)

Materials needed for potholder:

Piece of paper

1/4 yard main fabric

1/4 yard contrasting fabric

1/4 yard Insul-brite (insulated batting)

1 yard double width folded bias tape

Method:

1.  Draw a 9″ circle on the piece of paper to use as your pattern.  Cut it out.

2.  Cut one circle out of the main fabric and one circle out of the contrasting fabric.*

3.  Cut 2 circles of the Insul-brite (you need the double layer to protect your hands from the heat properly.)

4.  Cut a 5″ length off of the yard of bias binding and stitch it shut along the open end and then trim the ends with pinking sheers.
 basting-2.jpg
5.  Sandwich the Insul-brite between the front and back fabrics.  Baste all the layers together.  This is important: you must not skip the basting because the layers will certainly shift while you baste the bias binding onto the edge if you don’t do this step.
 bias-binding-2.jpg
6.  Baste the bias binding around the edge of the pot holder pulling gently as you stitch to reduce puckers.  Do the best you can to keep the tape even on both the front and back.
 turned-under-2.jpg
7.  When you get to the end, tuck the raw edge under.  (You may need to trim it if there’s too much left over.  You should only tuck about 1/2″ under.)

 unpressed-3.jpg

8.  Your pot holder should now look like the above picture.  Do you notice that the binding is a little puckered?  At this point you need to iron your potholder making sure to press the binding as smooth as you can.  You need steam to do an effective job.  Do not skip this step.  This will make a big difference in the quality of your finished product.
 pressed-3.jpg

See how much smoother this looks once it’s been pressed?

looped-2.jpg 9.  Carefully stitch the bias binding down.

10.  Remove the basting stitches.

11.  Take your 5″ length of bias binding and put one end on the top front (covering the folded under part of the binding) and one end in the back.  This is easy, but difficult to explain so refer to the picture above to see how to place it.  Stitch it in place.

*1/4 yard of your main fabric will yield 4 potholder fronts, or 2 complete pot holders with the same front and back.  I like doing all my sewing in bulk so my recommendation is to make four pot holders at the same time.  The 1/4 yard of Insul-brite is just enough for four pot holders.  If you decide to make 4 of them at a time you will need 1 yard of bias binding for each additional pot holder.

Fabric note: Because you will be using pot holders to protect your hands from very hot pots and pans, you should only make pot holders from 100% natural fibers.  The best choices are cotton or wool.  Synthetic fibers have a tendency to melt when they come in contact with high heat which, if they melted close to your skin, could cause you some serious injury.
You may also enjoy doing these projects:
Make a mushroom smock
Create a gift larder (includes a different pot holder tutorial)

Create A Gift Larder

canned-goods-2.jpg

Home canned goods wrapped in a handmade dish towel.

tea-cup-candle.jpg

Beautiful homemade gift basket collection including potholders, decoupaged match boxes, tea cup candle, and home canned goods.

bethanys-gifts-2.jpgBethany's gifts 2

Different presentation from Bethany’s gift larder.

match-books-2.jpg

Close up of decoupaged match boxes and tea cup candle.


Note from the headmistress Mrs. Williamson: Bethany Mann, best known as Bitter Betty from her creative crafting blog Bitter Betty Blogs, spent many years working for Nordstrom’s as the regional manager of the window displays before deciding to leave her career to stay home and pursue a more personally rewarding path of becoming an urban homesteader and professional craftsperson.

On her blog you can find useful craft and homesteading tutorials.  Here she is presenting several projects you can easily make from things you likely already have, or can find inexpensively at thrift stores, to create a gift larder.


Give What You Have

By Bethany Mann

Every Urban Homesteader can appreciate the happiness and security of a full pantry, made by your own hands. It is also a great idea to keep a full gift larder, making gifts in batches, to give for most any occasion. Using what you have on hand and recycling make these gifts both green and affordable, which makes giving and receiving them that much better.
I have started a gift larder of my own. It began with putting up some extra preserves with nicer labels. I have moved on to also putting up a few other items that are great to keep on hand. These projects are ideal to do in the wintertime, while the garden is resting.
I do try and reuse as much as possible and some of these items required little or no new purchases to create.

Thrifted Teacup:
Clean the teacup thoroughly.
Chop up old candles and crayons, or new candle wax, into tiny pieces. I like to use the big pillar candles after the wicks get buried and they are no longer useful… but often still have a pound or so of wax left. Half-burned tapers are even easier to chop up. The wick bits are skimmed off after melting.
Melt in a tin can over a pot of boiling water.
(Do not heat in oven, with direct heat, or in the microwave,
as this is a huge fire hazard.)
Prepare the teacup by putting a new cotton wick into a wick clip and tying to a bamboo skewer that has been laid across the top of the teacup.  The wick should extend up from the bottom of the cup.
Pour the melted wax slowly into the cup to the desired level.
Let cool overnight.
Best given with:

Decoupage Matchboxes:
Take the slider off the box of matches.
Cut paper to fit. Reuse wrapping papers and pretty gift cards or magazines.  You can use just about anything!
Use decorative shears to cut borders.
Punches can add pretty 3-d elements to the boxes.
Coat the flat non-strike surfaces with Mod-Podge.
Place the paper and let dry, pressing out the air bubbles as you go.
You can either add a topcoat or not, as you desire.
Glue the 3-D punch-outs in place.
Another couple of items that always seem to be needed are the ubiquitous pot holders and dish towels. Everyone uses them – and they wear out and get shabby so quickly.
These also make a great extra to add to the jar of jam.  The dishtowel can even be used as wrapping!
I use scraps from my stash to make the potholders and trim the dishtowels.
A day or two at the machine, and you can have a nice little stack ready to give.

Quickie Potholders:
Cut 3 strips of coordinating fabric for each front panel.
Strips should measure 4×9 inches.
Cut one rectangle that is 10×9 inches for back panel.
Sew strips together (1/4 – inch seam allowance) and press open seams.
Place front panel, right sides facing on back panel, and pin if you desire.
Sew around the perimeter leaving a 4 inch opening at the “top” of your potholder.
Layer in 2-3 layers of cotton batting or recycled towel and smooth flat.
Hand stitch (or machine stitch) the opening closed, inserting a loop of ribbon with which to hang the holder.
Machine or tie quilting makes this project even nicer.
I machine quilt mine in a loose square spiral pattern.
Handmade dish towels can be trimmed with patchwork, stamped with potato prints, or embroidered to match.
Often freshly-baked goodies are gift enough, but a sophisticated presentation can be a little tricky. I am trying to avoid using plastics too much and the prints on the average tins are usually “not my style.”
On the upside, that is easily changed.

Peace Tins:
Thrift store purchased tins are cleaned and sanded.
Several coats of a non toxic (check label – some are okay for kids’ rooms) spray paint applied to both top and bottom.
Find a plate that is slightly smaller (by 1.5 to 2 inches) than the lid.
Trace it on the lid, and also on contact paper.
Use blue tape to mark the peace symbol lines on the contact paper and cut out along the lines.
Re-assemble on the lid using the circle line as a guide.
Spray paint the lid white and let dry.
Remove the contact paper.
Wash, line with wax paper, and fill with cookies.
I also keep an eye out for clean baskets while thrift shopping. People donate these like crazy. These are cleaned, sometimes painted and filled as needed for whatever occasion may come up.
Why not give yourself the present of never having to make a mad dash to the mall or pull an all nighter and set up a little gift larder all your own? You’ll probably want to send yourself a Thank You card every time you use it.

Make Your Own Knit Washcloth

washcloth-3.jpg 
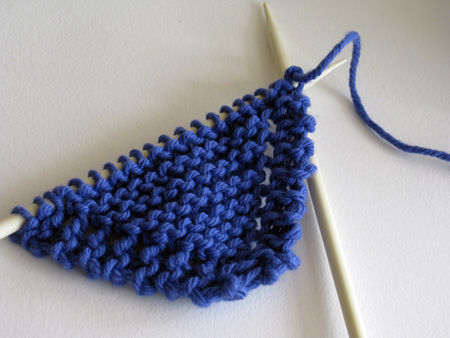
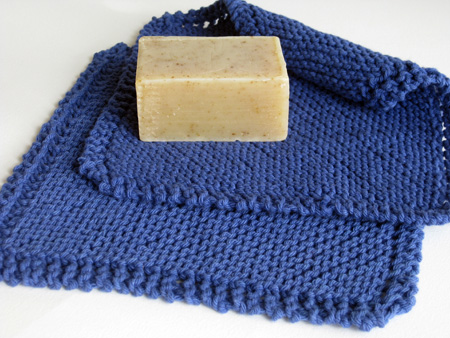
This project was created and brought to you by my very close friend Lisa E. who is an excellent knitter with an Etsy shop called Knitpotato where you can buy pretty scarves, felted bags and bowls, and super cute crocheted caps.

 washcloth-1.jpg
Lisa is always experimenting with ways she can recycle and reuse the things she already has at home.  She gardens, preserves food, and is an excellent cook.   She is always inspiring me to use what I have in the cupboards to whip together amazing meals.  I hope you will try her project and check out her shop.
 washcloth-2.jpg

Make Your Own Knit Washcloth or Dishcloth

Why would anyone want to knit a washcloth? Because they are quick and easy to make, and the process is oh so satisfying! Knitted cotton washcloths are durable and become super soft the more they are used and laundered (machine wash and dry). Did I mention economical? One ball of cotton yarn, readily available at your local craft store for a couple of bucks will make two washcloths. Better yet, if you have odds and ends left over from other projects, it is a great stash-buster!

Making knitted washcloths is a great project for the beginning knitter or for anyone wanting a simple and rewarding project. If you are new to knitting and don’t have a friend or relative to show you the ropes, just get on the web and find a tutorial for any knitting technique you are not familiar with. You will be well-versed in the knitting basics after the first one (cast on and bind off, knit, increase and decrease), but I bet you won’t want to stop until you have a good supply for yourself and for last-minute gifts.

This project is knit on the bias.  The first half you will increase one stitch on each row creating a triangle shape, and the second half you will decrease one stitch on each row to make a square. These increases and decreases create a pretty eyelet border. 

The eyelets make it easy to hang to dry when you are finished using it.

You can easily adapt this pattern to make a baby blanket if you keep increasing until you have the desired size.

Get set to crank out a stack of these babies and have them ready for birthday presents or stockpile them for a great Christmas present along with a special bar of soap.

You will need:

Size 6 – 9 US knitting needles

1 skein 100% cotton yarn such as Lion Brand Cotton or Lily Sugar’n Cream

Instructions:

Cast on  stitches.

Row 1: Knit across row.

Row 2: K2, yarn over, knit to end of row. (5 st)

Repeat row 2 until you have 40 – 45 stitches depending on the desired size of your finished washcloth.

Next row: K1, K2tog, yarn over, K2tog, knit to end of row.

Repeat until 4 stitches are left. Knit one more row and then bind off.

Make A Mushroom Smock: Recycle A Men’s Shirt

smock-6.jpg

Here is a fairly quick and easy project you can do to make use of men’s shirts that may have grown too shabby for the office or for dressing up.  If you don’t happen to have any lying around your own house, they are easy to find at thrift stores for a couple of dollars.  Smocks are  great garments to have around for cooking in, mucking out chicken runs, doing yard work, or wearing while canning.  They cover your clothes more fully than most bib aprons.

Sewing skills needed: ability to apply bias binding to a seam edge and experience making and stitching appliques.  This project is appropriate for intermediate level sewers.

Materials needed:

1 men’s shirt

3 yards narrow bias binding

matching thread

contrasting fabrics for applique (1/8 yard each of 3 different fabrics of your choice)

fusible web (1/8 yard should be enough)

2 pieces of paper

smock-11.jpgThe shirt before adulteration.

This project is easiest if you have a dress form on which to make your alterations.  If you don’t have one, you will need to use a friend or family member to model the shirt while you pencil in the shape of your neckline.

smock-4.jpg

1.  Pencil in your desired neckline.  There is no science to this.  You can keep the neckline high if you prefer for more coverage or scoop it out lower for a looser fit.  Sketch it out using your dress form for guidance to help make each side as even as possible.   Try to follow the natural curves of the neckline of the dress form or the person helping you.
In the front you want to keep your eye on where the buttons are and sketch your cutting line either just above a button or just below it.
In the back you want to avoid cutting into styling details that are already sewn into the shirt such as yokes with pleats.
 
smock-3.jpg

2.  When you are satisfied with the shape of the neckline, cut the shirt along the lines you have made.  Then cut the sleeves off of the shirt as well.  Don’t widen the armscye until you try the smock on after this first cutting.
Once you have tried it on you can widen the armscye if you need more room (a smock should be a comfortable garment) and make any adjustments to the neckline that you feel will improve it.
 
smock-7.jpg

3.  Now measure your neckline and your armscye and add 1″ to each measurement to allow for turning the ends under.  If it’s a little longer than you need you can snip the excess off when you’re finishing the edges.  It is better to have a little too much than not enough in this case.

4.  Stitch the bias binding on your raw edges.
 
smock-5.jpg

At this point you have a usable smock and if you like it plain then you’re set to go.  But making an applique is such an easy embellishment that I urge you to do it.  My mushrooms give me joy every time I see them and it is the little touches like these that make putting on an apron or smock so enjoyable.

To Make A Pocket:
1.  Using one of the pieces of paper measure out a rectangle that is 8.5″ wide  x 9.5″ tall (use a T-square ruler if you have one). 

Note: if you are petite you may need to make a smaller pocket, depending on the width of the cut open sleeve of the men’s shirt you’re using.  I have simply supplied you with the measurements I used.

2.  Cut open one of the shirt sleeves that you removed and press it.

3.  Pin the rectangle to it at its widest point, making sure that if there are stripes you line them up with the straight edge of the paper.

4.  Cut it out.

5.  press the top of the pocket under 1/2″ and then turn it under 1/2″ again and stitch it down.

At this point you need to make your applique which you will sew to the pocket before stitching the pocket in place on the smock.

1.  On your second piece of paper draw out 2 mushrooms (I made one slightly bigger than the other).  Keep in mind that you will be cutting the stem from the top so that you can use contrasting fabrics.  Cut the mushroom shapes out.  You should have 2 stems and 2 caps.

2.  Using your paper cutouts as patterns, cut out one each of these in the fabrics you have chosen.

3.  Now use your mushroom pattern to cut out fusible web.  You don’t have to use the fusible web but I find it makes appliques so much easier to stitch without having the fabrics pucker.

4.   On your ironing board, lay all the fabric mushroom pieces together on the pocket with the fusible web between them and iron them in place.  (Do not move your iron back and forth.  Just place the iron over the applique and apply gentle pressure for several seconds.)

5.  Use a narrow zig-zag on a shortened stitch length (or an applique stitch,  if you have one) to stitch the pieces in place.
The Last Step- stitching the pocket on the smock:

1.  Turn the sides of the pocket under 1/2″  and press them.

2.  Turn the bottom of the pocket under 1/2″ and press it.

3.  Place the pocket on the shirt.  If you have stripes try to match them up (but don’t agonize, this detail will not be noticed by others, just by you if you can achieve it.) and pin it in place.  I placed mine about 1.5″ from the hem of the shirt.  Place it where it feels comfortable to you.

4.  Top stitch the pocket edges down.
Now show me your work please!  I want to see the pretty smock you’ve made.