Walnut Pesto

walnut pesto 2

This is just about the easiest sauce to make. It’s also quite fast.   If you weren’t aware of it, you may like to know that walnuts are rich in the fatty acids every health guru has been going on and on about lately. The Omega-3’s.   So this is a healthful dish. Will this cost you many points in calories? Heck yeah. But if you only eat a cup of it, and the pasta is home made, the points are not wasted on your hips.

Here’s what you do to make it:

Put the following ingredients in your food processor;

1 1/2 cups lightly toasted walnuts

1/3 cup olive oil

3 medium garlic cloves (roughly chopped)

1 tsp salt

freshly ground pepper to taste

1/4 cup boiling water

Pulverize the heck out of it. When it’s all ground up, slowly add the olive oil.
When you’ve got a smooth paste, add about 1/4 cup boiling water.

Add it to 16 oz  hot cooked pasta of your choice.  (You can use half the walnut sauce on the 16 oz of pasta if you like a real light coating of sauce, or you can use it all.  I prefer more sauce.)

Recipe Note: You can add a little of the pasta cooking water to the sauce to make it even creamier.  I always add a liberal amount of Parmesan to each serving but it is delicious without the cheese.  An excellent accompaniment to this dish are roasted vegetables, my favorite being roasted asparagus.


Make Your Own Knit Washcloth

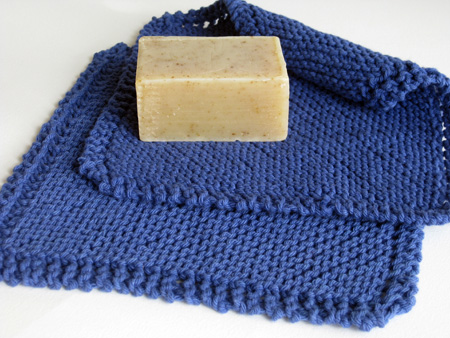
washcloth-3.jpg This project was created and brought to you by my very close friend Lisa E. who is an excellent knitter with an Etsy shop called Knitpotato where you can buy pretty scarves, felted bags and bowls, and super cute crocheted caps.

 washcloth-1.jpg
Lisa is always experimenting with ways she can recycle and reuse the things she already has at home.  She gardens, preserves food, and is an excellent cook.   She is always inspiring me to use what I have in the cupboards to whip together amazing meals.  I hope you will try her project and check out her shop.
 washcloth-2.jpg

Make Your Own Knit Washcloth or Dishcloth

Why would anyone want to knit a washcloth? Because they are quick and easy to make, and the process is oh so satisfying! Knitted cotton washcloths are durable and become super soft the more they are used and laundered (machine wash and dry). Did I mention economical? One ball of cotton yarn, readily available at your local craft store for a couple of bucks will make two washcloths. Better yet, if you have odds and ends left over from other projects, it is a great stash-buster!

Making knitted washcloths is a great project for the beginning knitter or for anyone wanting a simple and rewarding project. If you are new to knitting and don’t have a friend or relative to show you the ropes, just get on the web and find a tutorial for any knitting technique you are not familiar with. You will be well-versed in the knitting basics after the first one (cast on and bind off, knit, increase and decrease), but I bet you won’t want to stop until you have a good supply for yourself and for last-minute gifts.

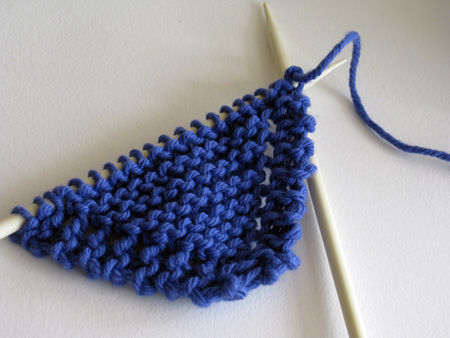
This project is knit on the bias.  The first half you will increase one stitch on each row creating a triangle shape, and the second half you will decrease one stitch on each row to make a square. These increases and decreases create a pretty eyelet border. 

The eyelets make it easy to hang to dry when you are finished using it.

You can easily adapt this pattern to make a baby blanket if you keep increasing until you have the desired size.

Get set to crank out a stack of these babies and have them ready for birthday presents or stockpile them for a great Christmas present along with a special bar of soap.

You will need:

Size 6 – 9 US knitting needles

1 skein 100% cotton yarn such as Lion Brand Cotton or Lily Sugar’n Cream

Instructions:

Cast on  stitches.

Row 1: Knit across row.

Row 2: K2, yarn over, knit to end of row. (5 st)

Repeat row 2 until you have 40 – 45 stitches depending on the desired size of your finished washcloth.

Next row: K1, K2tog, yarn over, K2tog, knit to end of row.

Repeat until 4 stitches are left. Knit one more row and then bind off.

Dandelions (Taraxacum officinale): Plant Profile

dandelion-2

Dandelion

Taraxacum officinale

Asteraceae (Sunflower family)

true-dandelion1

Picture Above: Dandelions

Dandelions are native to Europe but have established themselves around the world.  They thrive in moist sites: meadows, lawns, pastures, and most likely in your own garden.  It is a perennial herb whose leaves grow in clusters around the root crown and whose long tap roots exude a milky juice.

The dandelion is both a food and a medicine.  Its leaves contain a number of nutrients including: iron, zinc, boron, calcium, silicon, and is especially high in potassium.  It is also high in vitamins A, B complex, C, and D.

As a food you can add young dandelion leaves to salads, to stir fries, or pasta dishes.  It is best to pick the leaves from crowns that have not yet flowered because once the plant flowers the leaves become tougher and more bitter, though you can still eat them if you choose.  The root can be dried and then used as a coffee substitute.  The flowers have traditionally been used to make wine.

As a medicine the dandelion plant has proved to be one of the safest and best diuretics because, unlike conventional diuretics, it is extremely rich in potassium so that it replaces what the body loses through water elimination.   Dandelion is used as a liver and kidney tonic, a digestive stimulant, and is considered a remedy for high blood pressure.   The latex contained in the leaves and stalks is used to remove corns.

Every part of the plant is safe to use.

 identification-2

Identifying dandelions in your yard or in wild areas:

Dandelions are not difficult to find  and most people know them by sight already.  However, if you want to be sure you are collecting the true dandelion, you need to become familiar with its imposters.  In the picture above there are 4 leaves.  The first one is from a plant often mistaken for dandelion which is why it is commonly referred to as “false dandelion”.  The next 2 are both true dandelion leaves.  The last one I have yet to identify but it grows everywhere the dandelion does in my garden.  Let’s go over the identifying qualities of the dandelion.

Identifying factors of a true dandelion:

The leaves are oblong with a jagged edge.  (Think “toothy”)

The leaves grow in a rosette close to the ground.

The stems of the flowers are hollow.

There is only one flower per stem.

The leaves are smooth to the touch.

 dandelion-comparison-2

1. closed dandelion bud 2. opening dandelion bud 3. false dandelion semi-open bud 4. false dandelion bud 5. false dandelion bud

false-dandelion-collage

Picture Above: False dandelions

False dandelions grow just as prolifically in most people’s gardens and are easily confused for them if you don’t know a couple of ways to differentiate them from the real thing.

Identifying factors of Spotted catsear (false dandelion):

The leaves are oblong and don’t have a jagged edge.

The stems of the flowers are thin and solid.

The flowers and flower buds are small.

The leaves are prickly both on top and on the underside.

Once you observe the differences between the two you will have no trouble telling them apart.  The two most immediately discernable differences are the fuzziness of the leaves of the imposter- true dandelions do not have prickly, fuzzy, or spiny leaves, and the stem of the flower- the true dandelion has a thick hollow stem and its imposter has a thin solid one.

You don’t need to worry about accidentally picking the wrong one to put in your food because although there are some toxic members of the Asteraceae family, all of the dandelion look-alikes in the family are completely harmless.

You can pick the leaves to eat fresh or you can dry them for later use.  All parts of the plant are bitter, though the bitterness is much less pronounced in the young leaves.  I have eaten them in pasta and I can say that they are bitter but paired with the rich cheese sauce I used the slight bitterness was counteracted nicely.

Dandelions, in most climates, bloom for about nine months out of the year.  The best time to harvest young leaves is either in the spring or the fall.  The roots can be cut and dried for later use as well.

It is amazing how a plant we have come to regard as an enemy of our yard can be such a boon to our health and well being.  Instead of cursing yours or using poison to get rid of them, how about harvesting them to dry for year round use and why not consider making wine with them?  This little weed packs a powerful nutritional punch and is worth putting back on our list of revered plants.  I don’t generally prefer bitter greens but I have to admit that after doing a bunch of reading about dandelions I feel I have wasted a great deal of time not treating my body to such an easy source of vitamins and minerals.  I am teaching my palate some new tricks and I entreat you to join me in the adventure!

Reference Material for this article:
Weeds Of The West” edited by Tom D. Whitsun
National Geographic Desk Reference to Nature’s Medicine” by Stephen Foster and Rebecca L. Johnson
The Complete Herb Book” by Jekka McVicar
Rosemary Gladstar’s Herbal Recipes for Vibrant Health” by Rosemary Gladstar

Mustard Lentil Salad

lentil-salad

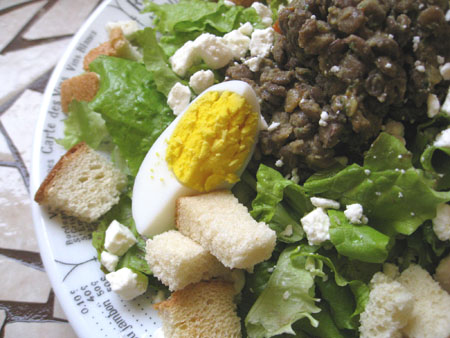
One of the biggest staples of my fridge is a ready batch of mustard lentil salad. It’s good by itself but is even better scooped onto a large bed of lettuce with some feta, croutons, and a hard boiled egg. One of the biggest blessings of this recipe, aside from being very easy, is that it is high in protein and reasonably low in fat. Fresh parsley is an amazing accompaniment to lentils for flavor and for it’s vitamins, minerals, and the digestive qualities it offers. I always keep fresh parsley growing in my yard just for this recipe.

Mustard Lentil Salad

Ingredients:

2 cups dry lentils, rinsed

2 Tbsp olive oil

1 onion, diced

2 stalks celery, sliced

2 carrots, sliced med/thin

Dressing:

1/4 cup olive oil

1/4 cup red wine vinegar

1/4 cup of favorite mustard (I used a spicy brown mustard)

1/4 cup (or more) fresh parsley

1 1/2 tsp salt (or more, to taste)

Hell of a bunch of grinds of black pepper

Method:

In a pot big enough to cook two cups dried lentils heat up the olive oil on med/high heat. Add the onions, saute until they start turning transparent, then add the celery and carrot. Saute all the vegetables for five minutes before adding the lentils and covering with water to about an inch above the lentils. Turn the heat down to low and simmer for as long as it takes for the lentils to be cooked through perfectly, usually between 2o minutes to a half an hour. If there is any water left at the bottom of the pan, drain the lentils in a colander and return to the pot, but not to the stove.

To make the dressing for the lentils:

In a container that will accommodate an immersion blender add all of the dressing ingredients. Then pulverize it until it is thick. Add to the lentils and stir well.

You can eat the lentils at room temperature, hot, or cold. I nearly always eat it cold as a salad. If you are eating it by itself it obviously needs no dressing, but when I put it on a bed of lettuce I add some dressing to the greens. You can cut down on fat by not doing this but I like a well oiled salad. Plus I like fat.

How I serve it: I put a big bed of lettuce on a dinner plate. I put about a cup of the lentils scooped onto the top. I add a sliced boiled egg, about a half a cup of croutons (when I’m being conscious, or about a cup when I’m not minding my manners and my waist), and about an ounce and a half of feta cheese.

This is a filling and very wholesome lunch or dinner. It includes protein, dairy, legumes, greens, grains, and a whole heck of a lot of vitamins and minerals. As far as calories are concerned I know that eating it as I often do will land you around 700 calories. If the rest of the food you eat in the day is leaner and smart I think the calories here are very well spent.

Note: If you have one cup of the lentils on one cup of lettuce with one ounce of feta cheese and 1 tbsp dressing for the greens it has only 470 calories. That’s also a good way to eat it and not spend so much of your daily calorie intake in one meal. I did the math on this quite a while ago as I eat it a lot and it was a staple when I managed to lose weight the first time (after having a baby. Now I have it all to lose again after breaking my hip!)

Make A Mushroom Smock: Recycle A Men’s Shirt

smock-6.jpg

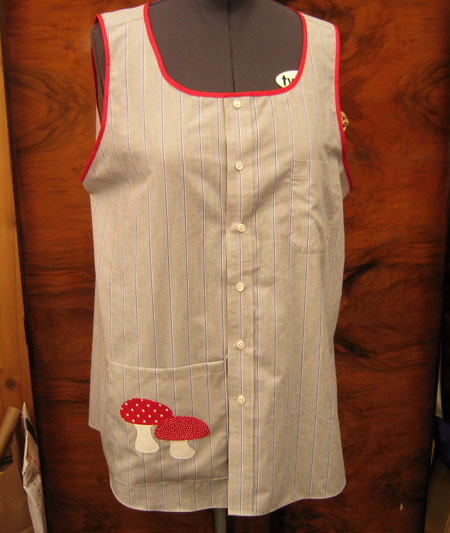
Here is a fairly quick and easy project you can do to make use of men’s shirts that may have grown too shabby for the office or for dressing up.  If you don’t happen to have any lying around your own house, they are easy to find at thrift stores for a couple of dollars.  Smocks are  great garments to have around for cooking in, mucking out chicken runs, doing yard work, or wearing while canning.  They cover your clothes more fully than most bib aprons.

Sewing skills needed: ability to apply bias binding to a seam edge and experience making and stitching appliques.  This project is appropriate for intermediate level sewers.

Materials needed:

1 men’s shirt

3 yards narrow bias binding

matching thread

contrasting fabrics for applique (1/8 yard each of 3 different fabrics of your choice)

fusible web (1/8 yard should be enough)

2 pieces of paper

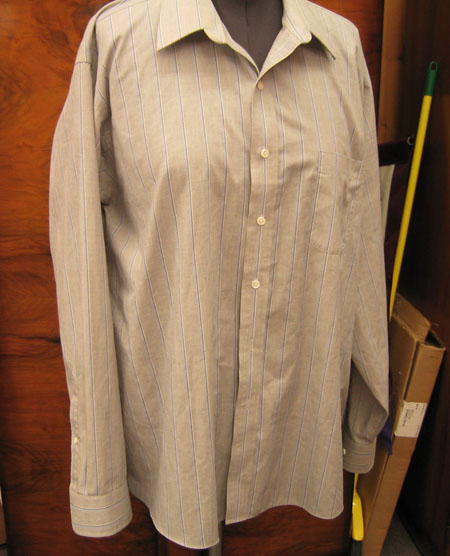
smock-11.jpgThe shirt before adulteration.

This project is easiest if you have a dress form on which to make your alterations.  If you don’t have one, you will need to use a friend or family member to model the shirt while you pencil in the shape of your neckline.

smock-4.jpg

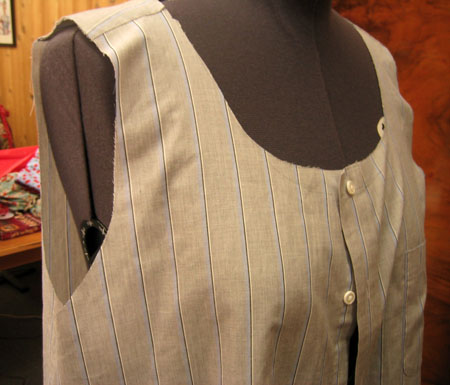
1.  Pencil in your desired neckline.  There is no science to this.  You can keep the neckline high if you prefer for more coverage or scoop it out lower for a looser fit.  Sketch it out using your dress form for guidance to help make each side as even as possible.   Try to follow the natural curves of the neckline of the dress form or the person helping you.
In the front you want to keep your eye on where the buttons are and sketch your cutting line either just above a button or just below it.
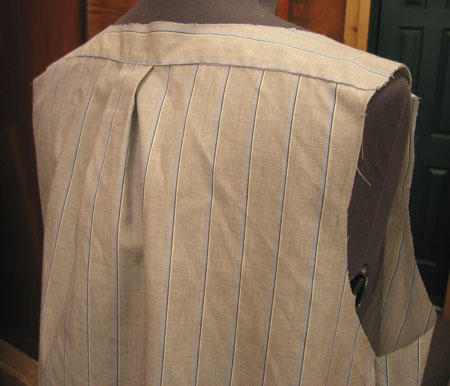
In the back you want to avoid cutting into styling details that are already sewn into the shirt such as yokes with pleats.
 
smock-3.jpg

2.  When you are satisfied with the shape of the neckline, cut the shirt along the lines you have made.  Then cut the sleeves off of the shirt as well.  Don’t widen the armscye until you try the smock on after this first cutting.
Once you have tried it on you can widen the armscye if you need more room (a smock should be a comfortable garment) and make any adjustments to the neckline that you feel will improve it.
 
smock-7.jpg

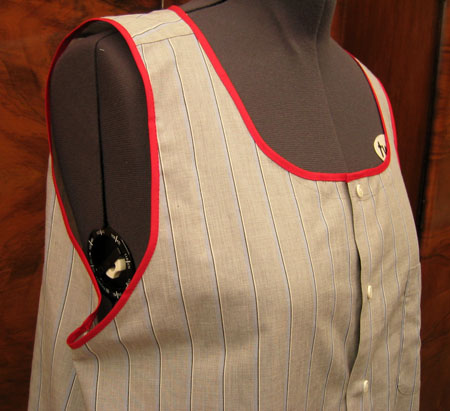
3.  Now measure your neckline and your armscye and add 1″ to each measurement to allow for turning the ends under.  If it’s a little longer than you need you can snip the excess off when you’re finishing the edges.  It is better to have a little too much than not enough in this case.

4.  Stitch the bias binding on your raw edges.
 
smock-5.jpg

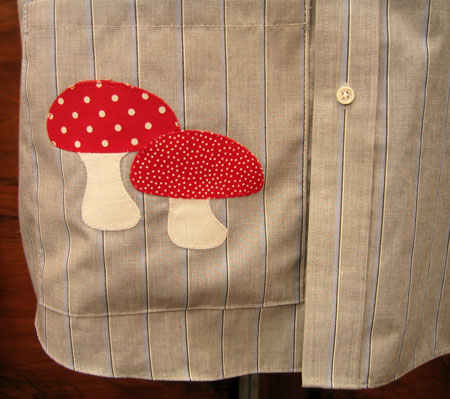
At this point you have a usable smock and if you like it plain then you’re set to go.  But making an applique is such an easy embellishment that I urge you to do it.  My mushrooms give me joy every time I see them and it is the little touches like these that make putting on an apron or smock so enjoyable.

To Make A Pocket:
1.  Using one of the pieces of paper measure out a rectangle that is 8.5″ wide  x 9.5″ tall (use a T-square ruler if you have one). 

Note: if you are petite you may need to make a smaller pocket, depending on the width of the cut open sleeve of the men’s shirt you’re using.  I have simply supplied you with the measurements I used.

2.  Cut open one of the shirt sleeves that you removed and press it.

3.  Pin the rectangle to it at its widest point, making sure that if there are stripes you line them up with the straight edge of the paper.

4.  Cut it out.

5.  press the top of the pocket under 1/2″ and then turn it under 1/2″ again and stitch it down.

At this point you need to make your applique which you will sew to the pocket before stitching the pocket in place on the smock.

1.  On your second piece of paper draw out 2 mushrooms (I made one slightly bigger than the other).  Keep in mind that you will be cutting the stem from the top so that you can use contrasting fabrics.  Cut the mushroom shapes out.  You should have 2 stems and 2 caps.

2.  Using your paper cutouts as patterns, cut out one each of these in the fabrics you have chosen.

3.  Now use your mushroom pattern to cut out fusible web.  You don’t have to use the fusible web but I find it makes appliques so much easier to stitch without having the fabrics pucker.

4.   On your ironing board, lay all the fabric mushroom pieces together on the pocket with the fusible web between them and iron them in place.  (Do not move your iron back and forth.  Just place the iron over the applique and apply gentle pressure for several seconds.)

5.  Use a narrow zig-zag on a shortened stitch length (or an applique stitch,  if you have one) to stitch the pieces in place.
The Last Step- stitching the pocket on the smock:

1.  Turn the sides of the pocket under 1/2″  and press them.

2.  Turn the bottom of the pocket under 1/2″ and press it.

3.  Place the pocket on the shirt.  If you have stripes try to match them up (but don’t agonize, this detail will not be noticed by others, just by you if you can achieve it.) and pin it in place.  I placed mine about 1.5″ from the hem of the shirt.  Place it where it feels comfortable to you.

4.  Top stitch the pocket edges down.
Now show me your work please!  I want to see the pretty smock you’ve made.

Is Making Your Own Clothes Economical?

bolts-2

Twenty years ago most fabric stores carried a large variety of fashion fabrics  so that the home sewer could, without too much effort, make clothes for herself/himself and the family for less expense than buying the same ready made clothes from stores.  Since that time most fabric stores have converted themselves into craft stores that carry mostly printed cottons for quilting with much less stock in fashion fabrics.  Another big change is that the price of good fabrics has risen while super cheap ready made clothing discount stores have proliferated to the point where asking if making your own clothes is worth it is a damn good question.

I would like to point out that whether it is economically worth your while to sew your own clothes depends on quite a few factors.  It is possible to save money sewing your own, but these are the main factors which must be considered:

What do you spend on your clothes now?

What is your sewing skill level?

What fabric resources do you have available to you?

What do you spend on your clothes at ready-made stores? If you are buying designer clothes (and most people I know are not), whether at full price or discounted price, you will obviously be able to save a tremendous amount of money making your own.  Designer patterns are available to those with the sewing skill to use them.  Most of us, I’m willing to bet, buy our clothes from more mid-range companies from department stores (looking for sales), or we scour the racks at places like Ross hoping for $5 shirts that fit.  If you are buying from heavy discount stores you are the one most likely to be saying that there is no way that sewing your own clothes can save you money.

Pricing it out (the average cost of a home made shirt):

Most decent fabrics cost between $7 and $15 per yard.  The average shirt takes between 2 and 3 yards of fabric.  Working with averages we can estimate the cost of making your own shirt: 2.5 yards x $11.00 = $27.50.  You must also figure on thread.  An experienced sewer generally has enough thread that it doesn’t need to be included in the price of every project, but let’s say you need the thread.  That’s going to cost you between $3 and $5, depending on the brand and spool size.  So let’s just stick with averages: $27.50 + $4 = $31.50

A lot of shirts require buttons and not everyone has a huge collection of them on hand, so you must figure the buttons as well.  You’re likely to spend between $1 and $10 on buttons (depending on whether you go for the discount type of simple button or fashion buttons) so let’s say you’re going to spend an average of $5 on buttons.  That brings your average home sewn shirt up to $36.50.

However, unless you’ve been collecting patterns for years in all different sizes (or know how to make your own), you will need a pattern too!  Patterns vary widely in price from $1.99 to $30.  So let’s add that onto our average home sewn shirt cost: $36.50 + $16 = $52.50  Wow, that doesn’t seem like a bargain when most of the shirts you can find at Ross cost less than $20.  So why would you spend your time and resources sewing your own if you’re not saving anything, and might in fact, be spending more to make your own than to buy ready made?

Cost cannot be looked at solely from the dollar perspective. This is true for many things.  When you’re considering home economics you have to consider quality.  The reason why designer clothes are so expensive is not just to gouge label-loving losers (a common belief, not shared by me) but because the quality of the fabrics, the care and time taken to make the fit of the clothes exquisite, and the attention to details in construction which make a garment last for years longer than their cheaper counterparts all go into the cost of designer clothes.

If you haven’t ever tried on or touched a designer garment, you should do so just to understand the difference.  I have rarely bought designer clothes but I have tried them on and examined them closely.  Details such as bound button holes, linings, tighter stitching, and enclosed seams all contribute to a garment that you can pass down through generations if it’s taken care of.  You will not find such care in design and construction in any shirts that cost less than $50.  Either the fabrics are cheap and will pill up quickly (or tear), or the stitching is shoddy and comes undone with too much wear.

The home sewer has control over many of these factors through her/his skill level.  Using shorter stitch lengths, back-stitching, seam treatments, and fabric quality are all factors that you have control over.  You can also custom fit a garment at home if you take the time to take your measurements and adjust your pattern accordingly.  If you do fittings before you’re finished you can make the waistband fit properly which is not a service you get when shopping at J.C. Penny.  You can make a $52.50 shirt seem like a bargain if you make it something that will last like a designer investment.

Although I have used average prices to illustrate the cost factor here, there are many ways you can cut down on the cost of your home sewn clothes.  It depends on what resources you have available to you in your area, or what you can find on line.  Shopping for fabrics on line is not always wise when you are buying fashion fabrics unless you are buying from a familiar seller whose quality (in general) you have confidence in.

Here are some ways you can cut down on the cost of making your own clothes:

  • Use coupons: I am generally not a big fan of coupons but JoAnne’s Fabrics frequently has 40% off coupons available for non-sale fabrics.  This can be an incredible boon for when you wish to buy costly wool blends, linens, or knit fabrics.  I sign up for their flyers and have used their coupons many times.
  • Locate a discount fabric store: bigger cities often have fabric stores dedicated to “end of run” fashion fabrics, or “end of bolt” fabrics.  These are often at a good price.  Smaller towns lack the industry that makes these stores likely to crop up, however, if you are visiting a big city near you, do a little research and see if you can find one.
  • Buy by the bolt: this is not generally possible to individuals but always ask if there is a whole bolt discount.  A bolt comes with 15 yards, generally.  This is worth buying if you buy something like a heavy cotton twill for making shorts, skirts, pants, or jackets.  You can probably get 5 garments out of a bolt.  One example of an online store that sells fabric to anyone by the bolt for a 40% discount is the Fabric Depot in Portland Oregon.
  • Buy undyed fabric. I know of only one source for this: Dharma Trading in San Rafael California.  The quality varies on their fabrics from decent to excellent.  The catch is that they come only in white/natural (a couple of them come in black) which means you will have to dye them yourself which is a cost, to be sure, and takes more time, but the price of their silks make it worth considering as an option.
  • Buy patterns on sale: most pattern companies such as McCall’s, Vogue, and Simplicity, have periodic sales on their patterns- often for 40% off.  Most of the stores that carry them will have at least one of those three on sale at any given time.  Sometimes you will see patterns on sale for $1.99.
  • Copy patterns from friends: copying patterns from friends is a great way to save money on patterns.  You will need pattern paper to do this well, but it’s worth it.  Do not cut out the pattern size you need, just lay the pattern pieces underneath the dot paper and trace the size you want including all the piece numbers and markings and notches.
  • Thrift stores: you can find good fabric, notions, and patterns at thrift stores but you need to be aware that patterns are often not complete and are already cut out to a specific size.  Sometimes it’s worth taking the chance for the huge cost savings.
  • Save buttons from old clothes: Buttons used to be so costly that no shabby garment would meet its resting place in the hearth until the buttons were removed and saved.  If you find you have to retire a favorite shirt or coat- save the buttons.  You can use them again!  I have (thanks to a favorite online friend and a local antique store) a very nice button collection.  I also buy buttons I like in different sizes when they are on sale.

Using the tips I’ve shared above I can make shirts for myself for as low as $10 a shirt,  but at a higher quality than I can buy from a store.

When it comes to home economics it is important not to find yourself unnecessarily spending $10 just to save yourself $1.  It is easy to get swayed by cheap prices of products and services offered by stores like Walmart.  I once bought a pair of pants at K-Mart for $15 which seemed like a great bargain at the time but when I put them on the next day they ripped within the first two hours of wear!  The fabric they were made of had no tensile strength which means that it was probably made of cheap short fibers.  I didn’t save myself $20 by not spending $45 dollars on a better pair of regularly priced pants, I WASTED $15.  Period.

It is telling, in my opinion, that while cheap clothes from deep discount stores have come and gone through my dresser drawers and closet ruthlessly fast over the years, the clothes that I still have, that are still in perfect wearing condition, are the ones I have made for myself.

We encourage questions here at The Farmhouse Finishing School, so if you have any, please speak up and we will do our best to answer them!

Cilantro, Bean, And Rice Salad

beans-and-rice-done

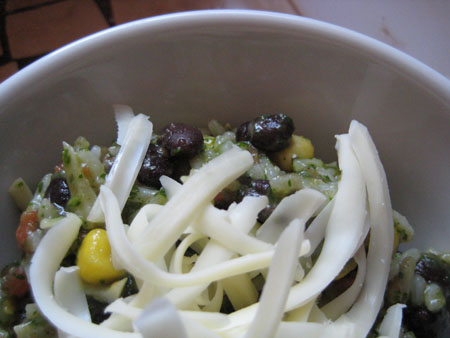
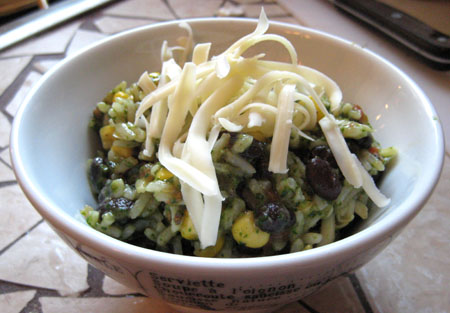
This is a great spring dish that uses the first fresh cilantro of the season to dress a melange of items from the pantry. You could make it in the summer too when there is fresh corn and tomatoes to be had but I don’t want to think about how much better it will be later when I’m enjoying the spring version now.

 cilantro-pesto

Cilantro Pesto Ingredients:

1 large bunch fresh cilantro, washed and stemmed

3 garlic cloves

2-3 tbsp olive oil

salt and pepper to taste

Rice Salad Ingredients:

2 cups cooked black beans (or two cans)

2 cups cooked Basmati rice

1 can corn

1 quart diced tomatoes

2 cups grated jack cheese

1 recipe cilantro pesto

 mixing-beans-and-rice

To make the cilantro pesto:

Put all the ingredients into a food processor and pulverize the hell out of it. You’re done.

(Or if you like to go the traditional route- put all ingredients in a large sized pestle and mortar and using your muscles, grind the hell out of them all.)

To make the rice salad:

Be sure to drain the canned goods first. Then you put all of the ingredients in a bowl together and stir well. You’re finished. Dinner is ready.

Serves 6-8

Variations:

If you’re one of those people who really likes two dishes on one plate, you could serve this rice salad with roasted potatoes, or grilled asparagus. I like it as a simple one dish meal myself. It’s great at room temperature but it’s also quite good heated. If you don’t have black beans, I think it would be superb with chick peas. I also made this with pasta instead of rice and it was WONDERFUL. If you want to add some heat to it you could add chopped up roasted jalapenos. Or chopped pickled jalapenos. What brings it all together is the cilantro pesto. If you are vegan you can make this without the cheese.

 beans-and-rice

Recipe Notes: this recipe qualifies as quick if you have the black beans in a can. I had to make mine from dried which takes time. But cooking the rice takes twenty minutes and you can make the cilantro pesto and grate the cheese while it’s cooking.

Pita Bread

pita2

This recipe is based on one I’ve been using from Deborah Madison’s cook book “Vegetarian Cooking For Everyone” which is a book I can recommend that everyone have a copy of. It’s that good. This is an easy recipe for anyone to make, even if you’re not experienced making other breads. If you have a baking stone, put it in the oven right now, before you forget. A baking stone is the best way to bake pitas, though you can use a regular baking sheet if you haven’t got one. The stone should heat up with your oven.

Ingredients:

2 1/4 tsp (1 envelope) active dry yeast

1 tsp honey

1 3/4 tsp salt

2 tbsp olive oil (plus extra for oiling the bowl for the dough)

1 1/2 cups multi-grain flour

2 cups bread flour (plus extra for kneading)

 pita1

Put two cups of water in a large mixing bowl, stir in the yeast and honey, and set aside until foamy, about 10 minutes. Meanwhile oil a bowl for the dough.
If your yeast never gets foamy it’s probably dead because you don’t bake often enough and you should use some fresher yeast.

Stir in the salt and olive oil, then beat in the multi-grain flour until smooth. Add the remaining flour in small increments until the dough is too heavy to stir. Turn it onto a counter and knead it, adding more flour as needed, until the dough is supple and and smooth. Form it into a ball and put it in the oiled bowl, turning it to be sure the top is oiled. Cover with towel and set aside until doubled in bulk which should take about an hour.

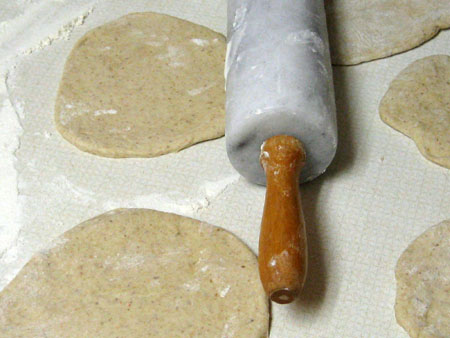
Punch the dough down and divide it into 8 pieces if you want large pitas, or 16 pieces if you want smaller pitas. I like the smaller ones better because they are the perfect size for a mini pizza for one. Roll each piece into a ball and set them all aside covered by a damp towel or do as I do and just leave them lying around the counter until it’s time to roll them out. At this point preheat the oven at 475 degrees. Let the dough rest while the oven preheats.

When the oven is ready I roll out as many pitas as I can fit on my baking stone, which is 4 if I’m making large ones, or 6 if I’m making the smaller ones. Place each one on the baking stone and let them cook for a bout 3 minutes each. Mine never completely puff up and I don’t know the reason why. Generally speaking each one will at least partially puff up and the occasional one will completely puff up. I check the bottoms of the pitas to see if they’re done- they should have only the slightest golden coloring on the bottom.

I roll out the next batch while I’m waiting for the current one to cook. If you happen to have an enormous kitchen you could roll them all out at once, but then you must not stack them on top of each other or they will stick together.

Let the hot pitas cool down on a cooling rack high enough up that my dog doesn’t eat them.

How To Preserve Citrus


salty1

Preserving Citrus

By Riana Lagarde

When Life gives you Lemons

In the Orient’s colorful markets you will see bright and sunny foods reflective of the desert landscape: green and black olives all-shades from sand to khaki to midnight, heady spices in conical stacks of saffron-red, turmeric-yellow, and burnt-sienna coriander. I am a lemon fanatic–I can eat them raw with just a little salt like an apple–thus I am always drawn to the gorgeous Suns: salt-preserved lemons bobbing in clear glass jars in those sultry markets. Dreams of chicken, artichoke and preserved lemon tagines (see the end of the article for the recipe) dance in my head to the same dizzying beat as the whirling dervishes.

Besides lemon jellies and marmalades, freezing lemons’ peels and their juices in ice cube trays, you can preserve the entire lemon. The ancient Arabic method of preserving lemons is easy and only requires three simple ingredients: lemons, lots of salt and plenty of time.

Once they are preserved the idea is to scoop out the soft flesh which you can use for something else, then finely chop the soft peel before adding to your savory dish – they’re best added towards the end of cooking. This procedure comes from the ever-reliable Claudia Roden.
 lemons-preserving

Salt Preserved Lemons

8 unwaxed lemons, preferably organic, if your lemons are waxed, it will not work

Around 4 Tablespoons of coarse sea salt

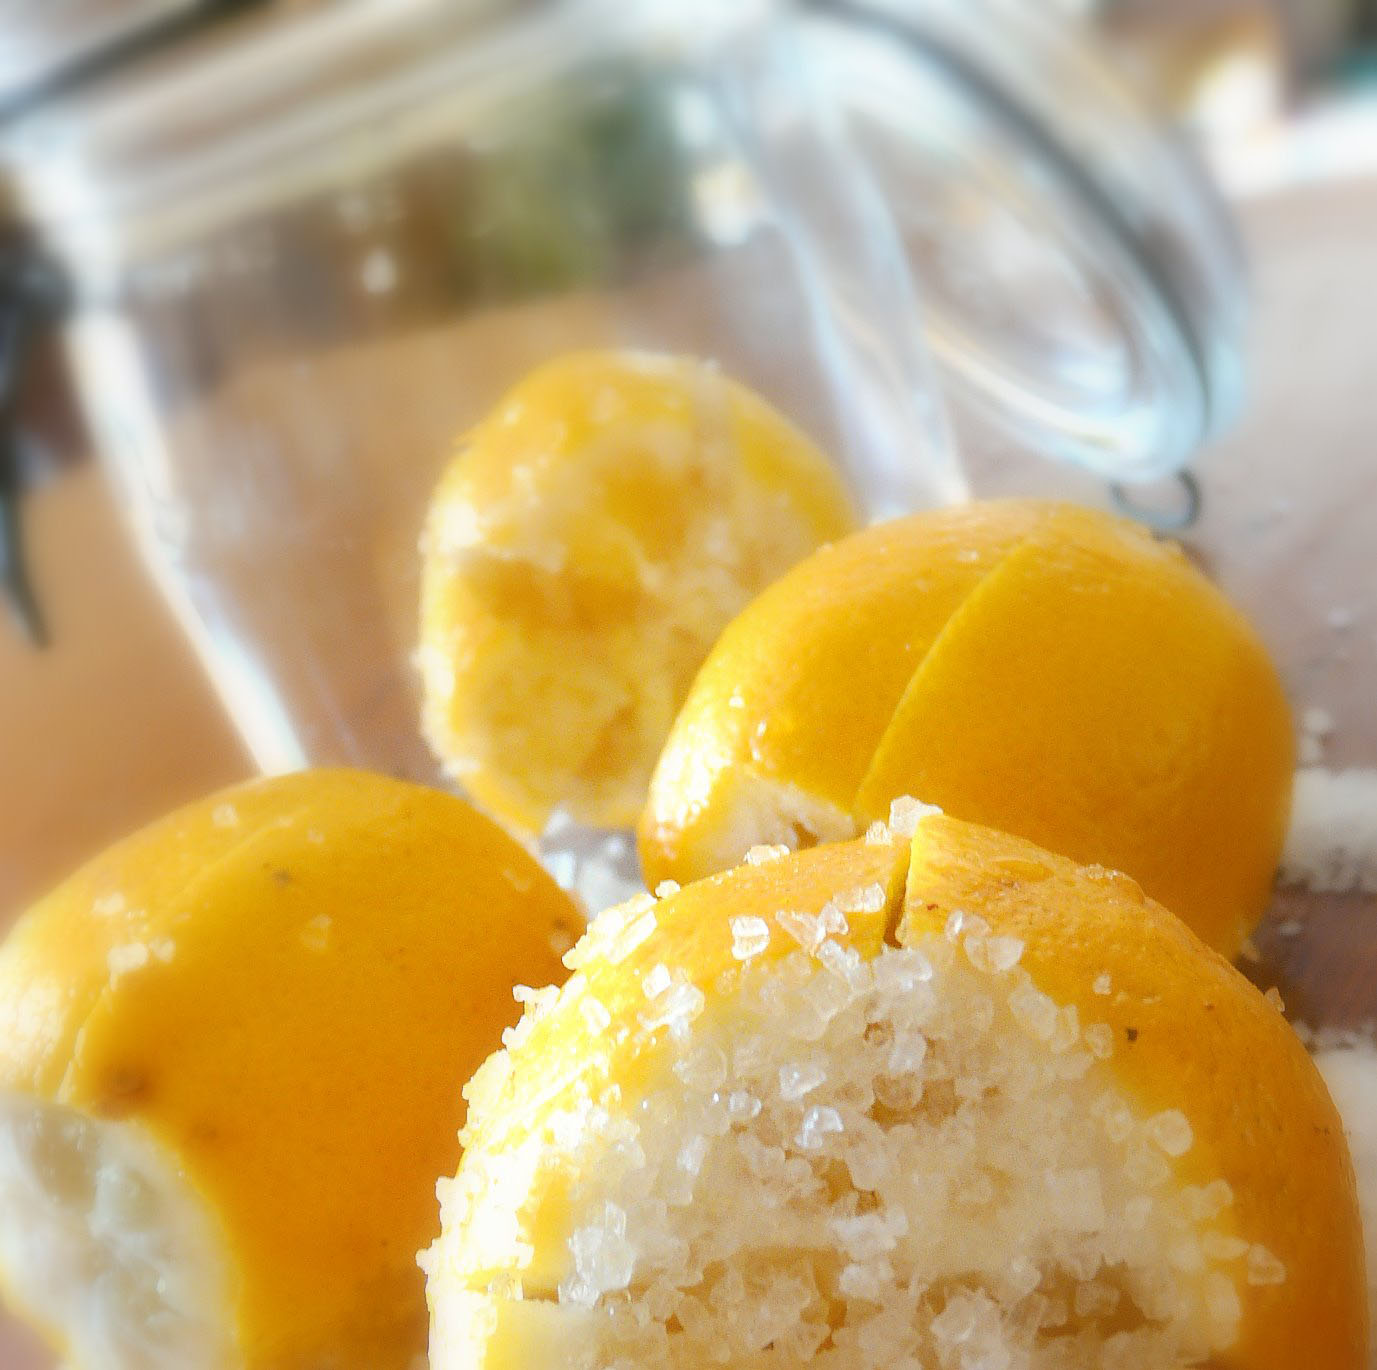
Cut each lemon into quarters, without going all the way through to the end. That leaves you with four petal star shape which you then pack with course sea salt. Squish the lemons into a sterilized preserving jar pressing down to release the lemon juice; seal and leave the jar on the counter for four days, so the salt draws out more the juice (it is very decorative as well). The skins will soften and the jar will be full of juice. You want high acidity, so top off the jar with fresh lemon juice; seal again.

Leave in cool (refrigerator or root cellar) place for about a month before beginning to use.

If the lemons are not covered by the juice all the way, they may develop a white mold which Roden says is harmless and should be washed off.

You can keep the juice after you’ve used the lemons, and start a new batch of lemons in the same jar. You might see a kind of lacy white substance in the jar as the lemons mature.

Use a wooden spoon to remove lemons from the jar.

Once you have your batch of preserved lemons, you start to wonder: What would I use preserved lemons for? You want to put them in everything! Anywhere that a little bit of mysterious lemoniness would be nice, preserved lemons are the ticket.

Consider: tossed in a green salad, potato salad, or pasta salad; over asparagus; over broccoli; over spinach; in melted butter for dipping artichokes; in couscous; in a stew of whatever, along with olives; in Spanish rice; with baked or mashed winter squash; as a garnish for carrot soup; as part of a Mediterranean-style gratin; with lentil stew; with penne and fresh tomato sauce; as part of a Greek egg-and-lemon soup; in a olive-oil pasta sauce; minced to the point of puree and mixed with butter and herbs to make a spread for cucumber sandwiches.

Two favorite preserved lemon uses: 1) Cut up and toss with root vegetables and whole unpeeled garlic cloves and olive oil and fresh ground black pepper and (opt) rosemary . Roast on a cookie sheet until all these things are soft as the lemons and crusty brown edged- with a good bread to mop it all up.
 tangerine1

Mandarins

Types:
Satsumas: Very sweet, seedless, medium sized, free skinned

Clementines: Small, very orange, few seeds, very sweet

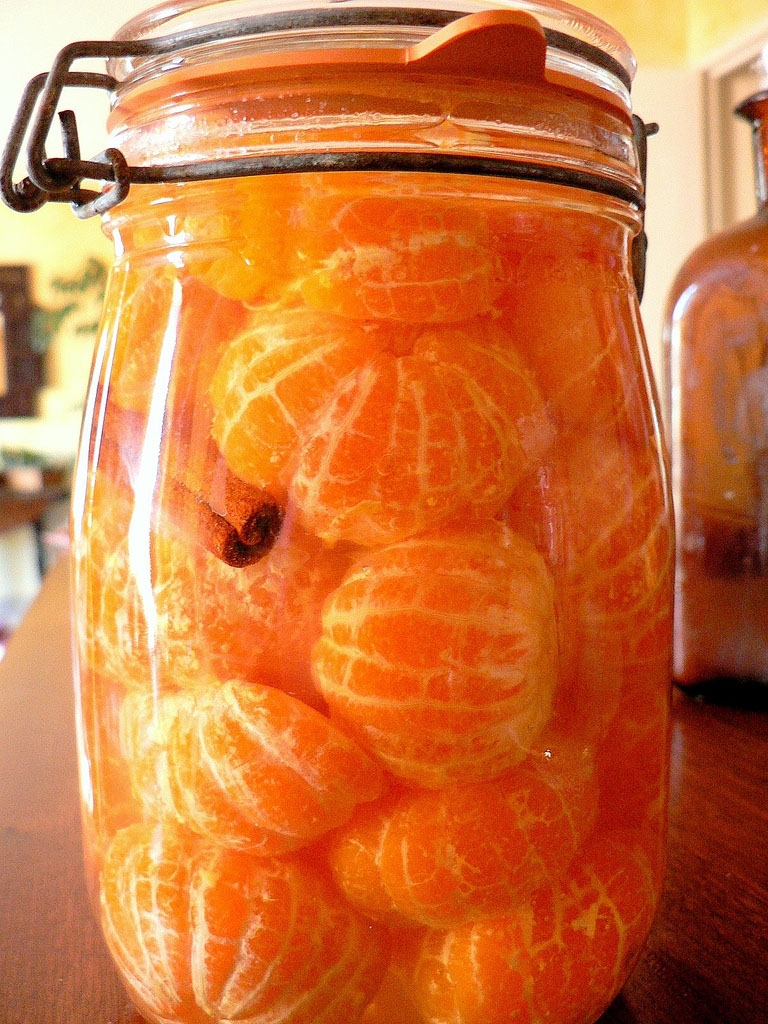
Canning: To extend the season of mandarins, they can be preserved as well. Peel, separate the segments, pack in jars with a sugar syrup (I add a touch of rose water) and be sure to process in a simmering hot water bath (30 minutes for pints, 35 minutes for quarts).

For desserts, use your syrup preserved mandarines over pound cake or ice cream with sprinkles of orange liqueur. Mandarin orange juice is good plain or blended with ice cream for a cool refresher.

Mandarins can also be used in marmalades, sauces, ciders or glazes or use the delicious segments topped on a spinach salad.

Rock-salted Tangerines
If you add extra lemon juice to up the acid for preserving, you can bottle your tangerines in the same fashion as salt preserved lemons. Then you can use them for savory dishes (omitting the salt in your recipes) like duck l’orange, chinese orange beef, minced meat pies, and spicy lamb tagines. I also chop them finely and mix with a black olive marinade for chicken or fish, and bbq sauces.

Recipes:

Lemon Chicken Tajine

from Claudia Roden’s Arabesque

Ingredients

3 tbsp extra virgin olive oil

2 onions, finely chopped

2-3 cloves garlic, crushed

½ tsp crushed saffron threads or saffron powder

¼-½ tsp ground ginger

1 chicken, jointed

salt and freshly ground black pepper

½ lemon, juice only

2 tbsp chopped coriander

2 tbsp chopped parsley

2 small preserved lemons, peel only (don’t substitute fresh lemons for preserved; the taste and texture are completely different, and preserved lemons are super-easy to make. All you need is patience, a clean glass jar, and lots of salt.)

12-16 green or violet olives, either stoned or left whole

9 artichoke bottoms

1. In a wide casserole or heavy-bottomed pan that will fit the chicken pieces in one layer, heat the oil and add the onions. Sauté, stirring over a low heat, until softened, then stir in the garlic, saffron and ginger.

2. Add the chicken pieces, season with salt and freshly ground black pepper, and pour in about 300ml/10fl oz of water. Simmer, covered, turning the pieces over a few times and adding a little more water if it becomes too dry.

3. Lift out the breasts after 20 minutes and set aside. Continue to cook the remaining pieces for another 25 minutes, then return the breasts to the pan.

4. Stir in the lemon juice, coriander, parsley, preserved lemon peel and olives, then lift the chicken pieces and put the artichoke bottoms in the sauce beneath them. Add a little water if necessary and cook for about 10 minutes until the artichokes are tender. Serve with the olives and lemon peel on top of the meat.

Tangerine Marmalade

4 tangerines or oranges

1 lemon

1 quart of juice and pulp

2 quarts water

sugar

Slice oranges and lemons is thinly as possible. Add the water and allow to stand covered in the refrigerator for 24 hours.

Cook over low heat until the rinds become tender. Cool and cut rinds into small pieces. Place in refrigerator and allow to stand another 24 hours.

Measure out fruit. To each quart of fruit add 1 quart of sugar. Bring to a boil, then reduce heat and simmer until marmalade thickens and the oranges are clear.

Ladle into hot sterilized jars and process in a boiling water bath for 10 minutes.

 mandarin-pudding1

Preserved Manderin Pudding

1 cup orange or mandarin juice, blood orange juice is beautiful for this

1 cup of syrup from the preserved manderins

10 preserved manderins divided into sections and pips removed, if any

1 ½ tablespoons corn starch or arrow root

seeds of ½ a pomegranate

1 cup heavy whipping cream,

Bring the orange or mandarin juice to the boil with the syrup and manderine sections, remove any pips.

Dissolve the cornflour in 250ml/9fl oz of water and pour it into the simmering juice, stirring vigorously. Continue to stir – in one direction only – until the mixture thickens, then cook over a low heat for about 15 minutes. Stir in cream and cook for five more minutes.

Let the orange or mandarin mixture cool and pour into a glass serving bowl, cover with clingfilm and chill in the fridge for a few hours.

Sprinkle the pomegranate seeds over the pudding and serve with more whipped cream if you wish.

Editor’s Note: Riana Lagarde is an intrepid urban homesteader living a slow life in Southern France.  Although she’s been professionally writing about food and travel for magazines for several years, she has recently given up magazine writing to concentrate her efforts on raising chickens, gardening, and writing for her own publications.

Pantry Ideas: Using It Up

jalapeno-jelly-2

The idea behind preserving food is to get us through the months of the year when good quality fresh produce is hard to come by.  You stock up on all the things you are going to want to eat later on that are in season now.  If you’re like me, that means that you froze a bunch of strawberries, sour cherries, blueberries, and roasted vegetables.  You canned pickles, dill beans, tomatoes, jams, and juices.  You dried herbs and like my friends Lisa B and Nicole, you may have even dried some vegetables.

If you have been holding back on using the things you preserved for fear of running out, now is the time to use it all up; especially any items that are over a year old already.  The quality will not improve most food with time* so you want to make room to store fresher produce this year.  What to do with it all?  Do you need some inspiration?  Here are some ideas on how to use what you’ve preserved:

Pickles (dill or sweet):

  1. Potato salad- I always add chopped dill pickle to mine.
  2. Grilled cheese sandwiches or hamburgers- a classic.
  3. Egg salad- I love the salty crunch.
  4. Put out with sharp cheddar cheese as an appetizer.

Tomatoes (diced, stewed, sauce) (You still have some?!):

  1. Give yours to me- I’m almost out.
  2. Spaghetti- it’s obvious but a no fail.
  3. Add to winter vegetable soups- adds a bright note.
  4. Make a tomato bread soup- such a luxurious light meal.

Grilled frozen eggplant:

  1. Add to pasta with sun-dried tomatoes, olive oil, and garlic.
  2. Add to a tomato sauce (diced) with a little balsamic and some onion.
  3. Heat up and eat in a sandwich- will remind you of summer.
  4. Add to lasagna- I just used ratatouille for a lasagna sauce!

Frozen or pickled hot peppers:

  1. Add to a black bean chili- perfect for chilly early spring.
  2. Use in a frittata with sharp cheddar cheese and fresh cilantro.
  3. Use them in tomales- I am hankering for this right now!
  4. Spanish rice- I just learned how to make this.

Frozen Fruit:

  1. Yogurt smoothies- I’m craving these right now.
  2. Added to muffins- easy to do, don’t defrost first.
  3. Cooked with a little sugar to make a compote- for pancakes, or deserts.

Are there things in your freezer or pantry that you want to use up but are having trouble getting inspired to use?  Tell me what you have and I’ll help you come up with new ways to use them (be sure to tell me what you’ve already been doing with them so I don’t repeat those ideas).  Let’s get our freezers and pantries cleaned out and ready for the new season!  We make the food so we can eat the food.

Are you doing something you love with your home preserved goods right now?  Share it with us all in the comments.

*Fruit cheeses and wines are the exceptions here.