Author Archives: angelina

Veggie Burgers: Quinoa and Kidney Beans

Most people I know are omnivores so when they want something substantial to put in a bun they simply go for the classic meat burger.  I was brought up as a vegetarian and have never reconciled myself to the taste, and more particularly, the texture of meat.  So when I want to eat a substantial sandwich I turn to veggie burgers, and I don’t want ones that are meaty and chewy.  I want one that is flavorful, robust, and textured without being toothsome.  So I am on a quest to develop a repertoire of veggie burger recipes that I can make, freeze, and then grab for easy nutritious meals when I haven’t had time to cook from scratch.

This particular recipe can be baked or fried (sautéed) but will not hold together on the grill.  I will be experimenting with bread  crumbs which are a usual ingredient for their ability to soak up moisture and stiffen patties.  I didn’t want to have breadcrumbs in this particular recipe because I wanted to keep the proportion of beans to grains at a 2 to 1 ratio.  The results are satisfying, flavorful, and just the perfect quick meal I was hoping for.

Ingredients:

4 cups cooked kidney beans

2 cups cooked quinoa

3 large carrots diced small

1 large onion diced small

3 ribs celery diced small

2 tbsp olive oil

1 bunch cilantro (chopped well)

1-2 pickled (or fresh) jalapenos (finely minced)

1 tbsp cumin

2 tsp salt

Makes 10 to 12 patties


Method:
Have your kidney beans and quinoa prepared ahead of time.  Heat the olive oil in a medium sauce pan (on medium high heat) and add the carrots, onion, and celery.  Once they start lightly browning turn the heat down to med/low and stir frequently.  When the onions get soft and sticky they’re done.  (It should take about 25 minutes.)

In a food processor combine the kidney beans and quinoa and pulse several times.  You want the beans to maintain texture but you want enough of them to be crushed that the beans and quinoa stick together.  Put this in a large mixing bowl.  Add the caramelized vegetables, cilantro, jalapenos, cumin, and salt and mix really well.

Form into patties.  You can make them any size you like.  I made mine palm sized and kept them fairly thick.

To cook: heat a tbsp of oil (any you choose) in a sauté pan and sauté patties on both sides until they develop a crispy brown crust.

To serve: I don’t eat my veggie burgers with buns when I eat them at home.  I like to eat them with sliced avocado, some cheese melted on top, and some salsa.  These have a slight spiciness (depending on how many jalapenos you used) so if you like really spicy food you can use a super spicy salsa or a hot pepper sauce drizzled on top.  If you like your veggie burgers with a bun you can eat them with a bun as well with pickles, lettuce and tomato.


If I had sides to go along with this veggie burger, like steamed or roasted vegetables, I would use one patty per serving.  If it’s going to be your whole meal, I would use two patties per serving.

Recipe Notes: I use 2 jalapenos for mine because I don’t like really spicy food.  There is a wide variation in spiciness when it comes to jalapenos so be cautious.  I prefer them pickled because they have a little tangy taste to them.  Veggie burgers freeze well.  To freeze them: lay the formed patties on waxed paper on a baking sheet and freeze for several hours until they are hard, then put them in freezer bags.  For longer term freezing I recommend using a vacuum sealer.   Caramelizing vegetables takes time but in this recipe it adds an important dimension to the flavor so I don’t recommend skipping it.

This recipe is vegan: unless you melt cheese on it or top it with sour cream.

This recipe is gluten free: provided the quinoa you buy was not processed in a facility that also processes wheat and if you use fresh jalapenos instead of pickled ones.

Soap Making: Learning From A Professional

Last weekend I was able to watch my friend Kari, the owner of the company The Soap Barn, make a batch of soap.  I’m interested in learning to make my own soap and Kari says she’ll teach me.  A lot of people are scared to make soaps using lye  so they stick to melt-and-pour soaps.  Why use lye?  Lye is the ingredient in soap that makes it harden.  You can’t make soap without it.  A reader mentioned this to me and I’ve done further research and even glycerine soaps are made with lye.  In my experience the melt and pour soaps seem to to be softer while the soaps made from scratch are often harder and last longer.  From the reading I’ve been doing there are many factors that control the texture and the hardness of your soap including the proportions of your ingredients, method used, and the length of time you let your soap cure.  The only benefit of using melt and pour soaps, in my opinion, is to avoid having to use the lye yourself because it’s already been added for you.  Otherwise it’s more expensive to use and you have a lot less control over the quality of your finished product.

  • All her soap ingredients are measured by weight on a scale.

I have never seen a lye based soap being made so it was fascinating and exciting.  One thing Kari pointed out to me is that she usually has all her soap making components ready to go, but because she was going to show me the process she dissolved her lye while I was there and we let it sit for a while.  When you add water to your measured amount of lye the water starts heating up immediately which is really weird and certainly illustrates how caustic it is.  She said she would normally have mixed the lye and water a couple of hours ahead of time because a lot of soap-making is about temperature.

A tip from Kari: always add your lye to the water, never the other way around.  If you add water to the lye you could make a lye volcano and hurt yourself.

All the soap making books and on-line instructions I’ve read have you cooking your lye and oils on the stove top.  Kari used to make her soaps this way too but heard of another way of doing it years ago and hasn’t gone back since.   She adds her lye to her oils and then blends it with an immersion blender until it thickens to the trace point.  When it’s reached the proper thickness she pours it into one of her wooden soap molds and puts it in the oven on a low temperature for several hours.

Doesn’t that sound easier than cooking it on the stove-top?  Watching Kari make this batch made me feel a lot more confident that I can learn to do this too.

You can see how thick it got just before she poured it into the mold.

Here’s Kari smoothing the soap into the mold before heating it in the oven.  After about a day in the mold it will be hard enough to remove and cut into bars but you need to let the bars cure for several weeks, even a few months, for the soap to reach its maximum hardness.

Why should you bother to make your own soap?  I think there are a few compelling reasons to make your own soap.

Control Of Ingredients: the majority of soaps out there, whether or not they are fancy or cheap, have a lot of ingredients you’d be better off not using on your skin or polluting our waterways with.  Skin is a porous organ and anything you put on it will also go IN it.  Skin absorbs poisons really well.  So whatever you put on your skin should be healthy, gentle, and pesticide free.  The best way in the world to control what’s in your soap is to make it yourself.

Cost Effectiveness (household economy):  there are some very cheap soaps out there that will fit a frugal budget but in most cases I’m willing to bet they’ve got a lot of stuff in them you wouldn’t really want inside your body.  Natural soaps are expensive.  You can nearly always save money making things yourself.  Not if you buy expensive kits from craft stores or from fancy gift shops, but if you buy bulk ingredients you can save a lot of money.  Sometimes buying bulk isn’t worth it for one family; consider going in on the ingredients with another family and make the soaps together!

No Packaging Waste: every single time we purchase something it comes in packaging.  It is possible to buy soaps in specialty shops with no packaging, but this is still rare.  More often than not soap comes wrapped in some kind of paper and often it comes in paper and also a box.  It may not seem like much, but it all adds up.  When you make your own soap you don’t need any packaging.

Personalized: when you make your own bath products half the fun is in being able to make exactly what you want.  You develop herbal combinations that specifically suit your skin type and your individual taste in scents.  Why let soap companies cram more lavender down your nose?*  There are so many essential oils and herbs you can use in your soaps to suit who you are and what your body really wants.  I think we all deserve that.

We haven’t set a date yet but when Kari teaches me to make my own batch of soap I’ll be writing up a detailed tutorial so that you can make your own too!

If you have no interest in making your own but would love to have another source for quality hand made natural soaps- check out Kari’s soaps at The Soap Barn!

*I LOVE lavender but I have a friend who hates it.

Mid-Winter: What To Eat

It is exciting to me that so many more people are making their way back to seasonal eating.  For those people dedicated to eating as locally as possible this isn’t something they have to think about because eating locally forces you to also eat seasonally.  Learning to eat seasonally isn’t easy when nearly all grocery stores are always stocked with tomatoes and summer squash in winter.  How do you know what’s in season?  Different regions are going to be a little (or a lot) different.  In Florida right now it’s strawberry season but by the time it’s strawberry season where I live, in the Pacific Northwest, it will be much too hot for strawberries in Florida.  So I can’t tell everyone what’s in season for their area specifically.  I can only give some general guidelines to help you find out what’s in season where you live.

Here are some tips to discover what’s in season where you live and following that I will list what’s in season specifically for my area.

Shop your local farmer’s market: this is the number one way to discover what’s in season.  Though many farmer’s markets close during winter, be sure to do some research including nearby towns or cities that may have year-long markets that you can visit.  A winter farmer’s market will have only the produce that could be grown in your region and stored (such a root vegetables) in winter.  At the one farmer’s market in Portland that’s open all year many vendors have produced their own jams and pickles and sauces from the produce they grew in summer so you may not be able to buy tomatoes from them but you can buy salsa produced locally.  Even if you don’t make a habit of regularly shopping at a winter farmer’s market, go to one to educate yourself.

Ask what produce is local at your regular supermarket: many large supermarkets will carry a few local items even if they aren’t labeled as such.  Be sure to talk with the produce manager to find out if they carry anything local.

Read garden books about your region: here in the Pacific Northwest we have a fantastic garden guide (but only for regions west of the Cascades) put out by the Seattle Tilth that is a month by month guide to what to plant and when.  Even if you don’t garden you can easily see what grows during different seasons in your specific climate.  Look for climate specific guides.
I would love to see some Southerners and Southwesterners compile a region specific list of what’s in season for them in winter.  The list I give below should roughly apply to most of the top 2/3 of the United States but will not apply at all to people in the South and Southwest for which I apologize! If any of you out there have been working on this topic and studying your region for seasonal eating and can provide a detailed list, I would love to publish it here.

What to eat in mid-winter:

Fresh eating: (either pulled from your own garden or bought from the store, these items should be available picked fresh)
Chard

Kale

collards

leeks

citrus (though it comes from the southern states if you buy them, winter is their season)

watercress

chervil

mache (corn salad)

parsley

sorrel

Asian greens (tatsoi, mustards, bok choi…etc.)

endive

radicchio

persimmons (depending on region, may be done by early winter)

mushrooms (if you have a local cultivated source)

From the root cellar: (even if bought from local farmers, most likely these things were harvested in fall and stored)

potatoes

carrots

onions

cabbage

winter squash

celery root

parsnips

rutabagas

sunchokes

turnips

beets

shallots

apples

pears

kiwis (usually harvested in late fall and ripen in storage in winter)

garlic

From the pantry:

fruits

pickles

jams

sauces

dried things

We have become very accustomed, us modern people, to eating tomatoes in winter and apples in summer but it isn’t natural and except for the root vegetables that store well nearly all year, no produce is at it’s best when it’s no longer in season.  Winter is a harsh season, especially for people living in the extreme north.  Our diets should become more limited in the winter.  When you spend all winter eating mostly greens and root vegetables punctuated by things you preserved for the pantry, you will look forward a great deal more to the change in diet the spring brings with asparagus and radishes and lettuce.  It may sound bleak if you’re used to eating lettuce salads all winter but unless you’re eating lettuce from your own green house, it isn’t natural to eat lettuce in midwinter.  It’s a time for soups and root vegetable roasts.  While it may seem counter intuitive to some people, eating preserved food (particularly made by you) is healthier than eating out of season vegetables.  It takes a big shift in habit but I think you’ll find that when you eat seasonally you become more connected to your own region, the earth’s natural cycles, and your food will taste better and provide more optimal nutrition for you.

While I eat mostly seasonally and still stick mainly to locally produced food, I do have exceptions.  What I learned from going mostly local for ten months (a couple of years ago) was that there are a few things in my diet that I don’t want to live without.  Avocados and citrus do not grow in my region so buying them means I’m always getting them from hundreds of miles away.  Though sweet potatoes can grow here, this isn’t their ideal region and very few people grow them.  Tropical fruits such as bananas don’t grow here ever.  Pomegranates are another thing that I used to enjoy but which don’t grow where I live.  While I was being more strictly local I bought none of these things.  What I learned was that I can live life without bananas.  I can live life only buying sweet potatoes at the same time my organic CSA has them (we don’t get a lot of them, I bought some extras), and I can live without eating citrus often.  But I cannot live without eating avocados.  I cannot live without imported coffee and olives.  While I was doing my local challenge I had a small list of imported foods that I allowed myself to have such as coffee, tea, oil, sugar, and some other essential items.

I consider imported items as a flexible list but a list that must remain roughly the same size at all times.  So while I’m buying avocados, I don’t buy other non-regional produce such as other tropical fruits.  If I really want to buy bananas for a special occasion (I bought them for the first time in two years a couple of weeks ago) I don’t buy some other non-regional item.  I am happy with the balance I’ve reached for now.  I am constantly looking for closer sources for things like oil and while cost is obviously a factor since I have very little padding in my budget, I can’t always afford to buy things made closer to home.  However, I found an olive oil that’s produced in California (organic!) that costs only slightly more than the cheap imported olive oil I can buy at my discount grocery store*.  California is a lot closer to me than Spain or Italy so buying from California not only reduces the number of miles my food had to travel to get to me, it also supports the economy of my own country.

Seasonal eating has given me a greater appreciation for the food I cook and the flavors I associate with each month of the year.  I would like to end this article with a little list of the foods that you shouldn’t be putting in your grocery cart unless you live in one of the southern regions in which these things might be showing up at your local farmer’s markets:

Not in season in winter:

tomatoes

fresh basil

eggplant

summer squash

green beans

lettuce

strawberries

berries of any kind

peppers (unless preserved)

cucumbers

Happy seasonal eating!

*I should note here that even at my discount grocery store the olive oil is surprisingly expensive.  If a Trader Joe’s was closer to me I’d probably buy theirs because it’s such a great price.  But I heard from a friend that even Trader Joe’s has some California oils available.

How To Sew Your Own Dinner Napkins

Dinner Napkins With A Rolled Hem Finish

ant-napkin-scale-2.jpg 

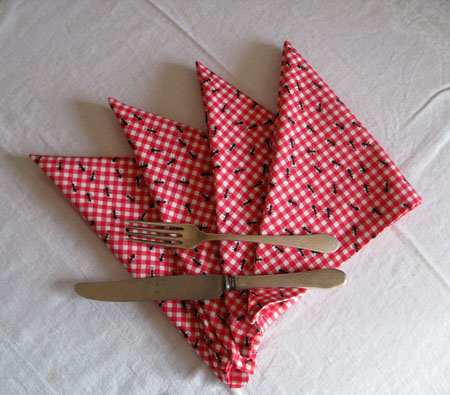
Many people use cloth napkins instead of paper ones, not because it’s better for the landfills and forests (though it is) but because they’re superior to the paper ones.  At the dinner table they are much more satisfying to wipe fingers on (they won’t tear) and they’re big enough and tough enough to clean up spills and other little table emergencies.
Another benefit of using cloth napkins is that they’re frugal because they can be washed and used again and again, you save money on buying paper napkins every month.  The best part is that they’re really easy to make yourself.  This is an excellent project for a beginner sewer and a super quick one for an experienced sewer.  It takes only 1 yard of fabric to make 4 generously sized cloth napkins.
 the-finish-2.jpg

You can make them all match or you can make them to mix and match.

 
pretty-napkin-2.jpg

You can make them out of many different fibers but I suggest using either a 100% cotton or a 100% linen or a combination of linen and cotton.  I would avoid using any synthetics.  My supplies list assumes you already have scissors and other necessities of sewing such as an iron.

What you will need:
1 yard of fabric
matching thread

 turning-2.jpg
Step 1: Fold your yard of fabric in half, and then in half again.  Use a ruler to mark straight square lines in an 18″ x 18″ size.    If your yard is a little short you may need to cut your squares a little bit smaller to compensate which is fine, you’ll still have a nice sized napkin.
 turning-under-2.jpg
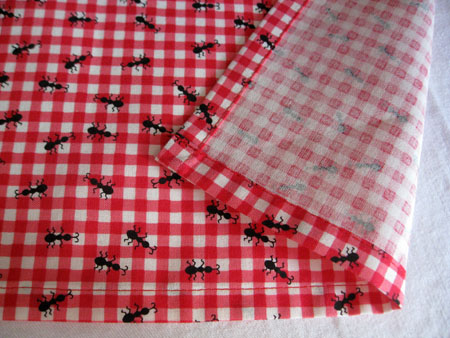
Step 2: On each napkin fold two parallel edges of the fabric under 3/8″ or 1/2″ and press them flat.  Fold each of them under again the exact same width and press.  (See the two pictures above to see the folded edges.)
 stitch-down-2.jpg
Step 3: Stitch along the edge of the hem on all the pressed sides of the squares.  Press again.
 backside-view-2.jpg
Step 4: On each napkin fold the remaining raw edges under 3/8″ or 1/2″ and press them flat.  Fold each of them under the same width again and press.
Step 5: Stitch along the edge of the hem on all the pressed sides of the squares.  Press again.

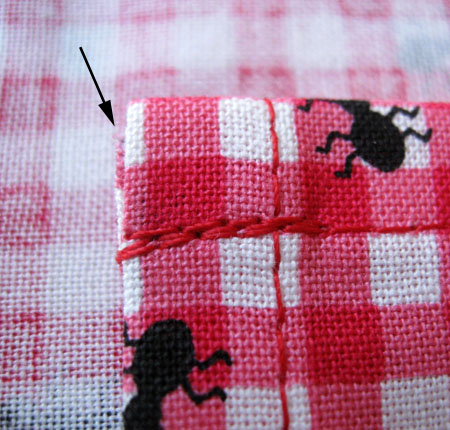
trim-2.jpg Step 6: If you have any edges hanging out of the hem at the corners carefully trim it off.  This isn’t necessary but will help your project look more professional.  Do  a final pressing.

Project notes: You can make your napkin hems as narrow or as wide as you’re comfortable with.  I never measure when I make them, (though I suggest that all beginners use a seam gauge until they can consistently eyeball widths), and I nearly always end up right between 3/8″ and 1/2″ hems which is a fraction I don’t care to calculate.  The important thing is that all your hems are the same width as each other.
I insist on a lot of pressing while sewing but once I’m done with a project I rarely ever press it again.  With these dinner napkins you won’t need to press them after washing if you line dry or if you fold them immediately when they come out of the dryer.  I recommend washing all fabrics in cold water and using a low setting on your dryer to prevent shrinking.

Tenement Stew (Cabbage Alphabet Noodle Soup)

It’s difficult to photograph cabbage soup to advantage.  You have to imagine the wonderful aroma of cabbage and carrots and rich vegetable stock punctuated with garlic and thyme to be suitably impressed.


This is fall and winter food.  You can use items from your freezer and pantry.  I made this soup from only things I already had on hand.  The title of the soup is my nod to the hard life and how humble ingredients such as cabbage and potatoes have kept a lot of poor humans from starving.  There are people who undervalue both the wonderful flavor of cabbage as well as its nutritional contribution to the fall and winter diet.  Common cabbage is a good source of vitamin C, calcium, and Potassium.

When I first made this soup I did a cost analysis on it.  Here were my results:

Can this stew be made more cheaply than going out to eat a fast food meal? It turns out that the reason why poor people eat so much soup is because it’s a cheap and nutritious way to feed your family. I priced out my ingredients (bearing in mind that my stock was free since I made it from my own vegetable scraps, and my thyme was almost free because I grew it and dried it myself) this soup cost .53 per serving.

That’s for a cup and a half of nutritious and very tasty soup. Can you get a nutritious meal at McDonald’s for .53 cents? That’s a trick question. You can’t actually get a nutritious meal there.  Try my tenement stew. It won’t break your pocketbook. It will hardly make a dent in it.

Ingredients:

2 tbsp olive oil

1 yellow onion, diced

3 large carrots, chopped

1 large russet potato, cut into 1/2″ cubes

1.5 pounds of chopped cabbage

2 cups cooked navy beans (or 1 can of rinsed white beans)

3 cloves garlic, minced fine or pressed

1 quart diced tomatoes (with its juice)

1 quart of stock (or water)

1/4 cup alphabet pasta (or orzo, or rice)

1 tbsp dried thyme

2 tsp salt (or to taste)
pepper to taste
a shake of cayenne pepper for heat

Method:

Heat oil in a soup pot. Add the onion, carrots, and potatoes and stir frequently until the onions turn transparent. Add the stock and tomatoes. If the stock is still frozen just dump it in there and close the lid for a while, checking to keep vegetables from sticking. Now turn the heat down to medium and add the cabbage, garlic, thyme, salt and pepper. If the soup is too thick, add some water to it. When all the vegetables are cooked through, add the cooked beans and the pasta and a shake of cayenne pepper. Cook for an additional ten minutes. When the pasta is done the soup is done.

This soup serves 6-8

Whether or not you need to economize right now, this is an excellent stew to eat when the wind outside is cutting through your wool coat and the rain is sheeting against your face. Eat it with a decent sized hunk of wheat bread with butter if you need to be out in that weather for long. The cayenne will help warm your blood, the garlic will help fend off the plague.

This recipe is vegan if the pasta you use has no eggs in it.

This recipe can be gluten free if you use a gluten free pasta: if you’re making it for someone who is eating gluten free because they have to (they’re allergic), please be very careful which pasta you use because some “gluten free” foods are made in factories where gluten is present.  If possible check with the person to see if they know of a safe brand.  OR just leave the pasta out altogether.

Potato Celery Root Soup

Celery root is abundant throughout the fall and winter in the Pacific Northwest and if you, like me, try to eat both seasonally and locally then this might very well be abundant where you are too.    Like most potato based soups, this one is creamy and lightly earthy and with the addition of celery root it also has a wonderful delicate celery flavor.  Seasoning should to be taste but kept simple.  I like to add milk to my creamy potato based soups but I’ve also made them without the milk and it’s very good, so it’s worth making if you’re vegan.  The cheese garnish is optional if you’re not me.

Potato Celery Root Soup

Ingredients:

3 large starchy potatoes (either Russets or a similar type), diced medium

1 whole celery root, diced medium

1 giant carrot, diced medium

2 quarts vegetable or chicken broth, or water

Salt to taste

Pepper, about a kazillion grinds

1 tbsp butter

1 tbsp olive oil

1 cup of 2% milk, optional

Cheddar cheese garnish, optional

Method:

Heat up the olive oil and butter in a soup pot on medium high heat, then add all the vegetables at once.  Stirring frequently, saute the vegetables until they very slightly brown (about 10 minutes on my burner).  Don’t let them burn.  Add the stock (or water) and make sure nothing has stuck to the bottom of the pot.  Bring the soup to a boil and then turn the heat down to a simmer.  Cook until all the vegetables are soft and until the potatoes come apart easily.

Add salt and pepper to taste.

Puree.

Recipe notes: With a delicate soup like this I would suggest the best choice for broth is vegetable or plain water.  Chicken would be alright, but beef broth would have too deep and heavy a taste of its own and may overpower the light flavors of the soup.  Always remember that a soup is highly personal and if you like it runnier than it turns out, add more liquid.  If you like it thicker, like I do, let it cook down a little bit.  There is no hard science to soup.  A lot of it is by preference and by feel.  I usually use more salt and pepper in this soup than my other soups.  I would say I use between 1 1/2 tsp and 2 tsp salt and I probably do about 40 grinds of pepper.  I use my immersion blender to blend it and don’t have to wait til it cools, but if you’re using a full size blender to puree the soup you’ll need to wait until it cools a bit or you might burn yourself.

To veganize this recipe all you need to do is use 2 tbsp of olive oil for the sauteing and don’t use the milk or add any cheese.  I promise it’s a very good soup without these additions.

This soup is gluten free through no merit or planning on my part.

Potato Celery Root Mash

This is a simple satisfying winter accompaniment to a meal.  It can also be put into hand-pies (what I lovingly refer to as “poorhouse pies”) and as soon as I have a couple of other necessary recipes posted I will give instructions on how to make poorhouse pies using this mash as one of the fillings.

Potato Celery Root Mash

Ingredients:

2 large potatoes (starchy type, such as russet), diced into 1/2″ pieces

1 whole celeriac (celery root), diced into 1/2″ pieces

1 medium sized turnip (or 2 small ones), diced into 1/2″ pices

1/2 stick of butter

salt to taste
pepper to taste

Method:

put all of the vegetables into a steamer basket fitted into a pot and steam them until very tender.  If your steaming basket will not accommodate them all at once, steam the potatoes first, then steam the celeriac and the turnips together.

Put all the hot vegetables in a medium sized bowl and cut up your butter into pieces and add it to the bowl and fold it into the vegetables until it is melted.

Use a potato masher to mash them into a smooth consistency.  Add salt and freshly ground pepper to taste.  My guess is at least teaspoon of salt will be needed.

Serve hot.  (Reheat if necessary)

Recipe notes: Many people boil their root vegetables before mashing.  I don’t see any reason not to do it this way if you prefer it.  My mother always steamed rather than boiled vegetables because she believed it was healthier, and I tend to agree, but I haven’t got any proof to share either way.  I am a fan of mashed potatoes and I like, but don’t love, potatoes mashed with turnips, but this combination is divine!  The celery root and turnip keeps the mash from stiffening up because they aren’t starchy like the potatoes, and the celery root adds a delicate wonderful flavor.  This is one of those simple winter foods that take few ingredients or effort to make and so are not only budget friendly but also a great dish for people with little time.

Veganize this! To make this recipe vegan, simply use olive oil in place of the butter.  Use a mild golden variety rather than a green grassier flavored one.  Or you can use a vegan butter substitute if you like, however, I would always recommend using either butter or olive oil rather than an unnatural hydrogenated spread which may rely on a lot of unnecessary ingredients to help it mimic the butter experience.  If you can’t (or don’t wish) to eat dairy, olive oil is often the best substitute for butter.

Farmhouse News

This is the market tote I’m making for my Etsy shop but will offer a tutorial on later so you can make your own.

Here at my farmhouse in town winter is really getting under way.  This morning we had our first hoar-frost with the temperature down to 22 degrees.  I know that in many areas across the country it has already gotten much colder and everyone is bundled up in their wool and mittens.

I am busy making market bags for my Etsy shop.  We have long since stopped using paper or plastic bags to put our groceries into and use cloth grocery/shopping bags.  Every time I leave the house I grab at least one of them because I can never be sure when it will come in handy, when I return home I hang it up on my bag hook.  We have many shopping bags because our kid can’t go anywhere without an entire tote bag filled with snacks and things to amuse himself with.  He’s an intensely picky eater and a grazer so he’s always hungry when we’re out and about but there is rarely anything “out there” for him to eat.  We always travel with a protein bar, some crackers, and filtered water.  He also has ADD and it has been a lifesaver to us since he was a toddler to always bring a collection of things/toys for him to play with while we’re out.  He will panic if he doesn’t have a bag of his things because his view of the world, depending on his mood, is that it’s either insanely boring or very hostile.  In either case, we never travel light and so some of our market bags are always packed with his things.  Some are also always in the wash.  So we have three hooks in our kitchen dedicated to aprons and market bags.

It took me a long time to get into a good habit of always having a cloth bag with me, and even now I forget once in a while, but the real trick for me turned out to be having those bags near my kitchen door, which also serves as our front door.  So if you have trouble remembering to bring bags with you, try this out.  Also be sure you have an abundance of them.  If you only have one or two you will never have them handy.

The bag I made (in the picture above) is a simple tote with no pockets.  It’s lined with muslin and has sturdy woven cotton handles that are long enough so that you can carry the bag on your shoulder.  This bag is currently in my Etsy shop and when I’m done with this post I am heading to my sewing machine to make several more in a couple of other patterns so if you would like to buy one please visit the Etsy shop.  If you want to make one of your own I have decided that this is one of those sewing projects that is ideal for beginners so I’m going to do a tutorial on how to draft this bag to your own sizes needs and how to make it.  But if you are already familiar with my timing you will understand that it may be a while before I pull it all together to present to you.

In a little garden news I want to share the surprise I found underneath my bean tee-pee: 4lbs of carrots!  I will probably do a separate post to talk about underplanting in the garden, but today is just a little post to share what’s been going on around here.  The carrots were completely neglected and thrived- they are so sweet I’ve actually been snacking on them raw.  I don’t often like snacking on carrots raw and plain but these are so sweet I am really enjoying them!  I absolutely love garden surprises whether they are volunteers shouting up at me from the ground (often the legacy of previous gardeners) or if I planted something and thought it died only to find it thriving later on.

It’s time I got to my sewing room so until next time- happy homesteading!

Come visit the Stitch and Boots Etsy Shop!

Candied Spiced Nuts Recipe

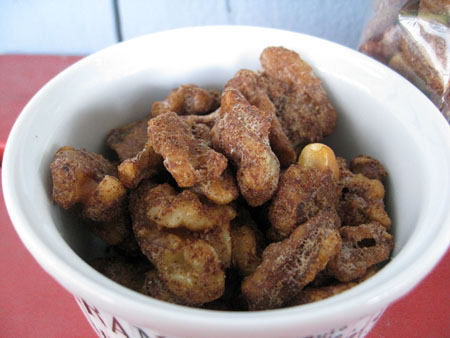
Spiced nuts make great holiday gifts but I usually make them for myself to put on salads.

Spiced nuts are easy to make and can be customized to suit your tastes.

Spiced Nuts
Ingredients:

6 cups of nuts, I prefer walnuts

3 egg whites

2 tbsp water

2 cups granulated sugar

2 tbsp ground cinnamon

2 tsp ground ginger

1 tsp salt

1 tsp nutmeg

1 tsp allspice

1/2 tsp cloves


Method:

Preheat oven to 300.  In a mixing bowl, beat the egg whites and water until frothy.  Fold the nuts into the egg whites gently until they are completely coated.

Combine the sugar, salt, and spices and blend well.  Add it to the nuts, stirring gently, until it is mixed in well.  Spread the nuts onto two large greased cookie sheets.  Bake uncovered for 20 to 25 minutes being sure to stir the nuts a couple of times while cooking.

Let the nuts cool completely before storing.  They will not be crisp when they first come out because of the egg whites but after they are completely cool they will be.  Store in an airtight container.


Coating the nuts with egg whites.

Coating the nuts with the spiced sugar.

Making them pretty if you’re generous enough to give any away.

Recipe Notes: If you haven’t worked with egg whites before then you may not know why you have to be so gentle with them: when you beat them they fill with tiny bubbles which give them loft but if you stir too roughly or too much the bubbles collapse.  In this recipe it isn’t as vital to maintain loft as it is in other recipes that use meringue like souffles, but it’s the gently cooked whites that give a special crunch to these nuts.  Feel free to play around with the spices- leave one out if you like (or all of them if you want candied nuts with no additional flavor).  If you know your oven runs hot, try setting it a little lower.  If you don’t like walnuts, like I’ve used here, use any kind of nut you like.

Stitch and Boots Etsy Shop

Here on Stitch and Boots my main objective is to help people learn as many of the skills an urban homesteader might need to know that are within my realm of expertise to share.  I want to be a conduit to DIY success in cooking, sewing, fixing, cleaning, and growing.  Sometimes with the help of much-loved and respected friends, often on my own.


In my former life I have been many things including: fast food cashier, electronics salesperson, shipping manager for Weston Wear in San Francisco, custom costume designer, needlewoman, assistant designer at Mulberry Neckwear, color swatcher at Mulberry Neckwear, coffee jerk (several times), technical writer, unpaid novelist, retail store owner, product designer and manufacturer for my own retail store, metal grinder (very briefly wonderfully satisfying), housewife, stay at home mom, and currently I am a headline editor for an online ad network.


I shut down my Etsy shop that followed my retail brick and mortar store because I wanted to be done with sewing for commerce.  I have a good job and not a ton of time.  Having a good job at this time must be counted as one heck of a blessing and I couldn’t be more thankful that I have one.  However, in spite of both my husband and myself being employed, like so many people we know we make very little money together and we are facing the tough prospect of a winter with no extra room in our budget for things like heating our house*.

I have some wonderful back-stock from my retail store that I made myself and I have decided to reopen my Etsy shop to sell what I have and to make some new things for it as well.

I have thought a lot about what my purpose is, what my usefulness to people is, and I believe that the real service I can offer to people is to help them learn to do things for themselves.  Trying to sell people ready-made things isn’t my main goal nor my ultimate gift.  The service of helping to teach others to do for themselves needs to be free.  I need to offer this as a real service.  A thing I do not for commerce but for sheer joy and personal fulfillment.  Money, just to have lots of it, is not an end goal I have, though I admit that like most people I don’t despise the dream of being  comfortable.

Most of the things I am listing in my Etsy shop are things I’d like to do as tutorials  here so that everyone can, if they want to, make them for themselves.  What I would ultimately like to do is to offer tutorials on how to make all these projects for yourself and then offer patterns only for sale at some point.

One pattern I will be working on this coming week is a little pattern for the mushroom applique I designed for the men’s shirt smock project.

I hope that all of you will visit my shop if only to say hello and see what’s going on there.  I know that so many people are in the same situation that I am financially and aren’t in a position to be shopping.   I am going to include links to my Etsy shop in any post where it seems appropriate but I ask you not to feel importuned in the least nor pressured to buy.  If I have something for sale that is exactly what you need or want then I will be delighted to provide it to you, but what I really want is for you all to continue visiting to see what new recipes, projects, and plant profiles are being added to this urban homesteading database.  I want all of you to continue to feel empowered to do things for yourselves.

Here is a link to my newly minted Etsy shop:

Stitch and Boots on Etsy

I have some new recipes to post in the next few days so come back soon!  Thank you all so much for spending time reading Stitch and Boots, this is one of my greatest achievements in progress!


*I’m not kidding.  The interior of our house has been between 53 degrees and 56 degrees all day.  We’ve always been known to keep our house at a fairly crisp cool temperature but this is ten degrees lower than we usually go.