Category Archives: Recipes

Cooking basics: How to Bake Acorn Squash

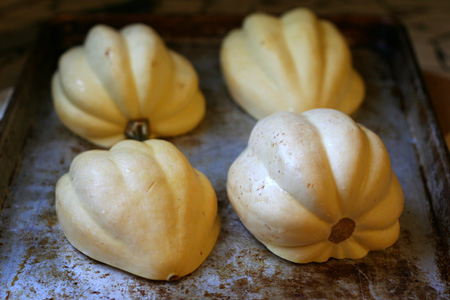
blond acorn 2.jpg Baking squash might seem too ridiculous to an experienced cook to explain but considering how many people I’ve met who’ve never baked their own pumpkin for pie, I think it’s important to cover the basics.  I like to think that if I died before teaching my son how to cook, he could come to my homesteading blog to learn how to do the basic things that mothers tend to teach their children in the kitchen before they ever set eyes on their first cookbook.

I would like to say, then, that there is no life instruction too ridiculous to teach a person who doesn’t already know it.

cut lengthwise 2.jpgAcorn squash are usually a dark green on the exterior (the ones in these pictures are mutants from a local farmer!) and medium to light yellow on the interior.  Their flesh is somewhat stringy and a little on the watery side compared to sugar pumpkins or other large squash.

1.  Preheat your oven to 375 degrees.

2.  Cut your acorn squash lengthwise.  Try to cut it into two even halves.  You can see that I didn’t completely succeed with one of mine!

stringy 2.jpg3.  Using a strong metal spoon scrape the seeds and the most fibrous part of the squash cavity out.

facing down 2.jpg4.  Place face down on a sturdy baking sheet.  Preferably not a non-stick.

baked 2.jpg

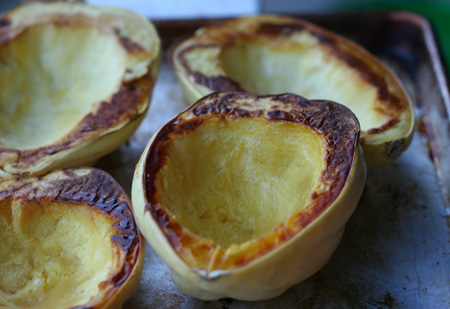
5.  Bake until tender.  How long this takes will vary depending on the size of the squash and the thickness of the flesh but it should take somewhere around 45 minutes.  To test done-ness: you will be able to stick a knife into the skin with no resistance when it is done.

Things to consider:

Some people like to brush the undersides of the squash with olive oil.  You may do this if you like but it is unnecessary.

Many people like to cover their squash with aluminum foil.  This is also not necessary and I would recommend you don’t do this to prevent waste in the kitchen.  I’ve heard some people say that it helps cook the squash faster by holding heat in but at least with regards to acorn squash you get the same effect by cooking them face down in halves.

You can cook the squash at 350 degrees and just expect it to take a little longer.  I cook all my squash at 375 degrees which I think lessens the over-all cooking time without overcooking it too fast which a higher temperature might do.

What now?

Stuff them:
  They’re perfect for stuffing because a half a squash is a good single serving size.  If you fill it with grains and beans you will have a complete protein and with some salad on the side you will have a very nutritious meal.

Dress them:  While still hot add a tablespoon of butter, a sprinkling of salt (about five shakes from a shaker) and some grinds of fresh pepper (also about five), then eat it.  Simple good food.  You can do this right in the skin or if you prefer you can scoop the squash out of the skin and then add the butter, salt, and pepper.

Enhanced by Zemanta

Polenta with Spinach, Onion, and Garlic

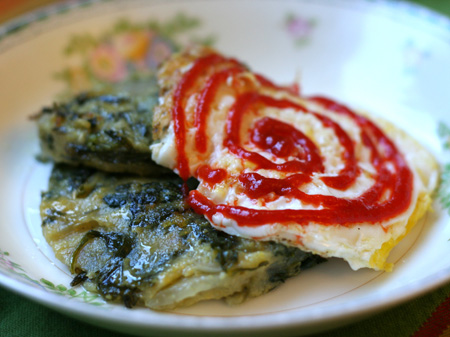
hot sauce spiral 2.jpgWhat’s the difference between polenta and cornmeal?  Nothing.  Polenta is boiled cornmeal.  You can make polenta using a fine, medium, or course grind of cornmeal which will determine how long it takes to cook.  The coarsely ground polenta will take at least 45 minutes to cook, sometimes longer.  I personally prefer a medium to fine grind because it’s silkier but a lot of my friends and family prefer the coarser grinds for the grainier texture.

This is a versatile dish.  It goes well with almost anything.  I make my polenta different almost every time using what I have on hand as my inspiration.  When it’s first cooked it’s soft and porridge-like, perfect for spooning into a bowl with a heap of sauteed greens and garlic, but when it cools it firms up so I always pour it out onto a baking sheet, smooth it, and when it’s cooled I cut it into squares or use a biscuit cutter to cut it into circles and store it in the fridge for frying up later.

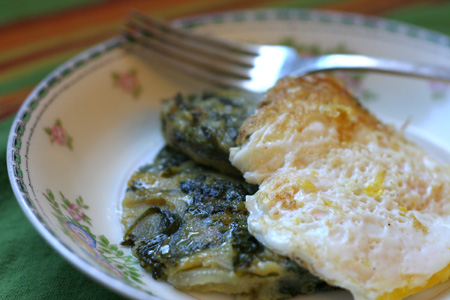
This particular batch made one dinner and several breakfasts.

best breakfast 2.jpg

Polenta with Spinach, Onion, and Garlic

Ingredients:

1 1/2 cups polenta
6 cups of water
4 cloves of garlic
1 tsp salt
30 grinds fresh pepper

1 lb spinach, washed and chopped
1 onion, diced
2 tbsp olive oil

To prepare leftovers for breakfast:
2 pieces of cut polenta
2 eggs
1 tbsp olive oil
salt and pepper
Sriracha hot sauce

Optional:
two slices of jack cheese

Method:

In a large sauce pan bring the water to a boil.  As soon as it boils turn it down to low heat and whisk the polenta into it, this is important because the whisking keeps the polenta from making lumps in the water.  Whisk really well to incorporate.  Press the garlic into the polenta, stir well, and then put the lid on the pot and let it cook.

Heat the olive oil in a large saute pan on med-high heat.  Add the onion and saute until translucent, then add the spinach and toss until well wilted, turn the heat down a little and put the lid on the pan to encourage steaming and stir every couple of minutes until the spinach is tender.

Stir the onion and spinach into the polenta, add the salt and pepper and stir well.  It is ready to spoon into bowls now unless you are using the coarse grind of cornmeal.

For the coarse grind you will need to let it continue to cook.  Total cooking time for coarse grind should be a minimum of 45 minutes, though some people swear it takes no less than an hour and a half (Italians do, anyway).  To check for done-ness taste a small cooled spoonful, if it’s done it will not be gritty.


To prepare leftovers for breakfast:

Heat the olive oil in a medium saute pan.  When hot, place two slices of polenta (pictured above are rounds I cut with a biscuit cutter) into the pan and crack two eggs next to (not on) the polenta.  The polenta is done when it is heated through and slightly browned.  The eggs are done when you say they are done.  Sprinkle the eggs with some salt and pepper.

If you like cheese you can stack a piece of polenta and and egg with a slice of cheese between them.

I highly recommend eating this with Sriracha hot sauce.

Recipe notes:  To make the breakfast vegan you can eat the sauteed polenta with beans (seasoned black beans would be very good) or with seasoned sauteed tofu.  This is a great and balanced breakfast- grains, greens, and protein.  I ate it for a week and it was the best thing about my day.  Yeah, hard week.


This recipe is vegan (if not using the egg or cheese for the breakfast leftovers)
This recipe is gluten-free.

Hors d’Oeuvre: Ciabatta, Caramelized Shallots, and Brie with Sour Cherry Sauce

the macro shiny brie 2.jpgI don’t often make hors d’oeuvres but I’ve noticed that when I don’t provide something to snack on while making Thanksgiving dinner everyone starts getting edgy and unthankful. 

I’m not a person who gets up at the crack of dawn to brine a turkey, partly because the thought of shoving my hand up a dead turkey’s “cavity” to remove its innards isn’t something I can handle before 5pm (when the experience can be fortified with strong drinks), but mostly I don’t make turkey because I’m a vegetarian.  In fact, I don’t labor in planning Thanksgiving dinner much at all.  A day or two before my family gathers (we’re a very small group) my mom and I discuss options.

This is the exception.  I have been planning to make this again since I made it twice last fall.  I took notes last year on the improvements I wanted to make and have been looking forward to making it again ever since. 

the cherry factor 2.jpgPeeling shallots takes a lot of time.  The ones from the store are
slightly easier than the ones I grow myself which have a thin dry skin
that doesn’t like to come off.  I made my sister do the peeling last
year so this year I performed an experiment in an attempt to improve the
tedium of peeling.  Garlic roasts well in its papery skin and squeezes
out afterwords very easily, so why not roast the shallots in their skins
the same way? 

I peeled all of the bigger cloves and left the rest.

shallot experiment 2.jpgUnfortunately, the experiment didn’t prove successful.  Yes, shallots can roast well in their skins but they are just as difficult to remove when they’re sticky as when they’re dry.  Most importantly, the bulbs that were skinned first got browned nicely whereas the ones left in their skin were browned on the skins only.  So the lesson is: peel your shallots.  Even though it’s a pain in the butt.  Better yet, assign a minion to do the peeling.

This appetizer takes time and effort to make.  It’s worth it.

godlike food 2.jpgCiabatta, Caramelized Shallots, and Brie with Sour Cherry Sauce

Ingredients:

2 lbs of shallots, trimmed and peeled by your minion
1/2 cup olive oil
salt
pepper

Sour Cherry sauce:
1 quart sour cherries, pits removed and chopped in half
4 cups sugar
(Alternatively: 1/2 jar sour cherry jam loosened up with water)

1 loaf of Ciabatta bread (or other good quality rustic bread)
2 wedges of Brie cheese, room temperature (Camembert is a good substitute)

the setup 2.jpgMethod:

Preheat the oven to 350 degrees.  Spread the shallots out on a baking sheet, drizzle all of the olive oil over them, then sprinkle with salt and grind some pepper on them.  Put on a rack in the middle and bake for up to an hour and a half, making sure to turn them with a spatula every ten to fifteen minutes.

Sour Cherry Sauce:

Add the sour cherries and the sugar to a medium sized sauce pan.  If the cherries are frozen, let them thaw enough to start liquefying the sugar before turning the heat on.  Once the cherry juice starts mixing and dissolving the sugar turn the stove on to high heat.  Bring the cherries and sugar to a boil, then reduce the heat to medium and cook for 20 minutes, stirring frequently to prevent scorching.  Remove from heat and let cool until everything else is ready.  As it cools it will thicken.

When the shallots are done (they should be browned but not scorched, see picture above) remove them from the oven and put them in a bowl with a couple of forks for serving.

Pour the cherry sauce into a bowl and provide a spoon for serving.

Slice the Ciabatta bread in appetizer sized pieces (each slice cut in four pieces worked well for me but you can cut them bigger if you like) and arrange them on a plate. 

Place the brie on a plate with knives.

If your guests are unfamiliar with or worried about the presence of fruit near their cheese and bread, go ahead and serve them up a piece before they have time to think about it. 

Each piece of bread gets a generous bit of cheese, a shallot or two, and a small spoonful of sour cherry sauce. 

sans cherry blood 2.jpgRecipe Notes:  If you can’t get your hands on sour cherries, cranberries would make an excellent substitute.  The important thing is to make a sauce that is both tart and sweet.  The shallots are sweet by themselves so using a fruit that is just sweet will result in a somewhat vapid experience.  A red currant sauce might be good here too.  Please don’t use sweet cherries.  They don’t work. 

About the rind of the cheese:  I don’t eat cheese rind.  I will dig into a wedge of brie completely gutting it, leaving just the velvety moldy exterior like a cheese-hungry termite which has caused some gasps of shock from others.  Some people view it as a crime to eschew the rind.  Some simply view it as the act of a philistine.  I’ve been told by many people that the French ALWAYS eat the cheese rind, however, I was finally gratified to find out from an actual French person that this isn’t true.  He said many French people don’t care for the rind either and it is a question of personal taste, not a point worthy of hysteria or snobbery.  I included the rind in these pictures and then fed them to my rind-eating relatives.  I think the rind is picturesque and since most people I know eat it, it seemed natural to include it for the shoot. 

The heat and cooking time: You can cook the shallots in less time at a hotter oven temperature but the results will not be quite as good.  Less heat keeps the shallots form scorching and consequently takes longer.  A good caramelization time.  Give it the time. 

best food ever 2.jpg

Enhanced by Zemanta

Lemony Beet Salad

beet feta salad 2.jpgI was six the first time I remember eating a beet.  I pulled it up out of my mother’s garden and ate it standing right there in the back yard, dirt and all.  I have since decided that I like my vegetables washed before eating as the grit of soil fails to please, but my love of beets has never wavered.  I offer you my favorite way to eat them here.

Most people I know either roast or boil beets.  I think roasting is nice sometimes but I find that roasting makes a beet have a stiffer drier texture (even with plenty of olive oil) so that I don’t roast them often.  I never boil beets.  In fact, I never boil anything.  I always steam vegetables.  I steam because that’s what my mother always did.  She steamed because she believed more of a vegetable’s vitamins and minerals were retained using this method.  I don’t know if that’s true but whenever a recipe calls for boiling, I steam instead.
 

This beet salad recipe can be served plain or it can be served on a bed of lettuce with feta cheese.  You can use any kind of beets.  I used a combination of golden beets and dark red beets.  Because I cooked them together the golden beets turned red.

To peel or not to peel?  I only peel off the rough parts of beets.  Sometimes this means I peel the whole thing but often it means I just peel the tops.  The golden beets were mostly smooth skinned so you can see a lot of it was left on.  My mother influenced me in this matter just as she did with steaming.  She believed that peeling vegetables removed some important vitamins and minerals and should only be peeled if the skin is tough or compromised in some way.  You will find that I rarely suggest peeling vegetables in my recipes.  You can always peel if you prefer it.   

golden beets 2.jpgLemony Beet Salad
Serves 4 to 6

Ingredients:
8 medium sized beets, cut into 1/2″ to 3/4″ cubes
1/4 cup olive oil
Juice of one lemon
3 cloves garlic, finely minced or pressed
1/2 tsp salt
1/2 tsp freshly ground pepper

To serve as shown in the picture:
(ingredients are per person)
2 cups lettuce
1 to 2 oz feta cheese
1 tbsp vinaigrette to dress lettuce

Method:

Fit a pot with a steamer basket, fill with water up to the basket (but not above), bring water to a boil.  (I have a steamer pot and prefer it to the baskets but either will do).  Add the cubed beats and steam for 15 minutes*, or until tender enough to pierce easily with a fork.

Meanwhile, in a medium sized bowl mix together the oil, lemon, garlic, salt and pepper.  When the beets are done steaming add them to the bowl and mix together with the dressing.  Toss it several times as the beets cool.

If you’re going to add the beets to a bed of lettuce, as shown in the picture, let the beets completely cool.  For each plate add two cups of lettuce tossed with a little vinaigrette, scoop about 3/4 cup of the lemony beets onto the bed of lettuce, and top with some crumbled or cubed feta cheese.

macro beet salad 2.jpg


Recipe notes:  If you’re vegan you can leave off the feta and this salad will still be amazing.  I like the salty punch of the feta and if you’d like to have that same punch without cheese you can add a few Kalamata olives to each salad.  Croutons are also good here, but if too many extras are added I think you lose the fresh lemon flavor, so I prefer to keep it simple.  If you have baby spinach on hand that would be a great substitute for the lettuce.  I had this salad with regular spinach and I have to report that it was too tough to be enjoyable.

This recipe is Gluten Free
This recipe is Vegan if you omit the feta cheese

*I timed the steaming and 15 minutes was perfect, however, if you cut your beets a little bigger than I did it may take a few extra minutes.

Enhanced by Zemanta

Pasta with Cheese Sauce, Chanterelles, Caramelized Onions, and Spinach

chanterelle pasta 2.jpgI have been wanting to try chanterelle mushrooms for a long time but haven’t bought them because I promised my son I wouldn’t sell him to buy fancy groceries.  I live in a damp region which encourages a diverse and plentiful population of mushrooms and it’s my plan to learn to forage them.  Near the end of the season last year I found some old boletes and some decaying chanterelles which didn’t make me hungry.  I hope to do better this year.  In the meantime one of the local organic farms I buy  my produce from had some chanterelles (foraged by their friend- boy would I like to know their foraging spots) were being offered for a single dollar digit per pound and I had to splurge. 

I love wild mushrooms generally mixed with cultivated ones.  On their own they’re often too maneurish for my taste.  Chanterelles, it turns out, are very mild and don’t need to be toned down by tamer cousins.  Aside from their delicate flavor, they have other charms: they’re very pretty and when sliced thin length-wise they make sweet curling shapes that remind me of ancient handwritten letters.

I think you should know that I wash my mushrooms under water.  I am completely aware that this breaks precious culinary laws and I am unconcerned.  The water the mushrooms soak up in the process of being washed gets cooked off quickly and I’ve never noticed an increase of mushroom flavor when eating mushrooms that haven’t been mauled by the faucet.  I respect you if you like to brush them.  I suspect it gives one a greater connection to their worth and cost- to treat them like rare treats one might not get to eat again for a long time. 

I will continue to wash mine in water.

This recipe is rich.  I’m not going to apologize to anyone’s waistline for presenting it.  Treat yourself just this once and I think you won’t be apologizing to your waistline either. 


Ingredients:
6 servings for gluttonous individuals like myself
8 servings for modest portions

1/4 cup olive oil
2 medium yellow onions, sliced thin
10 ounces chanterelle mushrooms, sliced thin
1/2 lb fresh spinach, chopped
2 tbsp water

3 tbsp flour
3 tbsp salted butter
1 tsp salt
1/2 tsp pepper
2 shakes of cayenne
3 cups of low fat milk, warmed
2 1/2 cups Emmentaler cheese, grated

1 lb angel-hair pasta

chanterelles sliced 2.jpgMethod:

Heat up the olive oil in a saute pan (on med/high heat) and add the onions to it.  As soon as the onions begin to brown a little turn the heat down to med/low and continue to saute them until they caramelize.  Be sure to stir them frequently to prevent burning them which makes them bitter.

When the onions are caramelized, add the chanterelles.  Let them cook for a few minutes and then add the spinach and the water and after you’ve stirred everything well, put the lid on the pan for a minute to encourage the spinach to completely wilt.  When the spinach is wilted, remove the pan from heat and set aside.

Bring a pot of salted water to a boil while making the cheese sauce, add the pasta to it as soon as it’s boiling.  I find that the pasta and the cheese sauce get done in about the same amount of time.

With the butter, flour, salt, pepper, and cayenne, make a light roux.  Whisk the warm milk into the roux and cook gently until it thickens.  Once thickened, remove the sauce from the heat and stir in the grated cheese.  Stir the cheese gently until it’s completely incorporated into the sauce. 

adding to the sauce 2.jpgAdd the chanterelle, onion, and spinach mixture into the cheese sauce.

Drain the pasta when it’s finished (test a piece for doneness).  Return it to the pot and pour the sauce over it.  I find the best way to blend the sauce into the pasta is with metal tongs. 

chanterelle cheese pasta 2.jpg

Serve it up!  I am a glutton for Parmesan but this pasta doesn’t actually need any extra cheese or garnishes.  I add the Parmesan anyway.

Recipe Notes:  If you can’t find Chanterelles any mushroom will be a good substitute.  If you’d like more iron to offset the richness of…everything else in the dish, I think you can safely double the amount of spinach without detracting from the other flavors because spinach has incredible shrinking power and even doubled will not amount to overdoing it. 

I’ve made this with sharp white cheddar which was fantastic; gouda would be good too though I prefer stronger sharper flavors.  If you want to coat your arteries just a little more, you can use whole milk or even some cream.  The reason I use low fat is because I like it best, not because it’s lower in fat.  I find the cheese adds plenty of creaminess here. 

You can also lower the cheese amount if you’re a fool.  (Just kidding!)  I usually only use two cups of cheese in my cheese sauces, I find it sufficient, the reason there’s more this time is because I had a half a cup left over and no plans for it.  I’m not sorry for the extra Emmentaler here, though I’m fatter this morning, I’m sure. 

Enhanced by Zemanta

Thoughts on Fitting Food Preserving into a Busy Life

organic apple 2.jpgI have been doing a lot of preserving in the past month.  It has been my intention for weeks to hang up the jar tongs and get back to seriously writing the second draft of my book.  I have this goal that I will have the second draft finished by January 1, 2011.  Instead of writing I’ve been making batches of pesto (I’m up to a little over 20 batches in the freezer), canning stewed tomatoes (17 quarts this weekend), making quadruple batches of enchilada sauce to freeze, and yesterday I made an enormous batch of soup using the last of the summer vegetables (corn, green beans, summer squash, tomatoes, new potatoes, and fresh basil).
The elderberries are winding down now.  I’ve got 11.25 cups of elderberries getting sauced in 2,250 ml of 100 proof vodka in the pantry.  I have at least another 6 pounds of foraged elderberries in the freezer.

I could be done now.   I could throw the towel down and leave the ring.  But if I did that I wouldn’t have any dill pickles.  There weren’t enough pickling cucumbers for me to make cucumber pickles but right now there are these giant locally grown cauliflowers and cabbages that I can pickle the same way I do the cucumbers.  I made the cauliflower last year and it was an enormous success- not only between myself and my husband but all of our friends who tried them loved them also.   

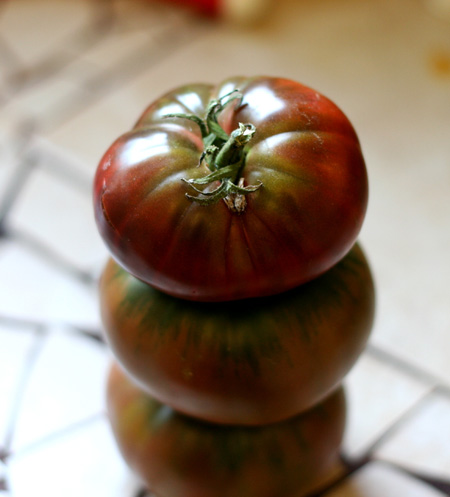
tomato stack 2.jpg

I have another nagging ambition: I want to make a green tomato salsa.  I want to do it just like the tomatillo salsa I made a couple of years ago.  Tomatilloes, like tomatoes, had a rough year and I didn’t manage to get any through u-pick.  But I have a Mexican cookbook that mentions that green enchilada sauce can be made with either tomatillos or green tomatoes.

I want to try it!

There’s more.  I saw a recipe for dill pickled green tomatoes that I think I’ll regret not trying all year if I don’t make them.

And what about the eggplants?  They’re 4 for a dollar at Bernard’s and I wanted to grill a huge bucket of them for the freezer…

I keep telling myself to stop, but the truth is that doing these preserving activities makes me feel good.  It makes me feel more hopeful and excited about the coming months during which time anything good or bad might happen but one thing’s for sure: I’ll be eating home pickles and making soups from tomatoes that have no pesticides on them.  When I’m feeling low I can make a pasta with grilled eggplant and pesto. 

So the book takes a little longer to write.  I’ve been thinking a lot about my characters as I preserve, thinking about how important these same activities are to them.  More so since they can’t just buy things from a grocery store the way we can today.  The inspiration for the story originally came from doing urban homesteading activities and asking “What if oil didn’t completely run out but became so limited and so costly that the average person couldn’t drive a car because they couldn’t get oil and what if they couldn’t buy anything plastic?  What if no one could afford to buy imported foods except on rare and special occasions?  What would you have to know how to do in order to survive being more isolated in the community you’re in?

These are the things I think about while processing 50 pounds of tomatoes. 

What I’ve realized is that preserving as much food every year as I can, at least in the fall, isn’t just a silly little project I enjoy doing, it’s a big project that I feel a deep need to participate in.  I need to know how to preserve food I have now so I can eat it later.  Because I already mostly eat seasonally my choices in produce are about to become much more limited.  I buy a few things out of season, but not much.  No green beans, no corn, no out of season fruit (except for Max), no summer squash, no tomatoes, no eggplant, no asparagus, no peas, and no fresh herbs I can’t still get out of my garden.

It isn’t a fancy rich person’s hobby.

I’m not rich and I’m not fancy.

It isn’t an indulgence as I’ve been telling myself it is just because I know I have other things to do.  It’s one of the most important things I do for myself and my family every year.

So I’m reminding myself, and anyone else who needs a similar nudge, that preserving your own food (no matter how much or how little you do) is using the kind of knowledge that allowed humans to cross the ocean.  Practicing this knowledge is what allowed humans to settle down in one place.  Unfortunately it’s also what allowed armies to march far enough to conquer and oppress other countries.  Food preserving is responsible for so many huge changes in human history.

It’s something I look forward to every year.

Enhanced by Zemanta

Marinated Summer Vegetables: a canning recipe

closer marinated veg 2.jpg l love marinated three bean salad, so when I found a canning recipe for it I was really excited to try it.  The only problem was it called for green peppers which I don’t care for, and which aren’t traditionally found in a three bean salad.  I’ve noticed that a lot of canning recipes call for green peppers where I wouldn’t normally suspect them and I’m sure this is because everyone grows them and then doesn’t know what to do with them.  Toss them in the pickle!  Toss them in the sauce!  Put them in the piccalilli!.

If you ask your local extension service about substitutions in canning recipes you are almost guaranteed to be told: NEVER MAKE SUBSTITUTIONS! and then they’ll fall into a dead faint.  They take this subject very seriously, and rightly so.  The danger of making substitutions in a canning recipe is that you  might alter the acidity level of the food which may possibly make it unsafe to can.

I chose to call my local extension office for advice and I ended up having to talk to the head master canner because the other ones were too scared to answer my question: can I safely replace the bell peppers in this recipe with more of some of the other items such as the green beans?  She looked into it and came back with the answer that it was safe.  She went on to explain that there was no reason other vegetables couldn’t be used in this recipe in place of what’s already in it, that the kidney beans and the chick peas were the lowest acidity items in the recipe and as long as I don’t skip the over night marinating step, I can make substitutions in this recipe.

Why is marinating this recipe for at least twelve hours important?  Because you need to allow the beans, which have the lowest acidity level of all the vegetables in this recipe to become well saturated with the marinating liquid which ensures that the beans are at the proper acidity level.

I’m offering two versions here: Marinated Summer Vegetables and Marinated 3 Bean Salad.  What I love about these recipes is that when it’s the middle of winter and there isn’t a lot to put on a salad I can drain a jar of these and add half a cup to a bed of lettuce and enjoy summer vegetables in winter.

marinated veg in pot.jpg

Marinated Summer Vegetables
yield approximately 6 pints

Ingredients:
5 cups equal parts corn, green bean, and summer squash
1/2 onion, quartered and very thinly sliced
1/2 cup celery, thinly sliced
1 1/4 cups water
1/2 cup white vinegar (5% acidity)
1/4 cup lemon juice
1/4 cup olive oil
1/2 tsp pickling salt
2 tsp dried oregano

Method:

Wash the vegetables and cut so that the pieces are all between one and two inches.  For example: I cut my zucchini in half lengthwise and then into 1/2″ thick slices except for the really small ones which I sliced into 1/2″ thick rounds.  Add the celery and onion and mix them all together.

In a big nonreactive pot mix the water, vinegar, and lemon juice and bring to a boil, then remove from the heat.  Add the oil, salt, and oregano and mix well.  Add all the vegetables to the solution and bring to a simmer.  Remove from heat and let it cool down before adding it to the fridge to marinate for a minimum of 12 hours.  I let mine marinate for almost 24 hours because that’s when I could get back into the kitchen to process them.

Once the vegetables have marinated, bring them back to a boil and fill clean hot jars with the vegetables, topping each jar up with marinating liquid, leaving 1/2″ head-space.  Adjust the lids and process for 15 minutes in a water bath canner.

Variation:

Marinated 3 Bean Salad

yield approximately 6 half pints

Ingredients:

2 cups green beans, cut into 1-2″ pieces
1 1/2 cups red kidney beans, cooked and drained
1 1/2 cups chick peas, cooked and drained
1/2 onion, quartered and very thinly sliced
1/2 cup celery, thinly sliced
1 1/4 cups water
1/2 cup white vinegar (5% acidity)
1/4 cup lemon juice
1/4 cup olive oil
1/2 tsp pickling salt
2 tsp dried oregano

Method:  Follow the same instructions for the Marinated Summer Vegetables (given above).

Recipe notes:  If you are one of those people with lots of green peppers to use up, reduce the green bean quantity by 1/2 cup and add 1/2 cup thinly sliced peppers if you’re making the 3 Bean, or you can add them in equal parts to the other summer vegetables in the Marinated Summer Vegetables recipe.  Another safe variation is to do all green beans for the vegetables. 

Enhanced by Zemanta

Spicy Corn Chowder

summer corn chowder 2.jpgMany years ago when I was going to fashion design school in San Francisco, a friend took  me to a cafe near Union Square on a blustery cold day.  I ordered their corn chowder.  It was better than any corn chowder I’d ever had and I have wished many times over the years that I had been paying attention to my food then the way I do now and taken notes.  It was thick, not runny; it was creamy but not too milky; it was spicy without being heavy with heat.  It had cilantro in it.

That cafe has been closed down for at least 15 years.

For some reason I’ve been remembering that bowl of chowder I ate 20 years ago a lot this summer, so I decided it was time to recreate it from distant memory.  After several batches I present to you one of the best things you can make with summer corn.  Chowder sounds like it’s meant to only be eaten in the cold weather but corn is at its best in the summer so if you can still get some at your farmer’s market, give this a try right away, even if it’s still hot where you live.

My friend Chelsea (a major inspiration for starting Stitch and Boots) suggested I make a stock out of the corn cobs and it was brilliant because the soup had a lot more flavor than when I’ve made it in the past.  It really isn’t too much trouble.  Cook the cobs down while you prep the rest of your ingredients and do some other kitchen chores.  It’s well worth the effort make the stock out of the cobs.

corn stack 2.jpgSpicy Corn Chowder
serves 4-6

Ingredients:

7-8 ears of corn (5 cups corn kernels)
3 tbsp all purpose flour
3 tbsp butter
2 tsp salt
30 grinds of pepper (or 1/4 tsp)
1 quart corn cob stock
1 tbsp olive oil or butter
1 med. onion diced fine
1 celery stalk sliced thinly
4 med round potatoes diced med/small
1 can evaporated milk (or 1 cup milk)
2-3 jalapenos, roasted, peeled, and finely minced
2 tbsp finely minced cilantro

Sour cream for garnish

corn stock 2.jpgMethod:

Bring two quarts of water to a boil in a stock pot.  Cut the kernels off the corn and set the kernels aside in a bowl for later.  Break the corn cobs in half and put them in the pot.  Boil the cobs until the stock is reduced to 1 quart (this takes about 40 minutes for me but times may very).

Remove the cobs and set the stock aside.

In a soup pot prepare a roux using the flour, butter, salt, and pepper.  Pour the corn cob stock slowly into the roux whisking briskly to remove any lumps and once all the stock is poured, let the veloute* thicken.

burnt on purpose peppers 2.jpgHeat up the olive oil in a medium saute pan and saute the onion and celery until the onion is beginning to brown slightly (this adds more flavor to the chowder).  Remove from the heat and add to the thickened veloute.

Add the potatoes, corn, and jalapenos to the chowder.  Stir frequently to prevent the bottom from burning.  Let the chowder cook until the potatoes are completely done, around 30 minutes.  Turn the heat off and add the milk and the cilantro, stirring them in well.  Let it cool a little before serving.

Top with a couple of tbsp of sour cream and serve!

corn chowder chop 2.jpg


Recipe Notes: You can use a lot more cilantro and the soup will still be great.  I made one batch with a whole bunch of cilantro and though it was good, I wanted the emphasis to be on the corn so the next batch I used just 2 tbsp and thought the balance was much nicer.  You can also garnish with some additional cilantro if you like.  

The chowder is just as good without the evaporated milk (I made it both ways) but a true chowder has milk and I like the flavor it adds so I prefer the version with milk.  A word about the jalapenos- mine were very hot and 3 of them was almost too much but I later bought peppers from a different vendor at the market and they barely had any heat.  So my suggestion is to only use two if your pepper are especially hot this year and you don’t want the soup to be super spicy.

One more thing- if you don’t have fresh corn on hand and want to use canned or frozen, 5 cups might be an awkward amount (it’s the amount I got off of 8 ears of corn).  Don’t worry about it.  Use whatever quantity comes closest in canned or frozen without wasting any.  A little difference in quantity of corn one way or the other won’t ruin this chowder.

*Technically a veloute is made with beef or chicken stock but when making a vegetarian dish you always substitute meat stocks with vegetable stock so while it isn’t a true veloute, this is a vegetarian version of one.

This recipe is vegan if you make the roux with olive oil instead of butter and omit adding the evaporated milk.

Related article:

How to Make a Roux

Enhanced by Zemanta

How to Make a Roux

roux base 2.jpg
What is a roux?

A roux is a cooked mixture of equal parts flour to fat which is used to thicken sauces, gravies, and soups.  Making a roux is very basic and is such a versatile cooking component that every cook should know how to make it.

The flour used is wheat and it works equally well with whole wheat as it does with refined wheat.  The whole wheat will give the roux an earthier fuller flavor while the refined wheat will be more flavor neutral. 

The traditional fat to use is clarified butter but you can use regular butter, rendered fat, or oil.  I nearly always use butter when I make a roux but I recently tried using olive oil because I’ve heard it works well and my friend Angela uses oil frequently and suggested I give it a try.  I did and it worked just as well as the butter so I can happily recommend that vegans learn to make roux in their kitchens using oil instead of butter.

A traditional roux is simply this:
Equal parts fat to flour, cooked.

That’s very simple.  But before I give you the method to making the roux I want to mention that I always season my flour before I make the roux.  I like to mix in a ramekin the following:

3 tbsp flour
1 tsp salt
1/4 tsp freshly ground pepper
2 shakes of cayenne pepper

This is the flour mixture I use when I make cheese sauce and I love the kick of cayenne gives to the cheese.  Even when I don’t use the cayenne, I always add salt and pepper to my flour.  (If you will be adding hot peppers a dish in which you will be adding the roux, omit the cayenne and only add later if your dish still needs more heat)  

roux 2.jpgHow to make a roux:

Heat up the fat in a skillet (or soup pot) at med/high heat, if it’s butter don’t let it brown*.  Whisk in the flour (or flour mixture).  When it’s all mixed together it should form a thick paste as you see in the picture above. Whisk the paste for two to three minutes. 

It is important to cook it for at least two minutes because this removes the raw taste of flour from the dish you will add your roux to.  I always make a light roux and so never cook it for more than five minutes before adding liquid.  The longer you cook it the deeper the color and flavor.

After a few minutes you either take it off the heat and transfer to another container for use later, or add liquid to create a sauce, gravy, or soup base.
 

making roux 2.jpg

What to do with the roux:

You can add any liquid to a roux that suits your purpose: water, stock, or milk are the most common liquids to add depending on what you’re making.

How much roux you need for a recipe will sometimes vary.  I have found that usually 3 tbsp of flour to 3 tbsp of butter is sufficient to thicken 3 cups of milk for making a cheese sauce for one casserole dish of macaroni and cheese.  I also find that this is adequate for thickening a medium batch of soup that serves 4 -6 people.

When you add your liquid to the roux you need to whisk constantly (and briskly) as you pour it into the pot to prevent lumps from forming.  I generally pour half my liquid in and make sure to get all the roux mixed well.  As soon as I see that the roux is mixed well with no lumps I add the rest of my liquid.  This will take longer to thicken.  It may take up to 20 minutes to fully thicken.

If you use milk (or cream) you want to make sure that you don’t let it boil hard.  Watch it carefully and as soon as you see it begin to bubble, turn the heat down to med/low and whisk it frequently to prevent burning. 

Once the roux has thickened your liquid, it’s ready for whatever application you intend it for. 

Here are a couple of examples of what you might do next:

If you’re making a cheese sauce you turn the bechamel (roux + milk = bechamel sauce) off the heat and add two cups (or more) of grated cheese, stir, then add to pasta.

If you’re making a soup you would add your veloute (roux + stock = veloute) to some sauteed vegetables or you would start adding your vegetables to the pot with your veloute. 

Every cook should know how to make a roux and I hope my instructions give a nudge to anyone who hasn’t learned to make one yet. 

*Unless you are following a recipe for a brown butter sauce or

Enhanced by Zemanta

Tomato and Basil Strata Recipe

egg strata 2.jpgThe first time I tasted an egg strata was at my cousin Christa’s house in Wisconsin.  It’s a great dish to make for brunches because you can assemble it the night before and throw it in the oven 45 minutes before you want to eat it.  It’s filling and offers everything in one dish that you should ideally start your day with (protein, grain, and vegetable).
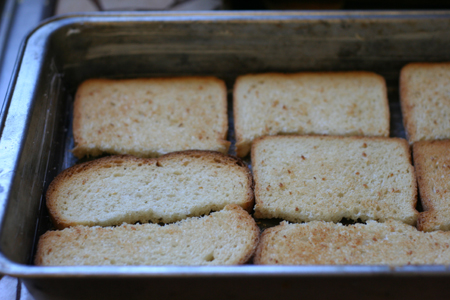
One thing you need to bear in mind when you make an egg strata is that you must let it sit at least for one hour before baking so that the toast becomes saturated with the egg and milk mixture.   

My recipe calls for a lot of eggs and if that makes you hesitant you need to consider that this recipe generously serves 8 people (or can be cut even smaller if you have other dishes to serve) which means that each serving has just 1 1/2 eggs in it.  That’s not too many eggs to eat for breakfast!

About the bread.  Most strata recipes call for good quality French bread or a brioche loaf.  I used a great local bread called “sesame white” which has good flavor and no gluey factor.  We usually use whole wheat bread and I would wholeheartedly suggest you use wheat if you have it.  However, I buy the sesame white to make croutons with (because they dry nice and light and not hard) and so this is what I had the first time I made it.  I liked it so much that I bought more sesame white.  Bread comes in all shapes and sizes so how much bread you’ll need to toast may vary a little from what I used.  Keep that in mind.  This is a regular sliced sandwich bread size. If you use a french bread the slices may be half the size of what I used.

Egg stratas lend themselves to lots of variations and I encourage you to play with the possibilities!

Tomato and Basil Strata

serves 8

Ingredients
8 slices of good quality bread
1 tbsp butter for greasing your baking dish
12 eggs
2 cups milk
10 large basil leaves (or one small bunch) julienned
1 tsp salt
30 grinds of pepper
6 large tomatoes
2 cups grated jack cheese

Method:

Preheat the oven to 300 degrees.

Place the bread slices on baking sheets and toast them until lightly
toasted and dried out.  Be sure to turn them over so they get toasted on
both sides.

Meanwhile, beat the eggs and milk together and then add the basil, salt, and pepper to it and beat a little more to mix well.

Slice the tomatoes in rounds (somewhere between 1/4″ and 3/8″ thick is good).

toast for strata 2.jpgGrease a 9×13″ baking dish with butter.  When the toast is ready layer
the bottom of the baking dish with them.  It was helpful with the shape
of my bread to break the slices up a bit to fit them in well.

making strata 2.jpgCover the toast with a layer of sliced tomatoes.  Make a second layer of
toast and beat the eggs again before
pouring evenly over the whole dish. Place a second layer of tomatoes on the top, cover the baking dish, and let it sit
for at least an hour.

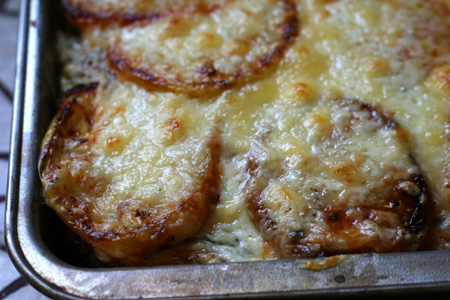
Twenty minutes before it’s ready to be baked, turn your oven on to 350
degrees.  The strata will take 45 minutes to cook.  I don’t put
the grated cheese on the top until it’s been in for a half an hour. 
After it’s cooked for 40 minutes at 350 I put the broiler on and let the
cheese get bubbly and slightly browned, which in my oven takes about 5
minutes.

tomato layer 2.jpgThese are some of the most beautiful tomatoes I’ve ever seen!  The first layer were all red ones.  I liked the mix a lot.
a corner of broiled cheese 2.jpg
Recipe Notes:  You can use whatever kind of cheese you like that melts well.  Jack is one of my very favorite cheeses for covering casseroles with but a gruyere would also be really nice.  My mom thought I should have used more basil but I didn’t want the herb flavor to overpower the flavor of the tomatoes which were at their peak of flavor.  I nearly always use a 2% milk but you can use whole milk or skim if you prefer.  I know some recipes even call for cream.  


Enhanced by Zemanta