Category Archives: Recipes

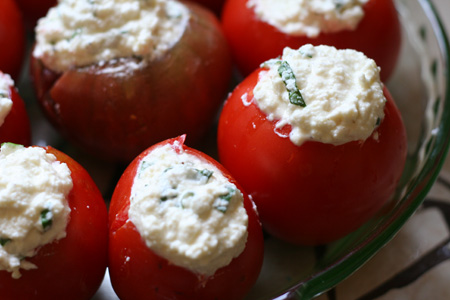
Ricotta Stuffed Tomatoes

ricotta stuffed toms 2.jpgThis is a very simple dish to make.  I always make my own ricotta but you can very satisfactorily use store bought which makes this dish also fast to put together.  If you have the time though, I highly recommend trying homemade ricotta as it has a sweeter fresher flavor than store bought.

I use this ricotta blend for stuffing other things as well, including lasagna.  The secret ingredient is nutmeg.  My mother, who lived in Rome for two years when she was a kid, taught me to put nutmeg in ricotta and though it seems strange- it is delicious!  If you hate nutmeg, leave it out.   

ricotta for stuffing 2.jpgRicotta Stuffed Tomatoes
serves 9

Ingredients:

9 medium summer tomatoes (firm)
15 ounces ricotta
1/4 cup grated Parmesan
1 egg
12 big basil leaves, julienned
3/4 tsp salt
3 shakes nutmeg
15 grinds fresh pepper

Method:

Preheat oven to 350 degrees.

Cut the top of the tomatoes off and hollow them out being careful not to rip them up (you can see in the picture that I ripped a couple of mine).

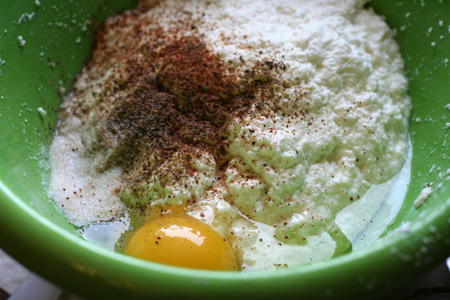
In a big bowl mix all the remaining ingredients using a fork so that the egg gets broken and mixed in well.

Place the tomatoes in a pie dish and fill each one up with the ricotta mixture making sure to heap it up at the top a little.

Bake in the oven for 30 minutes.  Then turn your oven broiler on and broil them until the tops turn golden (in my oven this is less than five minutes). 

ricotta stuffing 2.jpgThese make a great side dish or you can eat them as your main dish with a salad for a light dinner.  You can eat the leftovers for lunch.   

stuffed tomato with fork 2.jpg

Recipe notes:  Don’t use tomatoes that have already passed their peak and are soft because they’ll fall apart.  You can drizzle olive oil over the tomatoes before baking if you like.  I didn’t use it for myself because it really wasn’t necessary and I like that this dish is pretty light in the calorie department.  Olive oil would definitely add a bit more richness to the dish.   This recipe can easily be halved but I would still use one egg in the ricotta because it would be silly to waste a half and egg and though you can omit it all together, I like including an egg for extra protein and it lends more substance to the ricotta.
This recipe is Gluten Free

Enhanced by Zemanta

Preserving Notes: 9/5/10

pesto freeze 2.jpgI have 13 batches of pesto in the freezer.  That’s 13 up from last year.  There were many bone-damp cold winter evenings when I would have given a lot to defrost some pesto to put on hot pasta.  Something so green and fresh tasting never fails to bring warmth to the cold.  I never buy pre-made pesto any more.  It is always such a disappointment compared to my own.  I would like to get 9 more batches in the freezer before basil disappears from the market.

plum tomatoes 2.jpg

This is a terrible year for tomatoes in the Willamette Valley.  All the farmers are saying so.  I managed to pick (maybe) close to 80 lbs this weekend.  It was difficult finding that many ripe ones in the upick fields where I go.  The guy working at the farm stand yesterday said their tomatoes are 7.5 weeks behind from last year.  We don’t generally get hot enough weather to ripen tomatoes reaching into September.  So this is it.

I didn’t put up any tomatoes last year.  All winter I was bummed to have to buy canned tomatoes from the store.  I’ll have to do it again this year.  I have 5 precious quarts of tomato sauce I made yesterday which I will save for the darkest gloomiest days of winter.  I have 40 pounds still waiting for processing in the garage that I picked yesterday and haven’t yet processed and I’m having to ask myself what the best use for them is. 

I don’t buy fresh tomatoes once they disappear from the farmer’s markets.  Two things I’ve learned to make this year that call for fresh tomatoes but which I’ve had to use canned for are Mexican style rice and red enchilada sauce.  So my plan today is to make enchilada sauce and make the tomato/onion/pepper puree that goes into Mexican style rice, portion it out, and freeze them. 

To have one quart of tomatoes a week I would need to put up close to 300 pounds of tomatoes.  The most I’ve ever done were 36 quarts (200 pounds).  I didn’t buy a single fresh tomato or a single can of tomatoes from the store for an entire year.  But I was very careful how I used my tomatoes and realized that I use tomatoes so much in my cooking that I would have done better with a quart a week.

I put up 9 pints of marinated vegetables yesterday and have just as much ready to process today. 

I’ve got one box of peaches for which I must use half to make a peach chutney.  I’m not even sure I like chutney and since I don’t eat meat of any kind I’m unclear on the best use for it in my cooking- BUT – this is a labor of love for my mother who loves chutney.  The rest of the peaches will be jarred with a light sugar syrup.  If I’m lucky and there are some more peaches in at the farm stand next week I’ll put up another box in syrup. 

I also have about ten pounds of summer squash for making into relish and chutney.

There I should stop.  I don’t have time to do all the preserving I wish to do.  I’m squeezing all of this between work and parenting.  I haven’t worked on my book now for a month and I’m getting anxious about it.

I’m squeezing it in because last year I barely did any preserving and I regretted it all year.  Preserving food is generally fairly simple but terribly time consuming.  Why do it?  I love doing it.  I LOVE it.  The truly frantic preserving season is September for most people and this is the turning of the season as well. 

When I’m canning I feel as though my internal clock is being calibrated.  I become very present to the changes of weather which are influencing what’s available to preserve, I become connected to my own nourishment in such a primal way that I often find myself thinking about the history of humans as I peel blanched tomatoes, get sticky up to my elbows in sugar syrup, and think about the evolution of pickling as I fill jars with dill and spices for pickles. 

Whether you preserve your own food or buy commercially canned food this is still the only reason human beings can live in one place all year and get fat in winter instead of thin and feed more babies than you could feed if you still had to hunt and forage all year.  Agriculture and food preserving are the reason we can settle, fight wars, play golf, and mess ourselves up with junk food like Twinkies. 

I like to preserve as much of my own food as I can because it feels good.  It feels essential and keeps me from taking my food for granted.  The raisins I dried myself that I’m about to use in the peach chutney took time (though little effort) to make and came from a friend’s vines.  That’s a lot of interconnectedness with the local earth, friends, labor, and I’ve used very few of them because I didn’t have a lot to begin with and now it’s going to be used to nourish my own mother.

Preserving is a great labor of love. 

Preserving food is life-affirming. 

It makes my hands feel worthy of the life they’ve been given.

I’ve got a lot of work to do today and I couldn’t be happier.

I’ll be thinking of all the rest of you out there today putting up jams and sauces, fruits and vegetables.

Happy canning!

Enhanced by Zemanta

Fresh Tomato Salsa Recipe

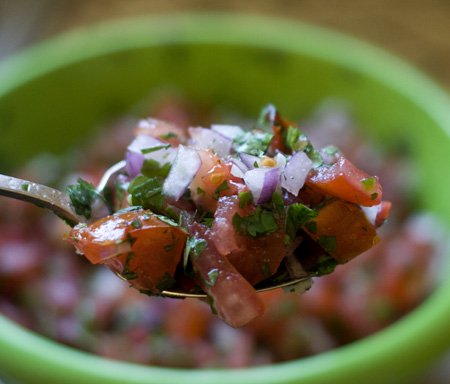
another macro salsa 2.jpgIf you don’t have fresh local tomatoes grown outside in the sunshine, don’t bother making this recipe.  I’m not being a tomato snob, I’m really not.  With recipes where you roast or cook tomatoes you can coax more flavor out of less than stellar fruits, but when making recipes with fresh tomatoes you need the very best. 
I learned to make this fresh tomato salsa from my friend Norman’s good friend Margie, about 19 years ago.   

Fresh Tomato Salsa

yields one big bowl of salsa

Ingredients:

6 ripe slicing tomatoes
1 small red onion
2 Serrano chilies
1 bunch cilantro, minced
1 lime
1/2 tsp salt

burnt skin 2.jpgMethod:

Cut the tomatoes width-wise, exposing the pockets of seeds, and over the sink or your compost squeeze the seeds out.  After removing the core, dice them into 1/2″ pieces, put in a large bowl. 

Dice the red onion fine, and add it to the bowl with the tomatoes.    

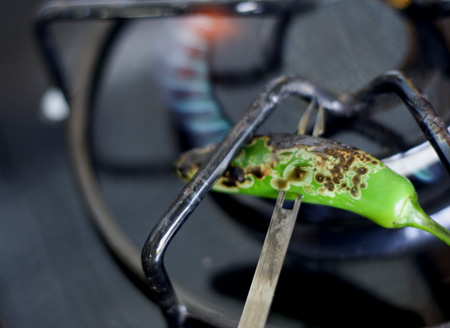
Roast the Serrano chilies by pushing onto a skewer (metal or wood, doesn’t matter) and hold over an open flame.  Turn the chilies around so all of the skin is charred.  Once the peppers are blackened and cooled enough not to give you a second degree burn from handling, rinse them in cold water, peeling the charred skin off.  Mince them into very fine bits and add them to the bowl.

Mince the cilantro very fine and add to the bowl with everything else.

Quarter the lime and squeeze it into the bowl.

Add the salt.

Now stir it up really well and eat it right away.

minced pepper 2.jpg

Recipe Notes:  I like it best eaten right away but Philip thinks it’s best after sitting for a few hours.  It will become watery at the  bottom of the bowl.  The heat of peppers varies, Serranos are generally a pretty hot pepper but I’ve bought some that were a lot more mild than I was expecting.  This is usually a pretty mild salsa.  If you would like more heat: add more peppers. 

Check out our other salsa recipe:
Pico de Gallo

This is a vegan recipe.
This is a gluten free recipe.
Enhanced by Zemanta

Baked Garlic Eggplant Recipe

baked garlic eggplant 2.jpg

Like so many people I know I didn’t love eggplant when I was growing up.  I didn’t hate it but it was last on my list of vegetables to cook for myself when I left home because my mom didn’t know how to turn the dry flesh into succulent eating.  I know how to do this now and the secret is simple.

FAT.

The first brilliant eggplant experience I had was when I was twenty five years old.  A friend came to Philip’s birthday party for which we were making spaghetti and her gift was an eggplant.  I’m afraid we weren’t particularly enthusiastic.  She took one look at our faces and decided that an eggplant in our hands might be a terrible thing so she marched into our little city kitchen and taught us how to make eggplant that no one could dislike.  There was butter and baking involved.  True to her word, we became fans of everything eggplant from that moment on.

I don’t cook with butter very often.  I prefer olive oil.  Either way, the very best eggplant is always cooked with fat.  That’s my opinion and no one will budge me from it.

This way of cooking eggplant will yield a very soft somewhat buttery flesh (even though it’s made with olive oil) and renders the skin tender.  The garlic bakes until it’s golden, rich, and has a mild nutty flavor.  If you like a firm eggplant treatment* you won’t like this.  I think it’s sublime put on a slice of good bread with stone-ground brown spicy mustard and a thin slice of mild nutty cheese (such as Fontina).  It can also be used to make a great eggplant spread or added to a pasta sauce.


Baked Garlic Eggplant Recipe

Ingredients:
4 small round eggplants (or 2 large ones)
1 whole head of garlic (two if the heads are very small)
1/2 cup olive oil
salt and pepper

Method:

Preheat the oven to 350 degrees.  Cut the tops off of all the eggplants and then cut them in half lengthwise.  Using a sharp knife cut slashes into the flesh diagonally- you want to cut down to about 1/2″ from the skin.  Don’t cut all the way through.  Then cut slashes diagonally in the opposite direction.  Put the halves onto a baking sheet.

Peel all the garlic cloves.  Leave small cloves whole but cut large ones in half lengthwise.  Divide them between all the eggplant halves evenly.  Stuff the garlic into the cuts in the eggplant. 

Drizzle the olive oil over the eggplant.  Use all of it.  Grind pepper onto the eggplant halves and sprinkle salt on them. 

Bake the eggplant for 40 minutes and then check it.  Baking times will depend on the size of your eggplants.  Even large ones should be done under an hour.  When the garlic and the top of the eggplants have turned golden and the flesh is soft when you press a fork into it, they’re done.

Recipe Notes:  You can cook eggplant faster in a hotter oven but you won’t get the melting quality of the flesh that way.  I love grilled eggplant but this recipe is about getting a succulence out of the eggplant that grilling (or roasting in a hotter oven) won’t achieve. 

*Really?  If anyone truly likes a firm eggplant treatment, may I suggest they hightail it to Aberfoyle to the local time-share restaurant on the hill where you can get a plate of salad with raw eggplant in it.  I happen to love the Scottish best of all people on earth but I have to say that they do not know the proper treatment of an eggplant.  What can you expect of a restaurant that thinks chicken soup is vegetarian?  But really, I love Abberfoyle.  Nothing could be more charming than the tiny farm store at the bottom of the hill with the surly people in it and the scary dog.  I’ve been twice and will go again!

Summer White Bean And Basil Salad Recipe

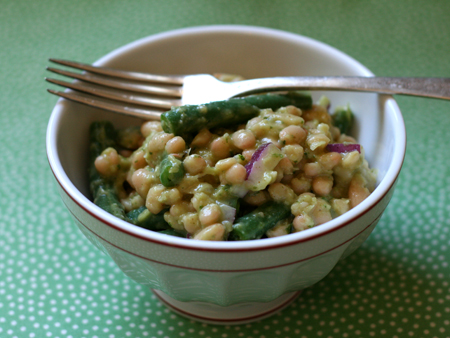
summer bean salad 2.jpgOne of my favorite beans is the navy bean.  I make a lot of bean salads with them because there is no vegetable and no herb that don’t pair well with them.  Unlike many other beans they have a mild presence which I find charming. 

I nearly always add feta to my bean salads but this one is so good just as it is, so tangy and flavorful, that I didn’t miss the cheese for a second.  Considering that I think life without cheese isn’t worth living, that’s saying a lot.

Summer White Bean and Basil Salad Recipe

Ingredients:

1 pound green beans
6 cups cooked navy beans
1/2 cup fresh basil dressing
1/2 red onion (sliced very thinly in 1″ long pieces)
 

basil bean salad 2.jpg

Method:

Trim the ends off the green beans and cut them in half.  Steam the beans just until tender (this usually takes 3-5 minutes). 

Put the navy beans into a medium sized bowl and pour the dressing into them,
mixing very well.  Stir in the steamed green beans and the onion. 

You can eat this right away but it’s best if you let it sit for at least an hour so that the beans can marinate in the dressing for a while.


Recipe Notes:  You can add other summery things to this salad such as cucumbers, tomatoes, or feta cheese.  If you add tomatoes to it I suggest you only add it to portions you are certain to eat the same day.  Tomatoes don’t fare well cut in salads and kept overnight in the fridge.  You can use great northern or cannellini beans in place of the navy beans. 

This recipe is gluten free: provided you use only gluten free vinegar in the dressing.
This recipe is vegan.

Enhanced by Zemanta

Fresh Basil Dressing Recipe

basil dressing.jpg

Something I’ve discovered in my picture taking learning curve is that in the final exam called “how to take a tantalizing picture of dressing” I have failed.  I would like to say in my defense that taking pictures of dressing seems to be a challenge for many people. 

I have been hearing the evil phrase “Too much basil!” being uttered by many silly gardeners and food bloggers.  This is a proclamation I have no patience with.  I have never had great luck in producing an “overabundance” of basil, no matter how hard I try.  What I wouldn’t give to have so much basil I could experience basil exhaustion.  The truth is, however, that there is no such thing for me.  Too much basil?  You will miss it like a lost limb in midwinter, so make a million batches of pesto to freeze!  Use it in salads, or ratatouille (also to freeze!), in pasta dishes, in ricotta for stuffing those ubiquitous zucchinis everyone also claims to get so sick of they could throw up at the sight of another one…

Basil is one of the single most versatile herbs I know of and though you can dry it, I have always felt that dried basil is a travesty of fresh.  Frozen basil is far superior to dried as well, provided you freeze it with oil to protect its lush greenness.

Most dressings I make I use dried herbs because I make large batches and sometimes the fresh herbs will brown before I get to using them.  However, I highly recommend making this fresh basil dressing, make it in a single batch and use it up within a week and you won’t regret it.  Regret it?  No, you’ll LOVE it!  I have already used it on a summer white bean salad (recipe coming soon) and as a dressing for pasta.  If you think pesto is too heavy or you want the fresh basil flavor but without cheese, you have got to try putting half a cup of this dressing on a pound of cooked pasta with roasted vegetables.

But obviously, this dressing will also shine on a simple fresh summer salad.


Fresh Basil Dressing


Ingredients:

1 cup olive oil
1/2 cup red wine vinegar
1 bunch basil (about 2 cups loosely packed)
2 garlic cloves
1 tbsp spicy brown mustard (or your own favorite mustard)
1/2 tsp salt
25 grinds of fresh black pepper

Method:

Put all the ingredients together into either a blender or into a container big and deep enough for an immersion blender to work well.  Blend it until all the basil is finely chopped and the dressing is creamy. 

Recipe notes:  If you don’t like mustard it’s still very good without it.  I like mustard so much I use a lot of it in most of my salad dressings.  It makes the dressing tangy which I love and this tanginess is surprisingly wonderful on pasta.  I also find that prepared mustard adds body to a dressing which I like. 

How To Make Couscous

fluffy couscous 2.jpg

Couscous is a granular pasta usually made of semolina.  I have never steamed couscous which is the traditional method of making it.  I first learned to cook it from Deborah Madison’s book “Vegetarian Cooking for Everyone” (which I highly recommend every cook have a copy of) but in rereading her instructions today I see I’ve gone completely off-book over the years with my own preparation.  My way works very well for me so I’m going to share it with you.

How To Make Couscous

Ingredients:

1 tbsp olive oil
1 cup couscous
2 cups water or broth

Method:

Pour the olive oil into a large saute pan and put the stove on high.  Add the couscous and stir to coat with the oil.  Stir the couscous for 1 to 2 minutes until it slightly colors. 

Add the water or broth and shake the pan gently to evenly distribute it.  Keep the burner on high until the water starts to bubble.  Turn the burner off and put a lid on the pan.

Let it sit for 7 minutes.

Remove the lid and fluff the couscous with a fork.

Recipe Notes:  Sometimes it clumps a little and if it does you just have to use the fork to break them up.  I don’t mind some clumps because they are never gummy or sticky for me.  I never eat couscous plain so by the time I mix vegetables into it the clumps usually break up completely anyway.  I don’t salt my couscous.  If I’m going to use salt I add it at the same time that I add other things to it. 

Enhanced by Zemanta

Oregano Garlic Zucchini Recipe

oregano zuch 2.jpg

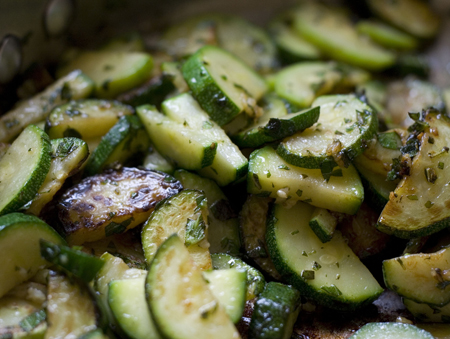
I don’t buy summer squash in the fall, winter, or spring so when it finally shows up at the farmer’s market I can’t get enough of it.  I know that zucchini is the proverbial pest in the kitchen garden for its fecund habits, but I have never once in my life had so much zucchini I had to worry about fobbing it off on others.  I love it grilled, roasted, stuffed, steamed, and sauteed.  The only way I don’t like it is raw.

This simple recipe is my all time favorite way to eat them.  You can make this and eat is as a side or you can add it to pasta, couscous*, or rice.  You can add it to almost any other dish.  I love it best just like this!

Oregano Garlic Zucchini
serves 4

Ingredients:

2 tbsp olive oil
4 medium sized summer squash
4 stems of fresh oregano
2 large garlic cloves

Method:

Wash and slice the zucchini: if they are thin just cut in 1/4″ rounds, if they are thick, cut in half lengthwise first and then cut in 1/4″ half rounds.

Strip the leaves off the oregano stems and mince fine.

Have your garlic loaded into a garlic press OR mince it fine.

Pour the oil in a large saute pan and turn the burner to high.  When the oil is hot** put in the zucchini and let some of them brown but not burn, they cook fast so don’t walk away from them.  It usually takes about five minutes to get some good roasted bits. 

One minute before taking the pan off the heat add the oregano and garlic.  You don’t need them in the heat long.  Be sure to stir them in well.

Remove the pan from the stove and they’re ready to eat.


Recipe notes:
  Any summer squash will be fantastic made this way.  I don’t even salt and pepper mine but of course you can add either if you prefer.  Salt is a real flavor enhancer but in this dish the oregano and garlic are flavorful enough for me.  The worst thing that can happen when cooking summer squash is to over cook them.  As soon as you see the slices start turning from chalk white to translucent, they are almost done cooking. 

*Which is technically teeny tiny balls of pasta.

**To check if oil is hot, flick a little drop of water in it, if it crackles, the oil is hot.  But obviously, be careful because it can spatter and hurt you if you flick too much water into hot oil.  Or, of course, you can test it by putting one slice of zucchini in the pan, the oil should be hot enough that the zucchini start to sizzle a bit.

This recipe is vegan.
This recipe is gluten free.

Enhanced by Zemanta

Mustard Potato Salad Recipe

another potato salad 2.jpg

Although potato salad is a dish that generally doesn’t get brought out until Memorial day, I think of it as an all season recipe because the ingredients can be found in your pantry all year.  When fresh dill is available it’s even better and then can be considered more of a summer indulgence.

Growing up I wasn’t a big potato salad fan because most of the time it’s made with too much mayonnaise, a condiment I like only in very moderate portions and never so much that I feel like my mouth is full of it.  This potato salad recipe has only a half a cup of mayonnaise and just as much mustard which gives it just enough creaminess to compliment the potatoes and the sharp tang of mustard shines.

Mustard Potato Salad Recipe

makes 6 servings

Ingredients:

8 medium red potatoes, cubed
1/2 cup mayonnaise
1/2 cup spicy brown mustard
1/2 red onion, diced fine
3 hard boiled eggs, roughly chipped
2 dill pickles, diced medium
1 tsp dried dill or 1 tbsp fresh (minced)
20 grinds fresh pepper
1 tsp salt

Method:

Steam the potatoes until tender but not falling apart.  It usually takes about ten minutes for me but I rely more on testing with a fork than on timing.  When they’re done put them in a large mixing bowl and let them cool for about fifteen minutes.

Once the potatoes are cooled down add the rest of the ingredients and stir them together well. 

This potato salad recipe is good eaten still warm or completely cold.


Recipe notes:  I used to make this potato salad with a couple of stalks of celery and if you like you can do this too.  I stopped being in the habit of using celery when I made greater efforts to shop seasonally for my produce.  Where I live celery is a late summer and early fall vegetable.  When using a large amount of prepared mustard try using a milder one first and then if you want it to be spicier try using a Dijon or experiment with other stronger prepared mustards.  The main thing is to remember that mustard is the star flavor in this recipe.

This recipe is gluten free IF the mustard you use doesn’t use vinegar made with malt or wheat.

This recipe is NOT vegan.  To convert this recipe to be vegan: omit the eggs and use a vegan mayonnaise.

Reblog this post [with Zemanta]

Mustard Vinaigrette Recipe

mustard vinaigrette 2.jpg

I rarely buy salad dressing from the store since my close friend Chelsea taught me to make my own years ago.  I use this dressing for every kind of salad and I think it makes a great dressing for pasta with roasted summer vegetables. 

A salad dressing becomes very personalized in no time at all.  Once you learn to make one basic recipe, you will adjust it to suit your taste almost without thinking about it, and indeed, if you make your own frequently you won’t need to think about it at all or look up recipes.  It will become second nature. 

If you don’t already have a favorite mustard vinaigrette, try this one!  I use my favorite stone-ground spicy brown mustard but many people prefer the sharper bite of a Dijon mustard; use what you love best because mustard is the star of this dressing.

Chelsea tends to make her dressings in batches just large enough for her needs each time, I prefer to make enough to put it in a bottle and use it for a few different salads.  This recipe will make one full bottle of dressing.  I often double it so that I have two bottles premade.  This dressing will last indefinitely in the fridge due to the vinegar and mustard content, though it will thicken with the cold and may need to be warmed to be poured.

Mustard Vinaigrette Dressing

Ingredients:
1 cup olive oil
1/2 cup red wine vinegar
1 tbsp mustard
3 roughly chopped garlic cloves
1 1/2 tsp dried thyme
1/2 tsp salt
1/4 tsp freshly ground black pepper

Method:

Add all the ingredients to a tall sided bowl or very large measuring cup and then blend them together really well using an immersion blender.  I like using the immersion blender for this dressing because it emulsifies the oil enough to thicken it and make it creamy. 

To make by hand:
Instead of roughly chopping the garlic, if you want to make this without a blender, I suggest chopping the garlic very fine first or crushing it well in a mortar and pestle.  Then add all the ingredients to a medium sized bowl and whisk them well.  This method will not create quite as thick and creamy a consistency but the flavor will be just as wonderful.


Variations: Chelsea sometimes likes to add a teaspoon of sugar to her dressing to round out the sharpness of the vinegar, you might like to try it her way to see what you think, many dressing have sugar in them for this reason.  I prefer mine without but it’s worth experimenting.  My preferred herb for dressing is thyme but there are many dried herbs that are just as good in this dressing.  One suggestion to try is: 1/2 tsp each of thyme, marjoram, and basil.   

This recipe is gluten free: if the vinegar is gluten free, red wine vinegar usually is but if you have Celiac’s it is wise to be sure.  You can use an apple cider vinegar as a substitution.

This recipe is Vegan

Reblog this post [with Zemanta]