Category Archives: Recipes

Navy Bean and Dandelion Green Salad Recipe

bean salad 2.jpg

I love cold salads made with navy beans (very small white bean) or cannelini beans (a bigger white bean favored in Italian food) because they have a mild bean flavor which pairs perfectly with many summery herbs and vegetables.

This salad is best made in early spring when you can pick very young dandelion greens which are the most tender and least bitter.  If you’re interested in making it now, look for brand new dandelion plants amongst the bigger ones or simply limit yourself to the smallest inner leaves.  You only need a handful.

I cook my beans from dried, rather than canned, but either will do perfectly well.  Because I make my own I always add a chopped onion and some thyme while the beans are cooking (you can see a bit of cooked onion in the picture).

Navy Bean and Dandelion Greens Salad Recipe
serves 6

Ingredients:

4 cups cooked navy beans (or 2 16oz cans)
1/4 red onion diced very small
1 handful of minced dandelion greens
1/4 cup prepared mustard vinaigrette*
1 tsp salt

Method:

Mix all of the ingredients together well.  That’s it.  It’s more of an assemblage than a method. 

May be served room temperature or cold.


*Use your own favorite home made vinaigrette or use my recipe for mustard vinaigrette.

Variation:  when in season you can add one whole chopped cucumber or a large tomato.  Other herbs can be added as well such as parsley (I’d use a tablespoon of minced fresh parsley) or fresh chopped thyme (I’d use a teaspoon) or basil (I’d use a 1/4 cup julienned).

This recipe is gluten free: provided the vinegar you use in the dressing is gluten free.

This recipe is vegan.

Here are some other articles you might be interested in:

Dandelions (Taraxacum officinale): Plant Profile

Mushrooms, Dandelion Greens, and Pasta in a Cheese Sauce

Mustard Vinaigrette Recipe


Reblog this post [with Zemanta]

Grapefruit Avocado Salad

This is a classic winter salad that invites a lot of variations.  The tartness of the citrus is mellowed and complimented by the richness of the avocado.  I am transcribing a very simple version here with almost no adornment because I think it’s always best to start off with something simple and then embellish from there.

I don’t buy a lot of imported produce because I believe it’s important to eat mostly locally grown food but I allow myself a few indulgences and one of the regular indulgences I allow are avocados.  Because I let myself buy quite a lot of avocados I don’t let myself buy citrus very often.  A family friend sent me two boxes full of oranges, lemons, and grapefruits from her own yard that she grew without pesticides- it was a gift  beyond price!  I haven’t had a grapefruit avocado salad in years and it is the perfect antidote to the usual deep winter root vegetable flavors and the grey skies.


Ingredients:

4 cups lettuce

1  large avocado

1 grapefruit

4 tbsp mustard vinaigrette

(Serves 4 as a side salad or 2 as a main salad)

Method:
Divide lettuce onto your plates evenly.  Slice the grapefruit in half and then (using a small sharp knife) cut out the sections and divide the slices evenly between the plates.  Slice your avocado in half, remove the pit, and then slice long narrow slices lengthwise.  If serving only two plates of salad remove all the long slices from one half and arrange on one plate (fanning them out is pretty) and then do the same with the other half.  If making four side salads then I cut the long slices in half and divvy the avocado up between the four plates and arrange neatly.  Drizzle 1 tbsp of dressing on each side salad or 2 tbsp on each main salad.


Variations: Kalamata olives are very good with citrus and avocado.  Feta is wonderful on this salad.  Instead of a mustard vinaigrette you could use a balsamic or a dressing flavored with rosemary.  Slice red onions paper-thin and add to each plate sparingly.  The same can be done with shallots.  If you don’t have grapefruit but you have very good oranges on hand- use them!  Oranges go very well with the avocado too.

Almond Biscotti: A Classic Recipe

I have met many biscotti in my life that I didn’t get along with because they tasted like cardboard.  I don’t like them too sweet either, or covered in chocolate, or filled with dried fruit and citrus rind.  I’m not sure what made me try this recipe in the first place, considering how I felt about this famous cookie at the time, but I did and it transformed my opinion.  I got the original recipe from a favorite cookbook “The Complete Italian Vegetarian Cookbook” by Jack Bishop which I highly recommend.  His recipe calls for eggs plus a couple of egg yolks to add richness to the cookies.  While I am a fan of eggs I am not a fan of a strong yolk flavor*.  So over time I adapted this recipe to better suit my own preference.  I am offering you my version of this classic dipping cookie.

Almond Biscotti

Ingredients:

1 cup whole almonds

2 cups unbleached all-purpose flour

1 cup sugar

1/2 tsp baking powder

Pinch of salt

4 large eggs

1 tsp vanilla extract

Method:
Preheat the oven to 350 degrees.  Spread the almonds on a baking sheet and lightly toast them (about 8 minutes).   Set them aside to cool but don’t turn off the oven.  Cut parchment paper to the size of a large baking sheet.

In the bowl of your stand mixer blend the flour, sugar, baking powder, and salt.  In a separate bowl beat 3 of the eggs with the vanilla extract.  With the mixer on med-low speed add the eggs to the flour in a steady stream and keep the mixer going until the flour and eggs have been completely incorporated.

Roughly chop the almonds (I like to chop them in half so the chunks are fairly big but you can chop them a little smaller if you like).

The dough is very sticky!  Remove it from the bowl of the mixer onto a floured pastry board or your counter – you will need a pastry scraper to help you knead the dough gently (just until it’s smooth).  You will need to add more flour as you go along and may even need to rinse your hands off once or twice.

Gently knead the almonds into the dough.

Cut the ball of dough into two pieces.  One at a time, transfer each one to the parchment paper covered baking sheet and roll them out until they’re about 12″ long and flatten out so that they’re about 3″ wide.

Beat the remaining egg in a small bowl and add a small splash of water.  Brush the egg wash on the outside of the dough, including the sides.

Bake in the oven (on a middle rack) for 30 minutes.

Remove the cookie loaves from the oven and turn the oven down to 325 degrees.  Let the loaves cool for a few minutes (allowing the oven to reduce in temperature as well) and then cut them up on the diagonal in approximately 1″ wide pieces.

Turn them on their sides and return to the oven for ten more minutes.  If you live in a damp climate, as I do, I recommend turning your oven off after ten minutes but let the cookies completely cool down inside the oven.  The texture of these cookies is definitely hard and crisp enough to encourage dipping, but if your air is generally a little damp then the cookies may not achieve as satisfying a dryness as is desired.  When they’ve completely cooled store them in an air-tight container.


Recipe Notes: I think the egg wash is important here, but I hate that one recipe of these only uses about half of the beaten egg.  So if you want to be extra thrifty, I suggest doing a double batch at a time.  Each recipe makes about 24 biscotti (depending on how thickly you cut them) so if 48 biscotti sounds extreme- freeze half of them for later or share them with others!  If you’re out of vanilla extract (as I am right now!) you can scrape some vanilla bean seeds into the eggs and let them sit for ten or fifteen minutes.

*So unless I get one of my friends who are excellent cooks to do a hollandaise sauce recipe for Stitch and Boots, there won’t be one.  I can’t stand any sauce made up primarily of egg yolks.  Mrs. Carlton?  Mrs. Evich?  Mrs. Lagarde?  Any of you up for the challenge?


Turmeric Roasted Rutabagas

Rutabagas aren’t as commonly used in the US as turnips and yet they are, in my opinion, much more delicious.  In Scotland and other places in Europe rutabagas are known as “yellow turnips” or “Swedes”.  When raw they have a similar sharp peppery bitter smell and a watery crisp consistency but when roasted rutabagas are much richer than regular turnips.  They are a golden color and sweeten with roasting.


In this recipe I have seasoned rutabagas with turmeric which intensify the golden color of the rutabagas and add an additional earthy tone to the flavor.  This is a simple side to make to dinner whether you are having a vegetarian main course or a meat dish.  It is a fall and winter root vegetable which can be stored in root cellars so may also still be available in early spring, but by mid spring should no longer be making appearances on the dinner table.  Enjoy it now!

Turmeric is not a spice I use often but I got inspiration from my friend Riana here on her flickr pages in her series on healing herbs and spices and how to use them in everyday ways.

Ingredients:

4 medium to large rutabagas, trimmed cubed to 1″ pieces

1/4 cup olive oil

1/2 tsp turmeric

a couple of pinches of coarse sea salt

several grinds of pepper

Method:

Preheat oven to 375 degrees.   In a large roasting pan or a large heavy duty baking sheet, spread out the rutabagas.  Sprinkle the salt and turmeric on the rutabagas.  Grind the salt on them.  Drizzle all of the oil on them and then, using a spatula, toss the vegetables in the oil and spices until thoroughly coated.

Put in the oven and every ten minutes turn the rutabagas with a spatula to be sure that all sides have a chance to roast.  When the rutabagas are soft and melting on the inside with crunchy golden roasted edges, they are ready to serve.  At this temperature it should take between 45 minutes and an hour.

Recipe Notes: You can cook these more quickly by increasing the oven heat to 400 degrees, but if you do this you need to check them more frequently to prevent scorching.  I like to use an herbed coarse salt on all my roasted vegetables, if you’d like to do the same but don’t have any you can simply add  1/2 teaspoon of your favorite dried herb combination.

Veggie Burgers: Quinoa and Kidney Beans

Most people I know are omnivores so when they want something substantial to put in a bun they simply go for the classic meat burger.  I was brought up as a vegetarian and have never reconciled myself to the taste, and more particularly, the texture of meat.  So when I want to eat a substantial sandwich I turn to veggie burgers, and I don’t want ones that are meaty and chewy.  I want one that is flavorful, robust, and textured without being toothsome.  So I am on a quest to develop a repertoire of veggie burger recipes that I can make, freeze, and then grab for easy nutritious meals when I haven’t had time to cook from scratch.

This particular recipe can be baked or fried (sautéed) but will not hold together on the grill.  I will be experimenting with bread  crumbs which are a usual ingredient for their ability to soak up moisture and stiffen patties.  I didn’t want to have breadcrumbs in this particular recipe because I wanted to keep the proportion of beans to grains at a 2 to 1 ratio.  The results are satisfying, flavorful, and just the perfect quick meal I was hoping for.

Ingredients:

4 cups cooked kidney beans

2 cups cooked quinoa

3 large carrots diced small

1 large onion diced small

3 ribs celery diced small

2 tbsp olive oil

1 bunch cilantro (chopped well)

1-2 pickled (or fresh) jalapenos (finely minced)

1 tbsp cumin

2 tsp salt

Makes 10 to 12 patties


Method:
Have your kidney beans and quinoa prepared ahead of time.  Heat the olive oil in a medium sauce pan (on medium high heat) and add the carrots, onion, and celery.  Once they start lightly browning turn the heat down to med/low and stir frequently.  When the onions get soft and sticky they’re done.  (It should take about 25 minutes.)

In a food processor combine the kidney beans and quinoa and pulse several times.  You want the beans to maintain texture but you want enough of them to be crushed that the beans and quinoa stick together.  Put this in a large mixing bowl.  Add the caramelized vegetables, cilantro, jalapenos, cumin, and salt and mix really well.

Form into patties.  You can make them any size you like.  I made mine palm sized and kept them fairly thick.

To cook: heat a tbsp of oil (any you choose) in a sauté pan and sauté patties on both sides until they develop a crispy brown crust.

To serve: I don’t eat my veggie burgers with buns when I eat them at home.  I like to eat them with sliced avocado, some cheese melted on top, and some salsa.  These have a slight spiciness (depending on how many jalapenos you used) so if you like really spicy food you can use a super spicy salsa or a hot pepper sauce drizzled on top.  If you like your veggie burgers with a bun you can eat them with a bun as well with pickles, lettuce and tomato.


If I had sides to go along with this veggie burger, like steamed or roasted vegetables, I would use one patty per serving.  If it’s going to be your whole meal, I would use two patties per serving.

Recipe Notes: I use 2 jalapenos for mine because I don’t like really spicy food.  There is a wide variation in spiciness when it comes to jalapenos so be cautious.  I prefer them pickled because they have a little tangy taste to them.  Veggie burgers freeze well.  To freeze them: lay the formed patties on waxed paper on a baking sheet and freeze for several hours until they are hard, then put them in freezer bags.  For longer term freezing I recommend using a vacuum sealer.   Caramelizing vegetables takes time but in this recipe it adds an important dimension to the flavor so I don’t recommend skipping it.

This recipe is vegan: unless you melt cheese on it or top it with sour cream.

This recipe is gluten free: provided the quinoa you buy was not processed in a facility that also processes wheat and if you use fresh jalapenos instead of pickled ones.

Tenement Stew (Cabbage Alphabet Noodle Soup)

It’s difficult to photograph cabbage soup to advantage.  You have to imagine the wonderful aroma of cabbage and carrots and rich vegetable stock punctuated with garlic and thyme to be suitably impressed.


This is fall and winter food.  You can use items from your freezer and pantry.  I made this soup from only things I already had on hand.  The title of the soup is my nod to the hard life and how humble ingredients such as cabbage and potatoes have kept a lot of poor humans from starving.  There are people who undervalue both the wonderful flavor of cabbage as well as its nutritional contribution to the fall and winter diet.  Common cabbage is a good source of vitamin C, calcium, and Potassium.

When I first made this soup I did a cost analysis on it.  Here were my results:

Can this stew be made more cheaply than going out to eat a fast food meal? It turns out that the reason why poor people eat so much soup is because it’s a cheap and nutritious way to feed your family. I priced out my ingredients (bearing in mind that my stock was free since I made it from my own vegetable scraps, and my thyme was almost free because I grew it and dried it myself) this soup cost .53 per serving.

That’s for a cup and a half of nutritious and very tasty soup. Can you get a nutritious meal at McDonald’s for .53 cents? That’s a trick question. You can’t actually get a nutritious meal there.  Try my tenement stew. It won’t break your pocketbook. It will hardly make a dent in it.

Ingredients:

2 tbsp olive oil

1 yellow onion, diced

3 large carrots, chopped

1 large russet potato, cut into 1/2″ cubes

1.5 pounds of chopped cabbage

2 cups cooked navy beans (or 1 can of rinsed white beans)

3 cloves garlic, minced fine or pressed

1 quart diced tomatoes (with its juice)

1 quart of stock (or water)

1/4 cup alphabet pasta (or orzo, or rice)

1 tbsp dried thyme

2 tsp salt (or to taste)
pepper to taste
a shake of cayenne pepper for heat

Method:

Heat oil in a soup pot. Add the onion, carrots, and potatoes and stir frequently until the onions turn transparent. Add the stock and tomatoes. If the stock is still frozen just dump it in there and close the lid for a while, checking to keep vegetables from sticking. Now turn the heat down to medium and add the cabbage, garlic, thyme, salt and pepper. If the soup is too thick, add some water to it. When all the vegetables are cooked through, add the cooked beans and the pasta and a shake of cayenne pepper. Cook for an additional ten minutes. When the pasta is done the soup is done.

This soup serves 6-8

Whether or not you need to economize right now, this is an excellent stew to eat when the wind outside is cutting through your wool coat and the rain is sheeting against your face. Eat it with a decent sized hunk of wheat bread with butter if you need to be out in that weather for long. The cayenne will help warm your blood, the garlic will help fend off the plague.

This recipe is vegan if the pasta you use has no eggs in it.

This recipe can be gluten free if you use a gluten free pasta: if you’re making it for someone who is eating gluten free because they have to (they’re allergic), please be very careful which pasta you use because some “gluten free” foods are made in factories where gluten is present.  If possible check with the person to see if they know of a safe brand.  OR just leave the pasta out altogether.

Potato Celery Root Soup

Celery root is abundant throughout the fall and winter in the Pacific Northwest and if you, like me, try to eat both seasonally and locally then this might very well be abundant where you are too.    Like most potato based soups, this one is creamy and lightly earthy and with the addition of celery root it also has a wonderful delicate celery flavor.  Seasoning should to be taste but kept simple.  I like to add milk to my creamy potato based soups but I’ve also made them without the milk and it’s very good, so it’s worth making if you’re vegan.  The cheese garnish is optional if you’re not me.

Potato Celery Root Soup

Ingredients:

3 large starchy potatoes (either Russets or a similar type), diced medium

1 whole celery root, diced medium

1 giant carrot, diced medium

2 quarts vegetable or chicken broth, or water

Salt to taste

Pepper, about a kazillion grinds

1 tbsp butter

1 tbsp olive oil

1 cup of 2% milk, optional

Cheddar cheese garnish, optional

Method:

Heat up the olive oil and butter in a soup pot on medium high heat, then add all the vegetables at once.  Stirring frequently, saute the vegetables until they very slightly brown (about 10 minutes on my burner).  Don’t let them burn.  Add the stock (or water) and make sure nothing has stuck to the bottom of the pot.  Bring the soup to a boil and then turn the heat down to a simmer.  Cook until all the vegetables are soft and until the potatoes come apart easily.

Add salt and pepper to taste.

Puree.

Recipe notes: With a delicate soup like this I would suggest the best choice for broth is vegetable or plain water.  Chicken would be alright, but beef broth would have too deep and heavy a taste of its own and may overpower the light flavors of the soup.  Always remember that a soup is highly personal and if you like it runnier than it turns out, add more liquid.  If you like it thicker, like I do, let it cook down a little bit.  There is no hard science to soup.  A lot of it is by preference and by feel.  I usually use more salt and pepper in this soup than my other soups.  I would say I use between 1 1/2 tsp and 2 tsp salt and I probably do about 40 grinds of pepper.  I use my immersion blender to blend it and don’t have to wait til it cools, but if you’re using a full size blender to puree the soup you’ll need to wait until it cools a bit or you might burn yourself.

To veganize this recipe all you need to do is use 2 tbsp of olive oil for the sauteing and don’t use the milk or add any cheese.  I promise it’s a very good soup without these additions.

This soup is gluten free through no merit or planning on my part.

Potato Celery Root Mash

This is a simple satisfying winter accompaniment to a meal.  It can also be put into hand-pies (what I lovingly refer to as “poorhouse pies”) and as soon as I have a couple of other necessary recipes posted I will give instructions on how to make poorhouse pies using this mash as one of the fillings.

Potato Celery Root Mash

Ingredients:

2 large potatoes (starchy type, such as russet), diced into 1/2″ pieces

1 whole celeriac (celery root), diced into 1/2″ pieces

1 medium sized turnip (or 2 small ones), diced into 1/2″ pices

1/2 stick of butter

salt to taste
pepper to taste

Method:

put all of the vegetables into a steamer basket fitted into a pot and steam them until very tender.  If your steaming basket will not accommodate them all at once, steam the potatoes first, then steam the celeriac and the turnips together.

Put all the hot vegetables in a medium sized bowl and cut up your butter into pieces and add it to the bowl and fold it into the vegetables until it is melted.

Use a potato masher to mash them into a smooth consistency.  Add salt and freshly ground pepper to taste.  My guess is at least teaspoon of salt will be needed.

Serve hot.  (Reheat if necessary)

Recipe notes: Many people boil their root vegetables before mashing.  I don’t see any reason not to do it this way if you prefer it.  My mother always steamed rather than boiled vegetables because she believed it was healthier, and I tend to agree, but I haven’t got any proof to share either way.  I am a fan of mashed potatoes and I like, but don’t love, potatoes mashed with turnips, but this combination is divine!  The celery root and turnip keeps the mash from stiffening up because they aren’t starchy like the potatoes, and the celery root adds a delicate wonderful flavor.  This is one of those simple winter foods that take few ingredients or effort to make and so are not only budget friendly but also a great dish for people with little time.

Veganize this! To make this recipe vegan, simply use olive oil in place of the butter.  Use a mild golden variety rather than a green grassier flavored one.  Or you can use a vegan butter substitute if you like, however, I would always recommend using either butter or olive oil rather than an unnatural hydrogenated spread which may rely on a lot of unnecessary ingredients to help it mimic the butter experience.  If you can’t (or don’t wish) to eat dairy, olive oil is often the best substitute for butter.

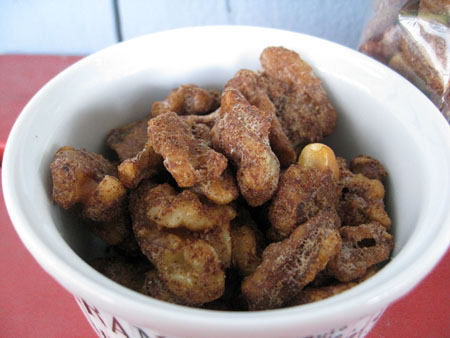
Candied Spiced Nuts Recipe

Spiced nuts make great holiday gifts but I usually make them for myself to put on salads.

Spiced nuts are easy to make and can be customized to suit your tastes.

Spiced Nuts
Ingredients:

6 cups of nuts, I prefer walnuts

3 egg whites

2 tbsp water

2 cups granulated sugar

2 tbsp ground cinnamon

2 tsp ground ginger

1 tsp salt

1 tsp nutmeg

1 tsp allspice

1/2 tsp cloves


Method:

Preheat oven to 300.  In a mixing bowl, beat the egg whites and water until frothy.  Fold the nuts into the egg whites gently until they are completely coated.

Combine the sugar, salt, and spices and blend well.  Add it to the nuts, stirring gently, until it is mixed in well.  Spread the nuts onto two large greased cookie sheets.  Bake uncovered for 20 to 25 minutes being sure to stir the nuts a couple of times while cooking.

Let the nuts cool completely before storing.  They will not be crisp when they first come out because of the egg whites but after they are completely cool they will be.  Store in an airtight container.


Coating the nuts with egg whites.

Coating the nuts with the spiced sugar.

Making them pretty if you’re generous enough to give any away.

Recipe Notes: If you haven’t worked with egg whites before then you may not know why you have to be so gentle with them: when you beat them they fill with tiny bubbles which give them loft but if you stir too roughly or too much the bubbles collapse.  In this recipe it isn’t as vital to maintain loft as it is in other recipes that use meringue like souffles, but it’s the gently cooked whites that give a special crunch to these nuts.  Feel free to play around with the spices- leave one out if you like (or all of them if you want candied nuts with no additional flavor).  If you know your oven runs hot, try setting it a little lower.  If you don’t like walnuts, like I’ve used here, use any kind of nut you like.

Roasted Brussels Sprouts

Roasting brussels sprouts brings out their sweetness and mellows their strong flavor.

The brussels sprout is a vegetable people love to hate.  It’s as pungent as a cabbage but comes in a small compact miniature head.  I suspect that many people have tasted only mistreated brussels sprouts or they would look forward to them every fall as I do.  Here is one of the simplest ways to prepare them and bring out their best side.

Roasted Brussels Sprouts

serves 4-6

Ingredients:

3 lbs brussels sprouts

1/4 cup olive oil

coarse salt to taste

pepper to taste


Method:
 

Preheat your oven to 400 degrees.  Prepare the brussels sprouts by peeling away the top 2 to 4 leaves, depending on how dirty they are.  Clean them.  Cut away any surplus stems.  Slice large and medium-sized sprouts in half but leave the small ones whole. Put them in a roasting pan.  Drizzle with the olive oil.  Grind as much fresh pepper on them as you like and sprinkle as much salt as you like.  I generally use about a teaspoon and a half of coarse salt.  Turn them with a spatula until they are all coated.  Put them in the oven.

It will take about 20 to 25 minutes for them to roast.  You want to turn them every so often to prevent any of them from burning and to get more surface roasted.  When they are tender and browned they are done.

Serve hot.

Recipe Notes: How brown you like them is a matter of personal taste.  I like mine to get to a nice medium brown where the vegetable surfaces are starting to caramelize.  I don’t think they taste good being too dark and if they’re too light you miss out on the sweetness.  If you like a touch of heat you can sprinkle some crushed hot pepper onto them.  An alternative to using olive oil would be to use bacon fat which would compliment the flavor of the brussels sprouts well. All I want to suggest is to keep your variations simple because this dish doesn’t need much to shine.